Get your custom PDF drafting guide or full-scale custom-fit PDF pattern


Draft your custom skirt pattern from scratch in minutes using your own measurements. Use my free interactive tutorial and let it handle all the math for you. No more math errors and unclear calculations. It is perfect for beginners and students who want to understand how a skirt block really works.
All you need is three body measurements to get started. The interactive tutorial walks you through each step using an illustrated guide. If you want to save time, you can also download the custom-fit guide or the full-scale skirt pattern and get straight to sewing (see what is included).
What is a basic skirt pattern?
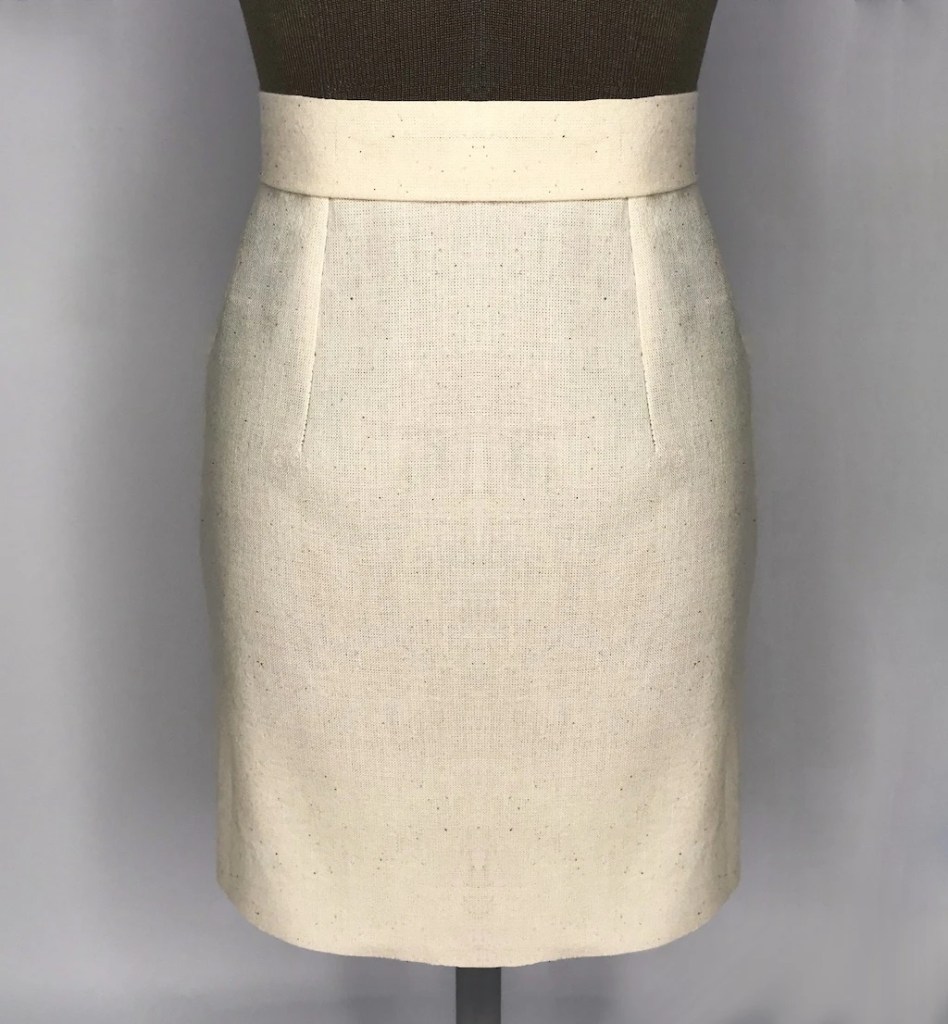
The basic skirt pattern (also called the basic skirt block, or pencil skirt pattern) is one of the most important sewing patterns for dressmaking. You can use it to make just a simple skirt, or change (open and close) the darts to create new designs. This way you can make an A-line skirt, flared skirt or even culotte pants. You may add pleats, folds, flounces or gathers to the whole skirt or just a part of it to make the design more interesting. By sewing the skirt to a bodice, you make a dress. The possibilities for making your wardrobe more exciting with this simple skirt are endless.

How the interactive tutorial works in 3 easy steps
1. Fill in your measurements
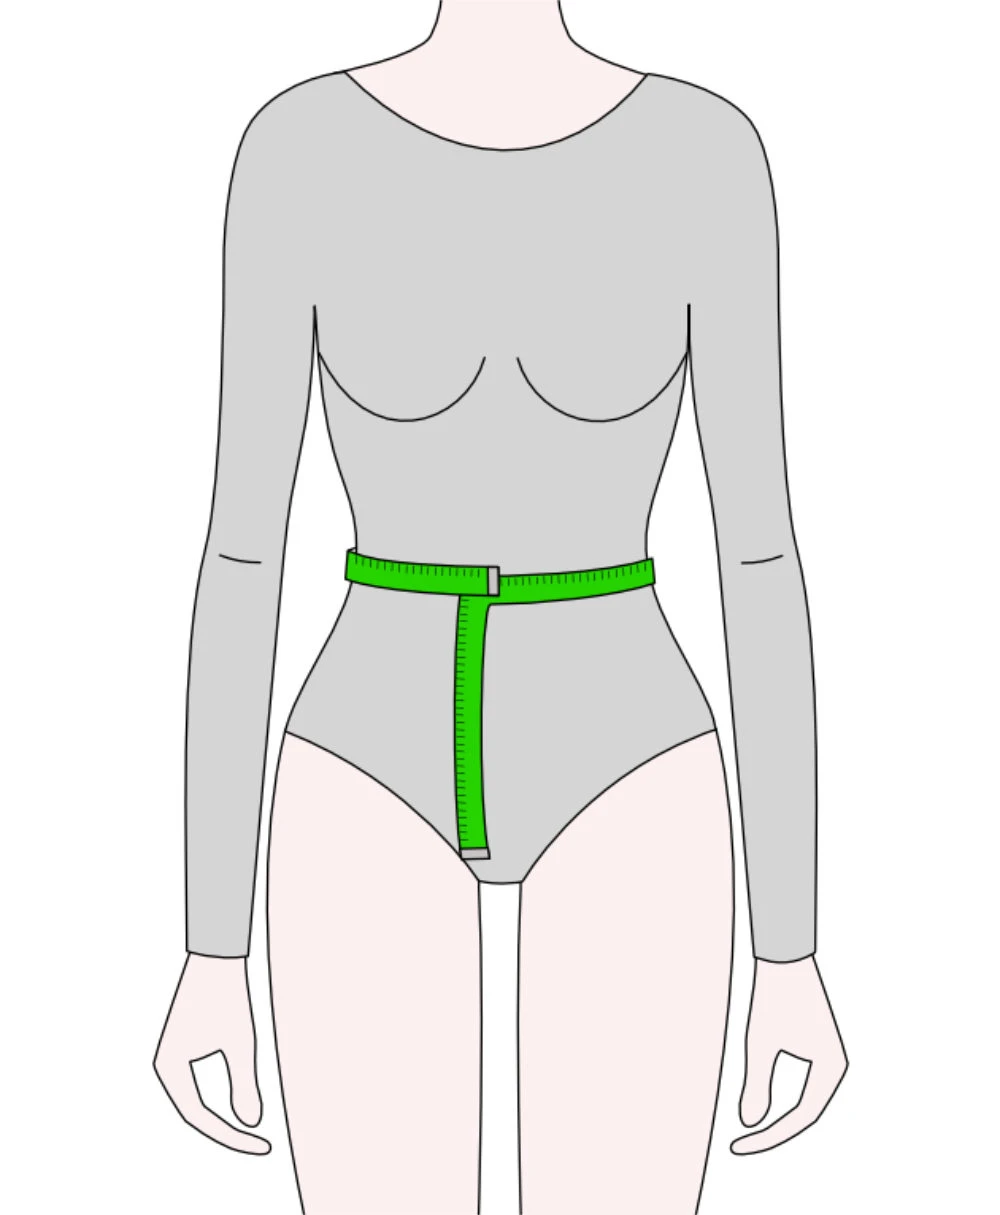
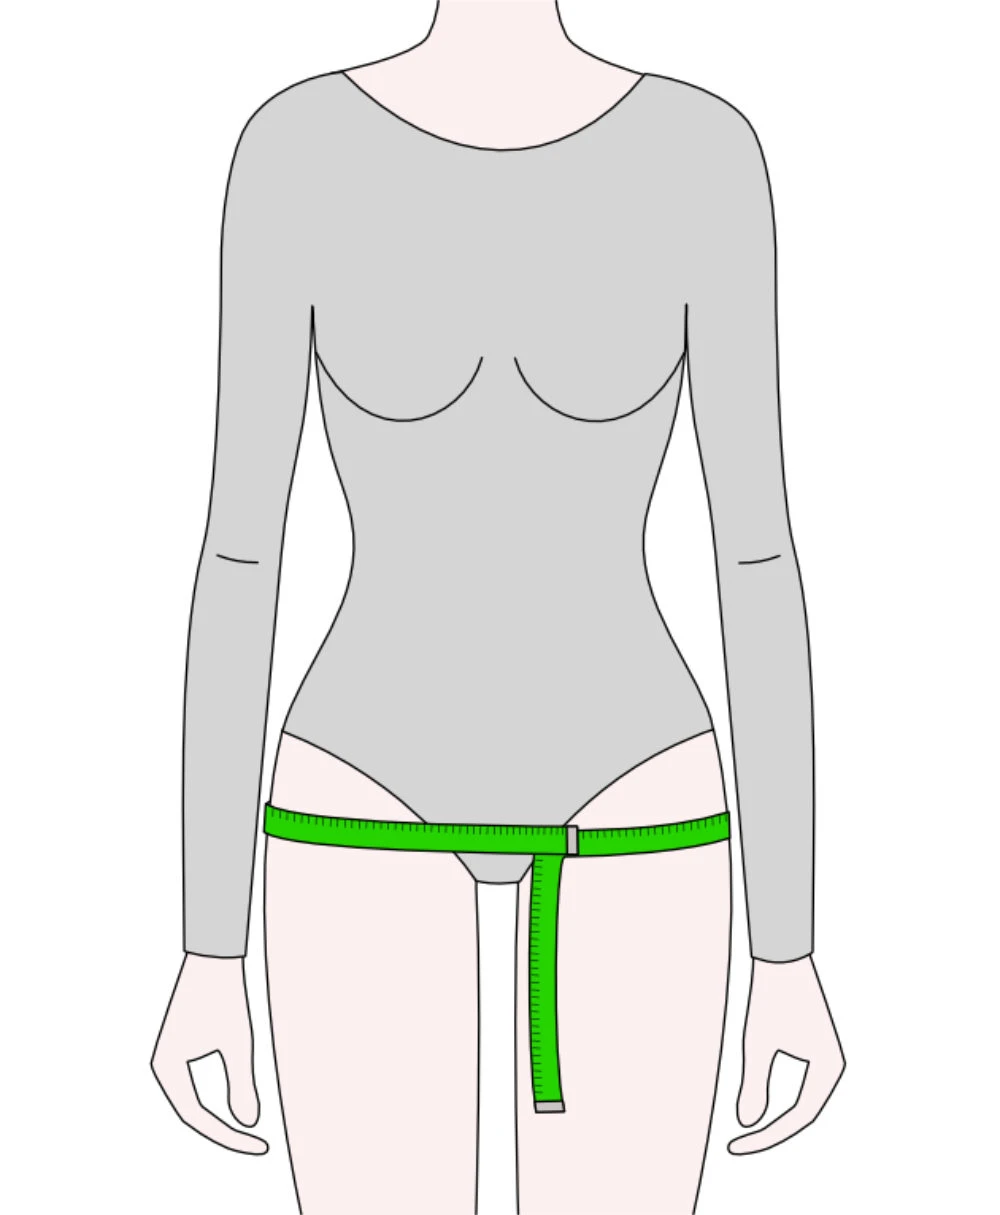
Easily input your body measurements, as shown in the illustrations and get a custom no-math pattern drafting tutorial.
2. Get a personalised tutorial
Click “Design tutorial” to receive a personalised pattern drafting guide with computed values for each step.
3. Download instantly without waiting
Download your tutorial or full-scale basic skirt pattern PDF instantly onto your phone or computer.
What’s included after you complete the interactive tutorial
Online tutorial
FREE
✓ Step-by-step illustrations
✓ Custom-fit drafting dimensions
✓ Formulas for calculated values
PDF tutorial
$2.99
✓ Step-by-step drafting illustrations
✓ Custom-fit drafting dimensions
✓ Formulas for calculated values
✓ Your measurements overview
✓ Approximate fabric consumption
✓ Step-by-step waistband drafting
Full-scale PDF pattern
$6.99
✓ Your measurements overview
✓ Approximate fabric consumption
✓ Full-scale custom-fit basic skirt pattern pages for home print
✓ Easy page assembly layout
✓ Info on pattern symbols used
✓ Printer settings for best results
This is a basic block pattern I would recommend for all beginners, including students and sewists eager to draft their first custom-fit pattern. Draft your block or assemble the full-scale PDF, and use a woven fabric to try it out.
This page also contains:
- Before you start drafting the basic skirt block
- Basic skirt sewing pattern interactive tutorial
- Step-by-step instructions for drafting the basic skirt pattern block
- Half-size basic skirt pattens for practising pattern alternations
- Basic skirt drafting FAQs
Before you start drafting the basic skirt pattern
Tools you’ll need
Gather a large sheet of paper, pencil, Sharpie or pen, long ruler, and a French curve or flexible ruler for drafting your basic skirt pattern. See FAQs for detailed tool tips.
Body measurements
Use a tape measure and two elastic bands to measure your waist and hip circumferences, waist-to-hip length, and desired skirt length (knee length recommended). See FAQs for step-by-step measurement guidance.
Add a comfortable amount of ease at the natural waist so that any patterns you derive from this block will have the preferred fit at the waist. When testing the basic block, use elastic to keep the skirt in place while checking the fit. Avoid zero ease at the hips, as this would restrict movement.
Custom-fit basic skirt pattern – interactive tutorial
Need more time to gather your measurements? Download this skirt measurements cheat sheet: a one-page, print-ready PDF with clear illustrations. Fill it out at your own pace, then return to enter your measurements into the interactive tutorial below.
Waist circumference
Hip circumference
Waist to hip length

Waist to knee length

Seam and hem allowance
We do not store, nor share any data you put into the form above.

Get the best fit based on your body measurements
On high-level, the basic skirt pattern is drafted in the following way:
- The waist + ease is divided into two equal measurements for the FRONT and BACK panel.
- Depending on the waist-hip difference, the hip + ease is either divided equally (for small difference) or slightly unequally (for large difference) between the FRONT and BACK panel (see Table 1).
- The waist-hip difference is distributed between the FRONT darts, BACK darts and side seam intake to achieve a balanced design (see Table 2).
| Waist-hip difference (including ease) | waist FRONT (whole piece) | waist BACK (whole piece) | hip FRONT (whole piece) | hip BACK (whole piece) |
|---|---|---|---|---|
| Equal or less than 2 3/4” (7 cm) | 50% of waist circumference + ease | 50% of waist circumference + ease | 50% of waist circumference + ease | 50% of waist circumference + ease |
| More than 2 3/4” (7 cm) | 50% of hip circumference + ease | 50% of hip circumference + ease | 48% of hip circumference + ease | 52% of hip circumference + ease |
| Front dart width range | 3/8 – 1 1/8” | 1 – 3 cm |
| Back dart width range | 5/8 – 1 3/8” | 1,5 – 3,5 cm |
| Side seam intake width range | 3/8 – 1 1/8” | 1 – 3 cm |
How to draft the basic skirt pattern step-by-step
The images below and in the PDF tutorial are illustrative; the dimensions are
exact. The full-scale PDF pattern available for download is accurate in size, proportion, and real scale, like a standard PDF sewing pattern.
To learn more, read my guide
on custom full-scale PDF patterns.
The tutorial below shows how to draft a basic skirt pattern with one front and one back dart. It’s a simple example of the drafting process. For a version tailored to your own measurements, use the interactive tutorial. It calculates the number and size of darts for your personal fit and includes all the measurement in a customised tutorial.


1. First, draw a large rectangle. The bottom of the rectangle represents the hem of the skirt pattern, while the top represents the waist. The height of the rectangle corresponds to the skirt length (see the image below).

a = skirt length
b = (hip circumference + ease at hip) / 2
⎯⎯⎯⎯⎯⎯⎯⎯⎯⎯⎯
hip circumference =
ease at hip =
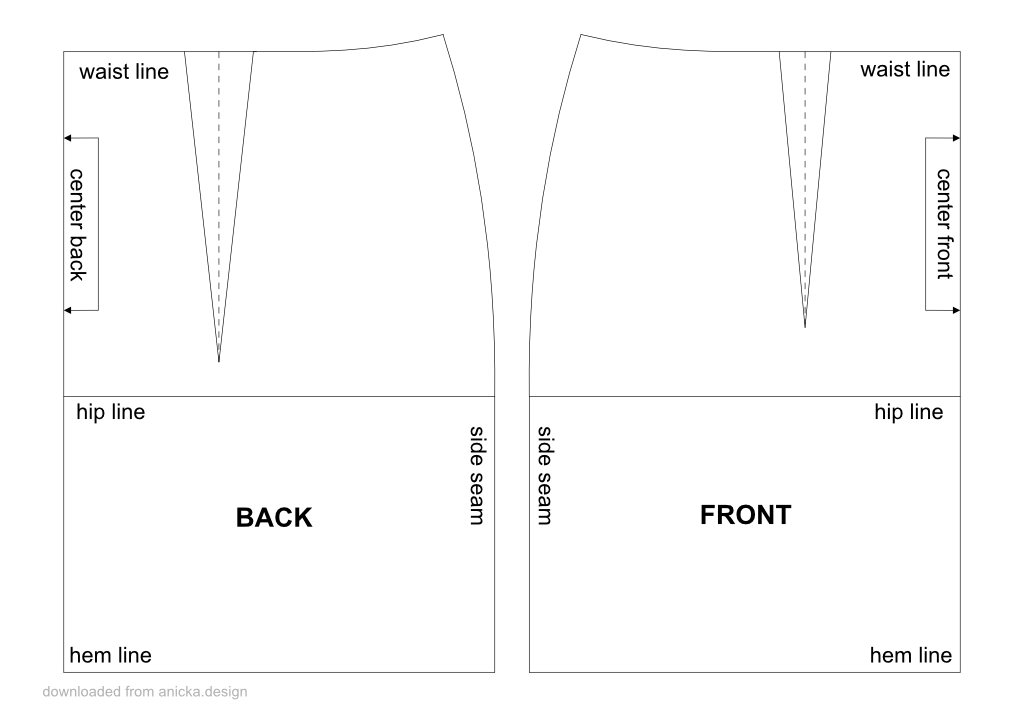
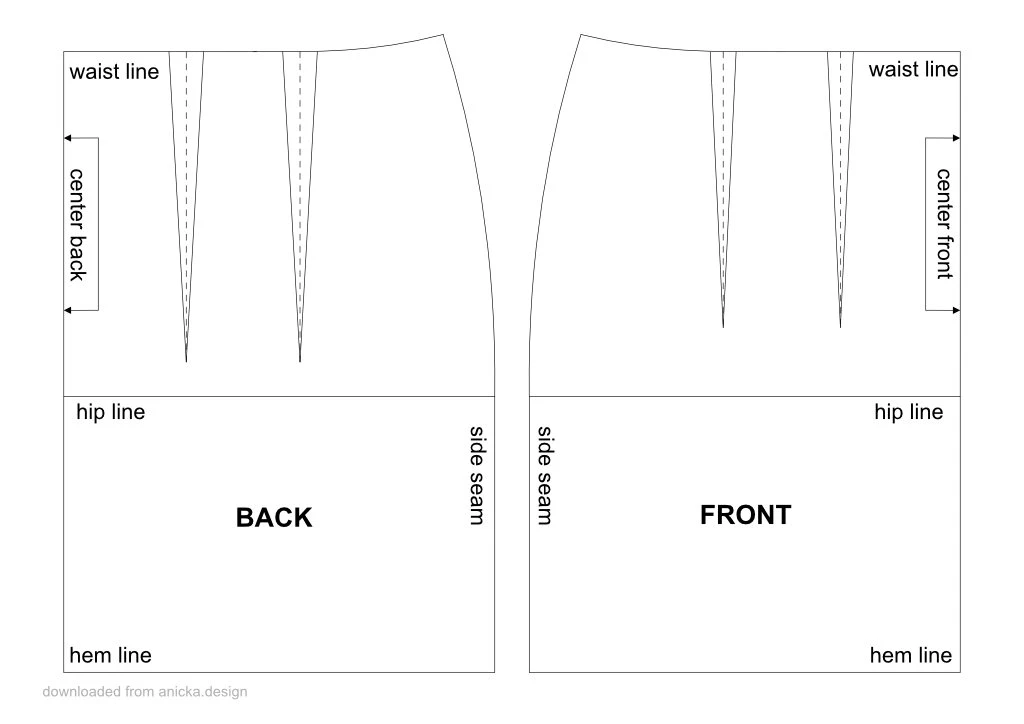
2. On the left vertical line, mark the waist-to-hip length measurement. On the hem line, mark the side seams. You may notice that the BACK pattern piece has slightly more width than the FRONT. This is intentional: the body requires a bit more fabric at the back to comfortably accommodate the shape of the seat, while the front needs less. The exact measurements for the FRONT and BACK can be calculated using the formula below.

c = waist to hip length
d = (hip circumference + ease at hip) / 2 × 0.48
e = (hip circumference + ease at hip) / 2 × 0.52
⎯⎯⎯⎯⎯⎯⎯⎯⎯⎯⎯
hip circumference =
ease at hip =
3. From the side seams marking, draw a vertical line up to the waistline. From the hip line marking, draw a horizontal line across the large rectangle (see the image below). This grid will be the area within which you will draw the basic skirt pattern.

4. Label the pattern: the left side will be the FRONT pattern piece, and the right side will be the BACK pattern piece (see the image below).

5. On the centre BACK, mark a waist drop: 3/8” (1 cm) to make the waist at the BACK fit nicely (see the image below). This small drop helps prevent gaping by allowing the waistline to follow the natural curve of the lower back. It ensures a snug, comfortable fit and helps the skirt sit smoothly without pulling away or creating unwanted gaps.

f = waist drop = 3/8” (1 cm)
6. Now, focus on the waist. On both the FRONT and BACK, mark a preliminary position of the side seams. (see the image below). The measurement for the FRONT includes the FRONT dart width. The measurement for the BACK includes the BACK dart width.

g = (waist circumference + ease at waist) / 4 + FRONT dart width
h = (waist circumference + ease at waist) / 4 + BACK dart width
⎯⎯⎯⎯⎯⎯⎯⎯⎯⎯⎯
= FRONT dart width = ((hip circumference + ease at hip) – (waist circumference + ease at waist)) × 0.2 / 2
⎯⎯⎯⎯⎯⎯⎯⎯⎯⎯⎯
= BACK dart width = ((hip circumference + ease at hip) – (waist circumference + ease at waist)) × 0.4 / 2
7. Locate and mark the BACK and FRONT dart base centres (see the image below). To find their position on the waist, use the formulas below.

i = FRONT waist width / 2
j = BACK waist width / 2
⎯⎯⎯⎯⎯⎯⎯⎯⎯⎯⎯
FRONT waist width =
BACK waist width =
8. Draw the dart bases, making sure that the previously marked centres lie exactly in the middle of the corresponding dart base. (see the image below).

k = FRONT dart width
l = BACK dart width
9. Starting at the dart base centres, draw the dart fold lines. The end of the dart fold line indicates the end of the dart (the dart point) (see the image below).

m = FRONT dart length = 4” (10 cm)
n = BACK dart length = 5” (13 cm)
10. From each dart base, draw the dart legs towards the dart point. Make sure both dart legs pass the dart base you have drawn on the straight waist line (see the image below).(see the image below).

11. To accommodate the hips and create a neat waistline, lift the side seams slightly on both the front and back pattern pieces. Raise them by 1/2” (1.2 cm) (see the image below).

o = side seam raise = 3/8” (1.2 cm)
12. Take your French curve and draw the waist at the FRONT and BACK. These waist curves are preliminary. You will adjust it later on as you draw the dart.(see the image below).

13. After you have draw the waist, the legs of the darts are not equal in length. Measure both dart legs from the dart points to the point, where they cross the curved waist. Make the shorter one the same length as the longer one – true the dart legs (see the image below).

14. Using the French curve, draw the following: the curved part of the hips, curved parts of the waist line.

15. Using a long ruler, draw the rest of the pattern: centre FRONT, centre BACK, hem and side seams. Mark the grainlines. Your pattern is complete (see the image below).


Half-size basic skirt pattens for practising pattern alternations
You can download printable half-size basic skirt patterns (A4 format) and practise pattern alternations like: moving darts, adding darts or adjusting their shape. Further adding pleats, gathers, flounces or other decoration. The darts of these patterns are a little different from the ones at the instructions above. They were made to fit my half-size dummy.
Working with the basic skirt sloper
If you are just beginning to make your own dress patterns, you might find the following publication by Adele P. Margolis useful. It will teach you how to alternate basic blocks (like the basic skirt sloper in this tutorial to make a different skirt type) to make your own designs.
Now that you’ve drafted your custom skirt pattern in minutes with no math, you can also learn how to draft a clean, well-fitting waistband to complete your skirt. Moreover, unleash your creativity by transforming it into A-line, pencil, or pleated designs with our step-by-step guides—start designing stunning, personalised outfits today.
You can also check out my review of this pattern-making book.
Basic skirt block drafting FAQs
- Tape measure, two elastic bands, pen, paper (optional, to note your measurements).
Steps to measure:
- Place one elastic around your natural waist (the narrowest part of your torso).
- Place the second elastic around the widest part of your hips — this ensures the skirt allows for comfortable movement.
- Measure your waist circumference at the elastic.
- Measure your hip circumference at the second elastic.
- Measure the vertical distance between the two elastics (waist to hip length).
- Measure your desired skirt length from the waist down (knee length is recommended).
- large sheet of paper or tissue paper
- pencil (for drawing guidelines — shown in grey in the tutorial)
- Sharpie, pen, or liner (for tracing final pattern lines — shown in black)
- long ruler
- French curve ruler or flexible curve ruler (for curved pattern lines)
Thank you, I remembered wrong! I reread it and it’s just as you say. Thank you for taking the time to help!
No problem, I hope your skirt will turn out well!
Anicka
Thank you so much! I’m really excited (and nervous) to try this. Just to clarify, when you said, “you can use 0 ease (or more) for the hips,” I assume you mean 0 or negative ease, as the original tutorial uses 0 ease at the hips. For a woven fabric, it sounds like the zero ease at the hips is what helps the skirt stay in place. For knit fabrics, does that job change to the waist? I ask because it sounds like that is where you recommend reducing ease the most.
Hi Nicole,
the default eases in the tutorial are the following: WAIST – 0 cm to keep the skirt in place, HIPS – 5 cm to be able to move and sit down.
For the knit fabric: WAIST – 0 cm ease (or slightly less), without the darts – this will make a snug fit at the waist.
HIPS – you can try 0 cm or more (meaning 1 cm, 2 cm, 3 cm…) for the hips. In this area, I probably wouldn’t go for a negative ease… However, the amount of ease you want to add (or remove) depends on the fabric and the look you want to achieve.
I hope I have answered your questions :).
Anicka
Hi Nicole,
good question, thank you! Knit fabrics stretch and conform to the body, so you need less ease compared to woven fabrics.
Reduce the amount of ease: You may use 0 ease for the waist or even negative ease. Negative ease means that the skirt’s waist would have a slightly smaller circumference than your waist. Also, you can use 0 ease (or more) for the hips. All of this depends on the look you want to achieve.
Adjust the side seams: Take in the side seams to accommodate the reduced ease. You can do this by redrawing the side seam lines.
Waistband: Instead of a fixed waist with a zipper, you can use an elastic band or elastic casing.
If you have any further questions, please feel free to contact me again 🙂
Anicka
How would you modify this for using knit fabric?
Thank you so much for this and the bodice block! It came out perfectly the first time, and I finally have a set of slopers that take into account things like the odd way my shoulders hang! On a different note, I have had the book by Adele Margolis for a couple of years, and use it all the time. It’s been nice for modifying commercial patterns, but it’ll be even better now that I have a custom block! Thank you so much!
Hi Ella, thank you for the lovely comment. I’m glad to hear that your basic blocks turned out well.
Anicka
Hi, and thank you so much for all of your hard work in putting together these tutorials!
For the skirt, what kind of waist band would you recommend?
Hi, thank you very much for your comment.
Draft a standard (not elastic) waistband – either a straight or a curved one.
A striaght one is easier to explain in text. It is actually a long rectangle that accomodates the skirt waist circumference + overlap for the button. (The darts at the waist are not part of the circumference). The width of the waistband depends on your personal preference.
Btw: thank you very much for your excellent question. I will include drafring waistbands into the tutorial :)!
I can’t thank you enough for your hard work and providing to all of us these wonderful information. You made the sewing tutorials much easier. Thanks a million
Hi, thank you very much for your comment 🙂 I hope my other (both current and future) tutorials will be as useful to you as this one.
Amazing. Thank you very much. Would you do it also for a basic bodice block? That would really be awesome!!
Hi, I’m happy to read your comment :). I’m definitely planning to make a calculator (dimensions, fabric consumption, etc.) for the basic bodice block and sleeve too. However, it will take me some time as I have finished some of the features on this page (like downloading calculated results as PDF documents) only recently.
Hi Fanny,
I have done some work and made the basic bodice block drafting tutorial. It also includes a calculator for individual parts of the basic bodice pattern (all downloadable as pdf document).
I will have to make some minor adjustments (clarifying how to connect the bodice and skirt). However it is a solid base you can use to draft the pattern and make your own designs.
Here is the link: https://anicka.design/how-to-draft-a-basic-bodice-block-pattern/
I have to day thank you sooo much for sharing this wealth of information. I used your circle skirt calculator and it was very easy. I love and appreciate your attention to detail. Take care!!!!
Hi, thank you for your nice comment. I’m very happy you find my page and tools useful :).