


A casing for an elastic waistband is an easy solution how to add an elastic to the waist of different garments and hide it. It is suitable for gathered skirts, trousers, leggings or sweatpants. In this tutorial I will describe three different ways of sewing such a casing. Each one has a different difficulty level. Choose one according to your skills and time you want to spend on your project. To demonstrate the different techniques, I’ll be working with a gathered skirt with one back seam.
- Fold the fabric at waist and sew the casing (difficulty: beginner)
- Fold the fabric at waist twice and sew the casing (difficulty: easy)
- Develop and sew a facing that will be used as waist band casing (difficulty: medium)
- Sew a rib jersey casing for the elastic band (difficulty: easy)
- How to insert an elastic into a waist band casing
The insertion of an elastic band is the same for any of the casings, therefore, it will be described separately at the end of this blog post.
Fold the fabric at waist and sew the casing

This is probably the simplest method of sewing a casing for an elastic waistband. I recommend this method for home use only. I personally use it for our costumes or clothing to wear at home. There are other methods of sewing an elastic wait band casing that look more pro than this one :).
If you decided to sew this type of a waistband casing, add extra fabric to the waist of the skirt before cutting the fabric. Add 3 cm (1 3/16 inch) + seam allowance (see the image below).

1. Check that you have finished all (side, front, back) seams and finish the seam allowance at the waist (see the image below).

2. Completely sew all side, front and back seams of the skirt BUT one. This seam will be used to insert the elastic waistband.
3. Pin the unstitched fabrics together and draw two markings as indicated in the image below.

4. Sew the seam allowance + 0,5 cm (3/8 inch) part. Skip the area between the two markings and start sewing again (see the image below).


5. Press all seams open (see the image below).

6. On the right side draw a line around the waist. The distance between the line and the finished fabric edge should be: seam allowance + 3 cm (1 3/16 inch) (see the image below).


7. Fold the fabric and seam allowance towards the wrong side and pin it (see the images below).

Now the pinned fabric should look like this (see the image below).

8. Press the folded edge. Be careful not to press the pins.

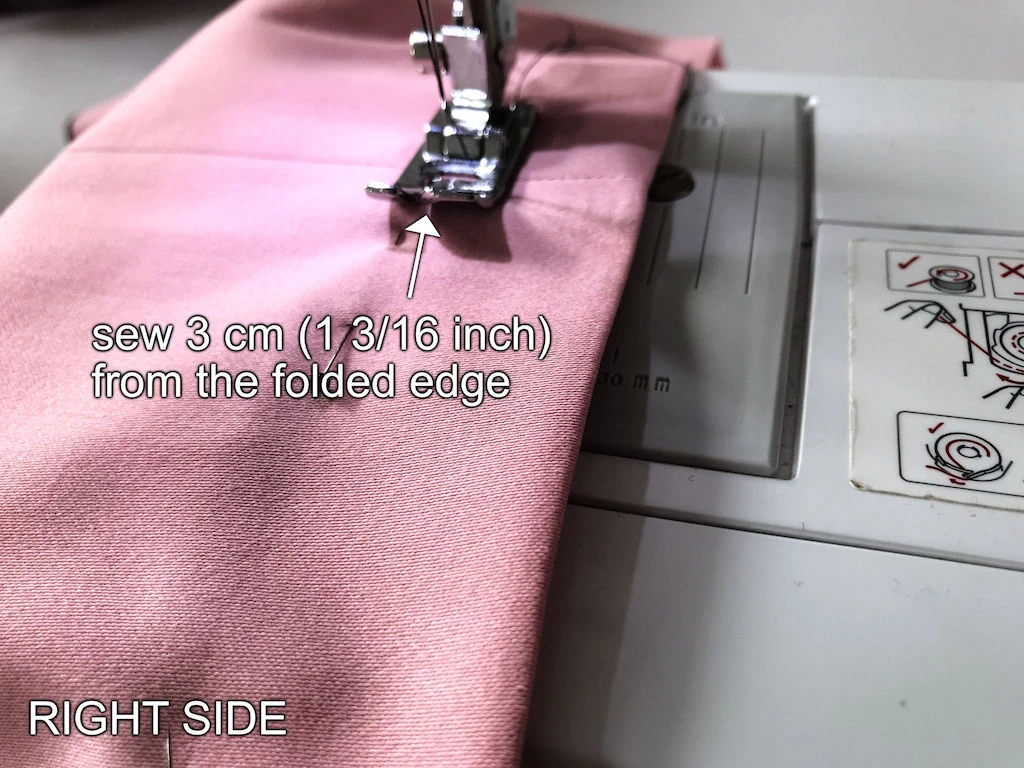
9. Sew 3 cm (1 3/16 inch) away from the fabric edge all around the waist.
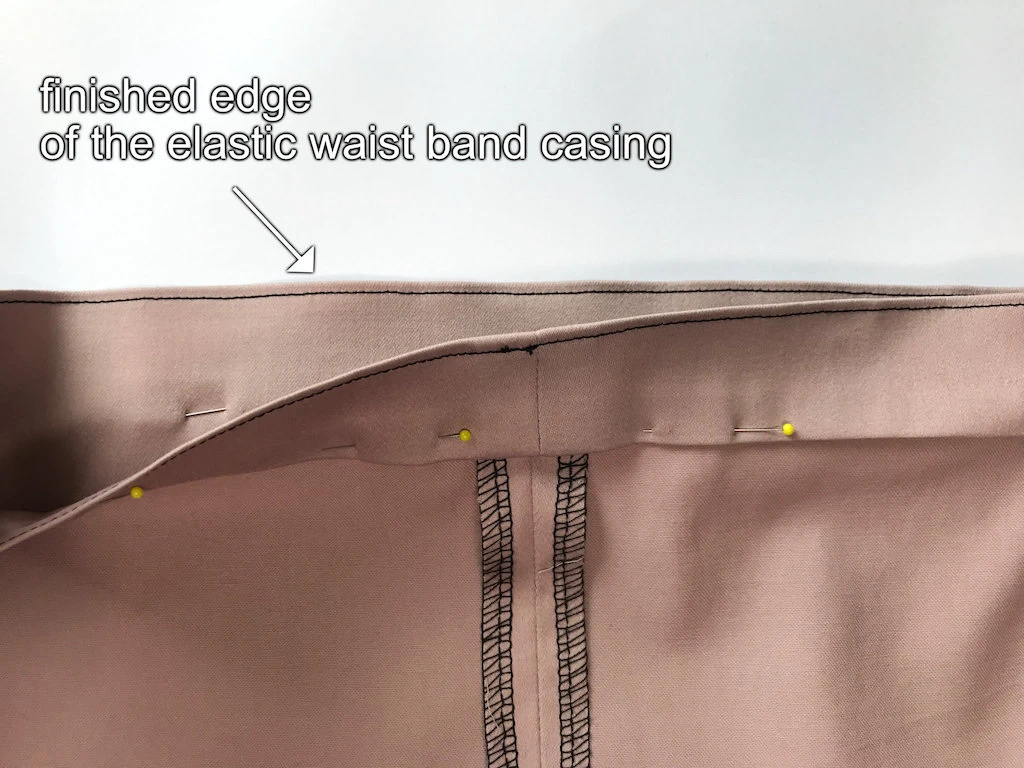
The sewn waist should look like this (see the images below).


In the image below, you can see a finished waist band casing with an elastic inside. Please, click here to see the step-by-step instructions for inserting an elastic.

Fold the fabric at waist twice and sew the casing

This method of sewing a casing for elastic waistband is slightly more complicated than the previous one – the seam allowance will be folded towards the inside of the casing. If you plan to sew this type of a waist band casing, you will have to add some extra fabric at the skirt waist before you start cutting it. Add extra 3 cm (1 3/16 inch) + seam allowance (see the image below).

1. Sew all seams: side seams, center front or center back seams so that the only thing left to finish at the waist is the casing. Do NOT finish the seam allowance at the waist and leave it raw. Press the seams (back, front or side seams) open (see the image below).

2. Draw a line from the fabric edge on the right side of the fabric all around the waist (see the image below). The distance of this line from the fabric edge equals the seam allowance width. Use a water soluble marker or a pen style chaco liner.


3. Draw another line 3 cm (1 3/16 inch) away from the first line. Again, draw it on the right side all around the waist.

Having done that, there are two parallel lines at the waist (see the image below).

4. Turn the skirt (or other project you are working on) inside out so that you are looking at the WRONG SIDE of the fabric.
5. Fold the fabric at the first drawn line (seam allowance line) towards the WRONG SIDE and pin it (see the image below).

6. Press the folded edge; be careful and do not press the pins. Just remove them right before pressing the bits they hold one by one (see the image below).

At this phase you have a folded and pressed seam allowance all around the waist (see the image below).

7. Fold the fabric towards the WRONG SIDE at the second line you have drawn, pin the fabric if necessary and press it (see the images below).

8. Start sewing close to the edge (2 mm – 1/16 inch) at the back or side seam along the casing. You can use a blind stitch presser foot which will guide the fabric easily. Sew all around the whole waist (see the images below).

9. At the back seam or side seam, where you first started sewing, draw to markings about 3 cm (1 3/16 inch) apart (see the image below).

10. Start sewing at one of the markings. Use a standard presser foot or a presser foot with a ruler and sew about 2 mm (inch) from the other folded edge (see the image below).

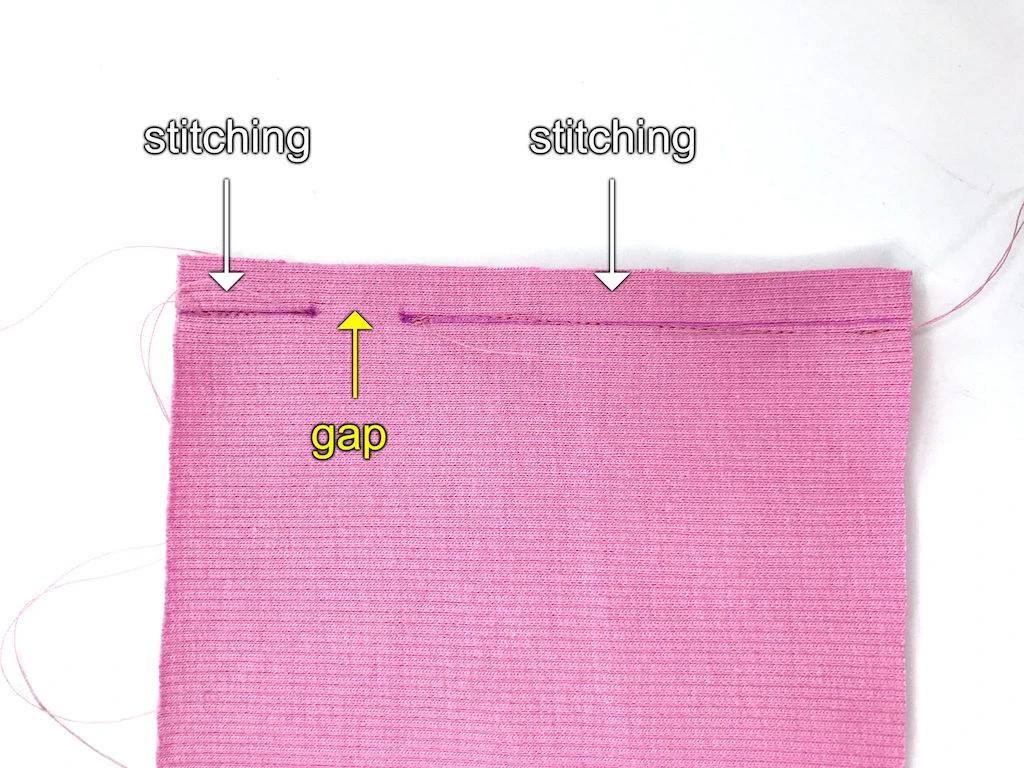
11. Stop sewing as soon as you reach the other marking. You should end up with a small unstitched part (see the image below).

Insert an elastic band through the gap and sew it. To read more detailed instructions of inserting the elastic, please click here.

Develop and sew a facing that will be used as waist band casing

The following steps will describe how to sew a facing at the waist that will be the casing for the elastic waist band. If you choose this method, add a seam allowance to the pattern at the waist and develop a simple facing (see the image below).

1. Leave the seam allowance at the waist unfinished and sew all (front, back, side) seams of the skirt. Press these seams open (see the image below).

2. Cut a facing for the waist and leave all seam allowances unfinished. Sew all seams but one together. Pin the two unstitched ends together (see the image below).

3. Partially sew the pinned ends together leaving an unstitched part in the middle (see the images below).


4. Press the seam of the facing open (see the image below).

Now you can see a gap in the facing that will be used to insert the elastic into the casing (see the image below).

5. Pin the facing to the skirt (or other garment) right sides together precisely so that the outcome looks nice (see the images below).


6. Sew the facing together with the waist.


7. Draw a line at the right side of the facing. This line will indicate where you should fold the fabric in order to hide the seam allowance of the facing (see the images below).


8. Fold the fabric at the drawn line, pin it and press (see the images below).

Be careful not to press the pins.

At this phase the waist should look like this (see the image below).

9. Gradually turn the facing towards the inside of the skirt and press it. Do not fold right at the stitching, but about 1 mm (3/64 inch) above it (see the image below).

As you finish pressing the folded facing, the casing should look like this (see the image below).

10. Now sew the facing so that it will form a casing for the elastic waist band. Sew about 2 mm (5/64 inch) from the left edge of the facing (see the images below).

The waist band casing is ready and you can insert an elastic band through the gap in the facing. To read more detailed instructions about inserting the elastic, please click here.


How to sew a rib jersey casing

2. Fold the rib jersey in half RIGHT sides together and sew the side seam. Skip a short part of the seam in order to leave a gap for inserting the waistband. You may draw the markings where to sew and where to stop sewing right on the jersey fabric (see the images below). I’ll insert a narrow elastic (2,5 cm – 1 inch), therefore the gap may be small. For wider elastics, make the gap wider.


3. Fold the jersey in half along the waistline so that you can see its RIGHT side. Position the seam on one of the folds on the right or left-hand side. Mark the opposite fold with a pin (see the image below).

4. Place the first pin opposite the rib jersey seam/ Mark each new fold on the side with new pins (see the image below).


You have just divided the rib jersey waistband into quarters using the seam and three pins. It should look something like this (see the image below). This helps you pin the jersey to the skirt waist properly.

5. Pin the rib jersey to your skirt (or other garment).


6. Sew the jersey to the skirt waist. An overlock machine (or serger) is the ideal option to do so. If you do not own an overlock, use an overlock stitch on your sewing machine. If you have a very basic sewing machine that does not have an overlock stitch, use a 3 step zig-zag stitch instead. The three-step zig-zag stitch keeps all the three layers firmly together, providing the stretchiness of the final seam at the same time.
While sewing all layers together, slightly stretch the jersey waistband (if necessary) so that it lies nice and flat on the design fabric (see the image below). Be sure you are not preventing the overlock or sewing machine from feeding the fabric. Also remove the pins before they reach the knife of your overlock (serger) machine!


Insert an elastic band into the rib jersey casing as described below.
How to insert an elastic into a waist band casing
1. Cut an elastic waistband. Calculate the length of the band according the following formula:
elastic band length = 0,7 ⨯ waist circumference
elastic band length = 0.7 ⨯ waist circumference
2. Attach a safety pin to one end of the elastic and insert it to a gap in the casing. It’s a good idea to fix the other end with a pin to the garment. This way it will not be swept inside the casing (see the images below).


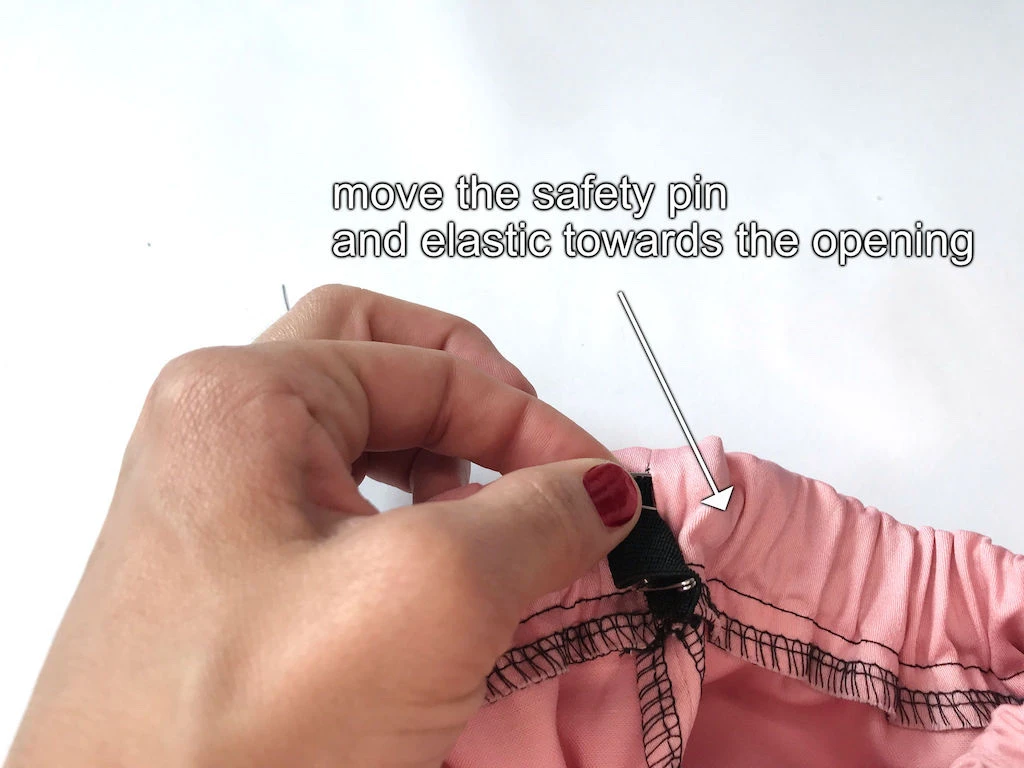
3. Move the safety pin inside the casing all around until you reach the opening.
4. As you reach the gap (opening), pull out both elastic ends (see the image below). A small part at the end, you worked with, will be slightly damaged. Just cut it away.

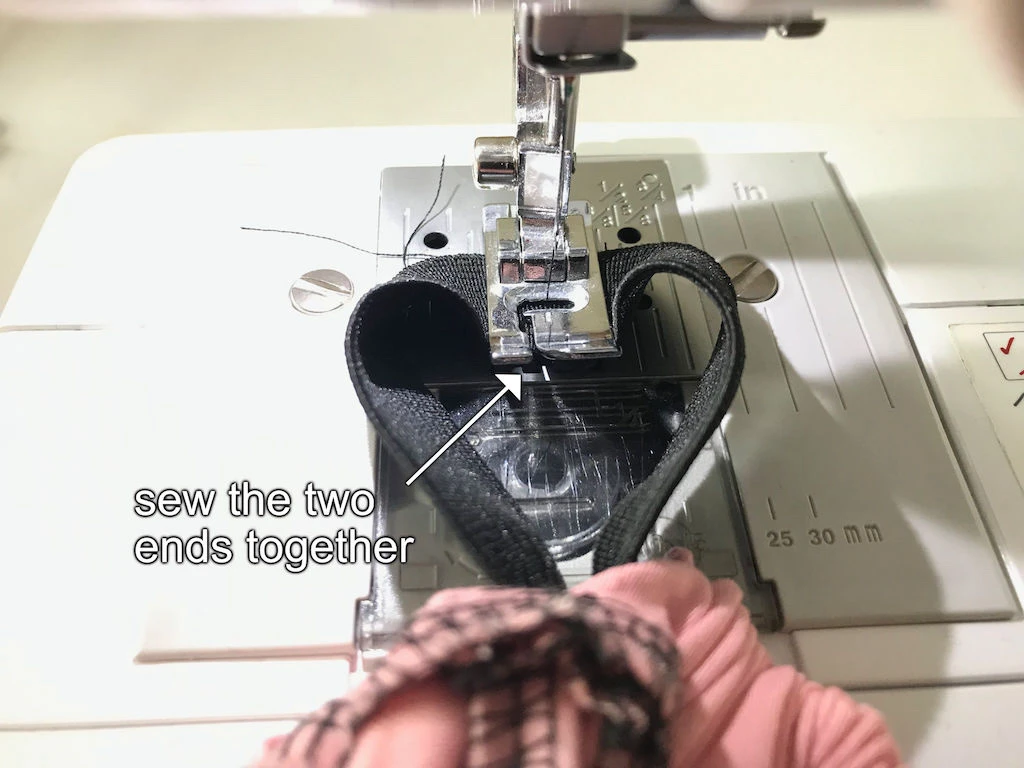
5. Now sew the two ends of the elastic together. I usually do this by using a dense zig-zag stitch (see the image below).
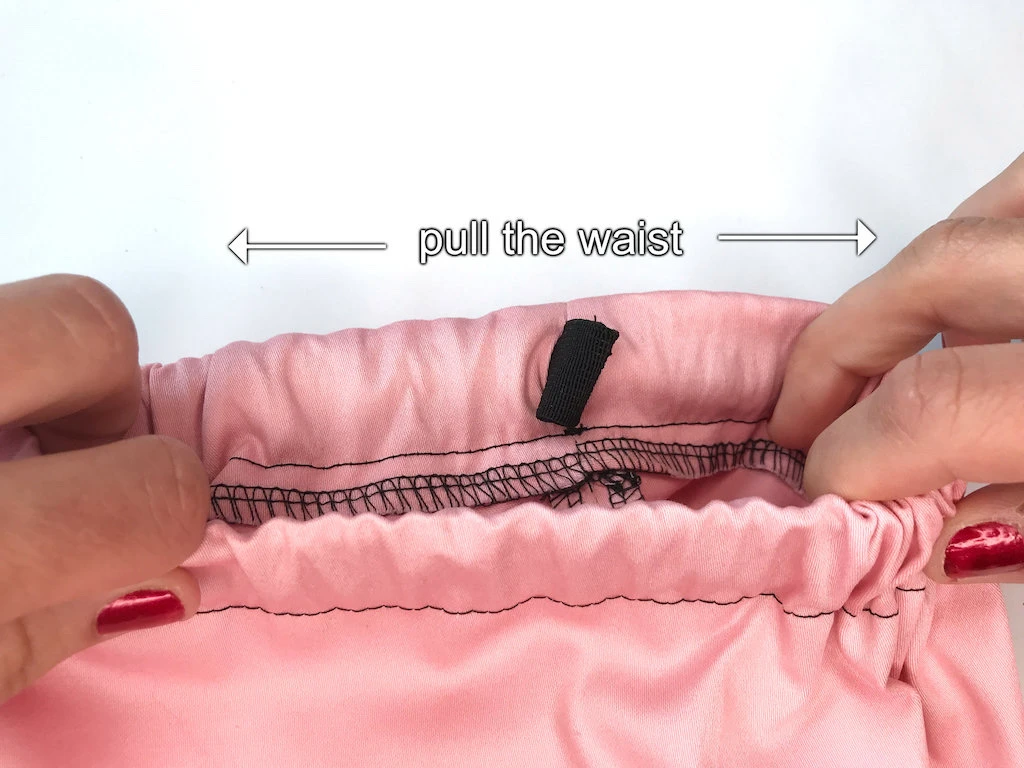
6. Pull the waist so that the elastic sweeps inside the casing (see the image below).
Conclusion: How To Sew A Casing For An Elastic Waistband
As you can see, sewing a casing for an elastic waistband is not a difficult task. Any of the methods described above will work well for your project.
Can you elaborate elastic length calculation with example in inches
Hi Nathani,
Of course — it’s quite simple!
Let’s say your waist circumference is 32”. That means the elastic band length should be about:
32 × 0.7 = 22 1/2”
But this depends on the strength of the elastic. If it’s a strong, wide elastic (like 2”), you might need a longer length — something like:
32 × 0.9 = 29”
It’s best to test the elastic around your waist before cutting, to see what feels comfortable.
I hope this answers your question!
Anicka
Thank you 😊