To every hobby sewist or beginner eager to create a well fitted pants pattern this math free approach makes it simple. Learn to draft your custom basic pants pattern with ease and confidence leaving frustration behind. Use this free interactive pants block tutorial to build your basic block from scratch effortlessly.
This page contains the following:
- What is a basic pants block
- Tools and measurements you will need
- How the interactive tutorial works in 3 easy steps
- Interactive basic pants pattern tutorial
- How to draft a basic pants pattern step by step
- Working with the basic pants sloper
- Basic pants pattern FAQs
What is a basic pants block
The basic pants block (or pants sloper) is a core foundation pattern in fashion design, alongside the bodice, skirt, and sleeve blocks. Drafting a custom-fit pants block gives you a precise base for pants, shorts, culottes, and more. Learn more about the structure in this post on individual pants parts.
Tools and measurements you will need
Tools: large sheet of paper, pencil, pen or Sharpie, long ruler, French/flexible curve.
Measurements: Accurate body measurements are essential for drafting a well-fitting pants. If possible, ask a friend to help with measurements. These might be: waist-to-knee, waist-to-ankle, or crotch depth.
- Wear fitted clothing
- Stand naturally (do not suck in or push out)
- Keep the tape measure snug but not tight
- Measure twice to ensure accuracy
How the interactive tutorial works in 3 easy steps
1. Fill in your measurements
Enter your measurements following the illustrations in the tutorial.
2. Get personalised results
Click “Design tutorial” to get your personalised drafting guide.
3. Download a PDF instantly
Download your customised PDF tutorial instantly.
How to draft a basic pants pattern – Interactive tutorial
Natural waist circumference

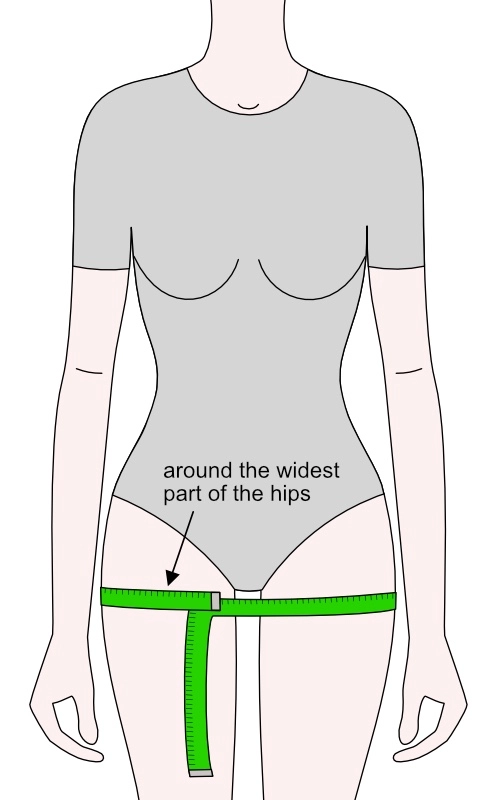
Hip circumference
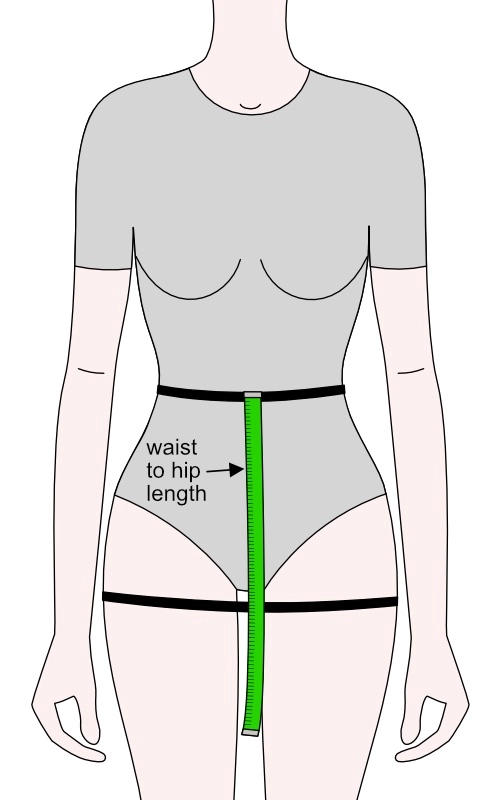
Waist to hip length
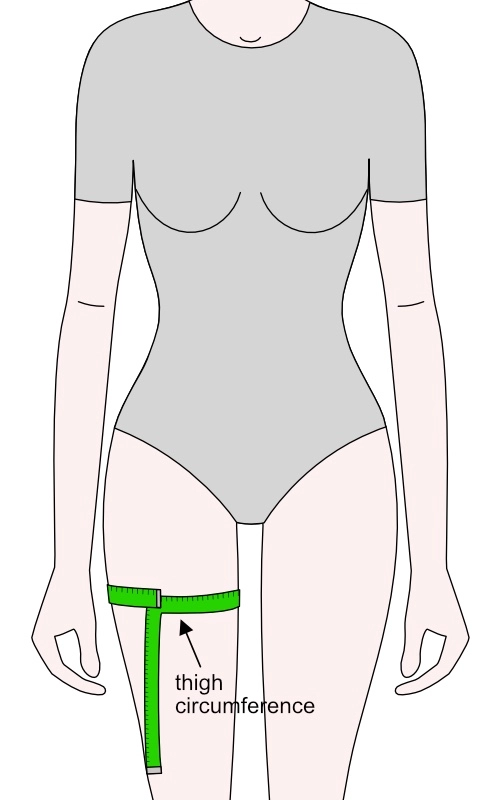
Thigh circumference
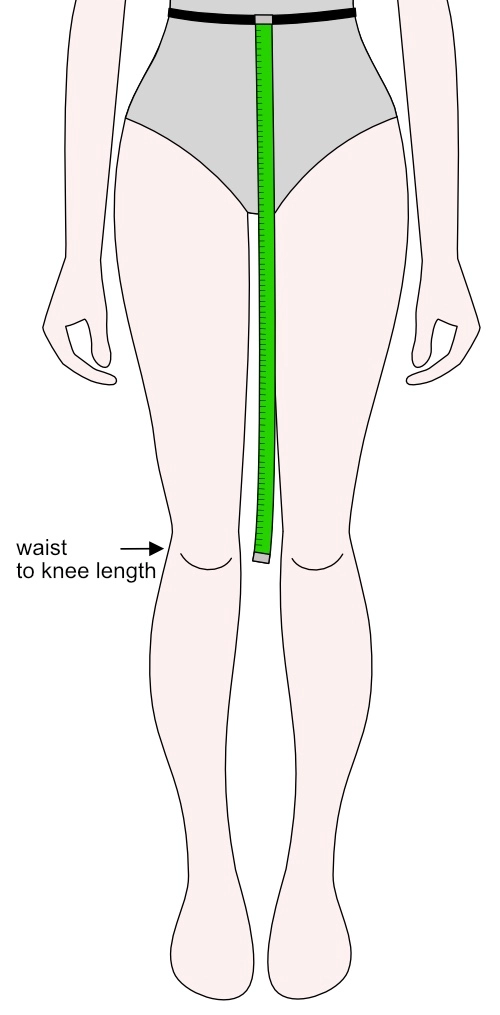
Waist to knee length
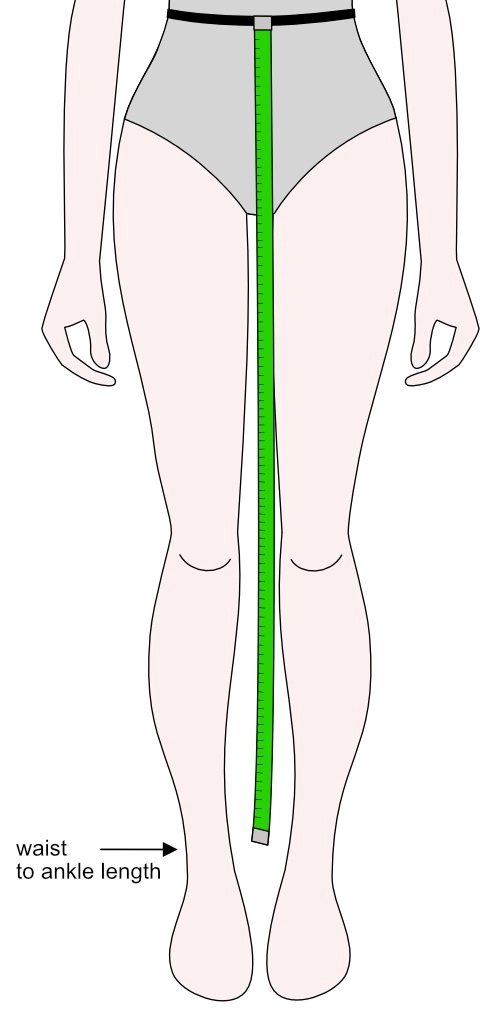
Waist to ankle length
Crotch depth (ease)
Seam and hem allowance
What’s included after you complete the interactive tutorial
Online tutorial
FREE
✓ Step-by-step illustrations
✓ Custom-fit drafting dimensions
✓ Formulas for calculated values
PDF tutorial
$2.99
✓ Step-by-step drafting illustrations
✓ Custom-fit drafting dimensions
✓ Formulas for calculated values
✓ Your measurements overview
✓ Approximate fabric consumption
How to draft the basic pants pattern step-by-step
Draw grey lines in pencil as guidelines, and black lines with a Sharpie as the pattern lines. Iron the tissue paper if needed and avoid using creased or crumpled paper.
Drafting the FRONT and BACK pattern pieces
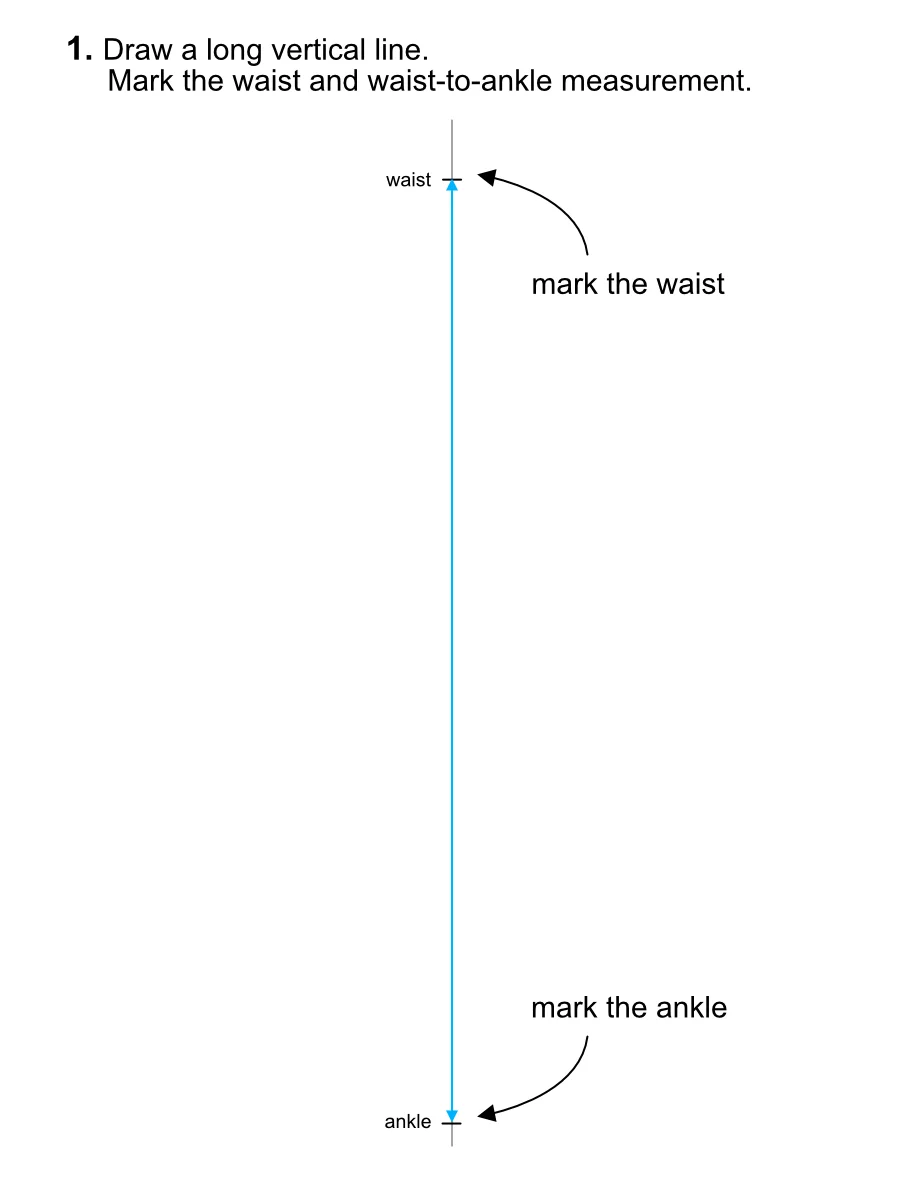
On a large sheet of paper, draw a vertical line down the centre. This vertical line will separate the FRONT and BACK pattern pieces and assist in drawing the side seams. Mark the waist-to-ankle measurement. This is the total length of the pants. Position the waist near the top of the vertical line.
a = waist to ankle length

Measure down from the waist along the vertical line and mark the waist-to-hip length measurement. Mark the waist-to-hip measurement.
b = waist to hip length

Mark the crotch depth, including ease for comfort.
c = crotch depth + ease at crotch
⎯⎯⎯⎯⎯⎯⎯⎯⎯⎯⎯
ease at crotch WOMAN = 0.5 × ease at hip + 3/8” (1 cm)
ease at crotch MAN = 0.5 × ease at hip + 3/4” (2 cm)
⎯⎯⎯⎯⎯⎯⎯⎯⎯⎯⎯
crotch depth =
ease at hip =
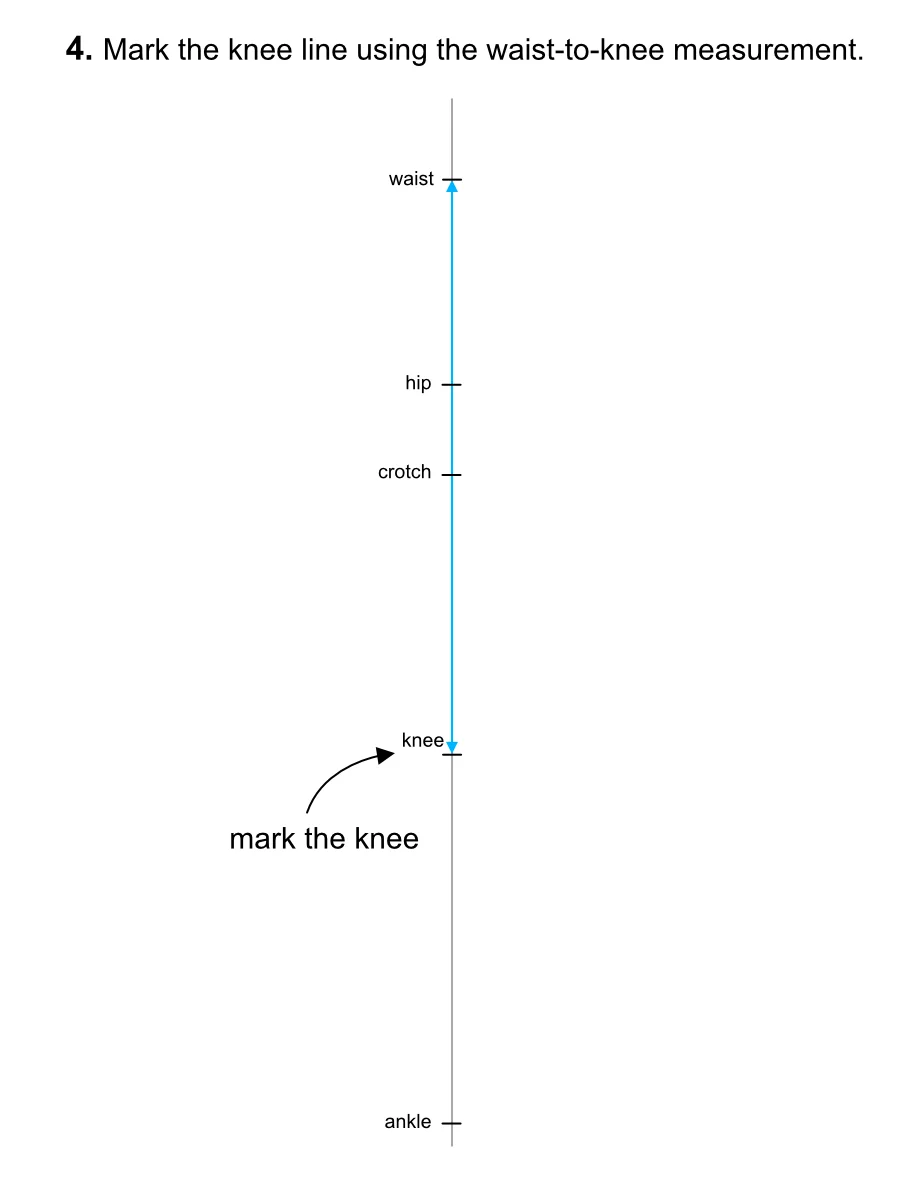
Measure down from the waist along the vertical line and mark the waist-to-knee length measurement and mark it.
d = waist to knee length

Draw horizontal lines intersecting all the markings you’ve made on the vertical line and label them according to the illustration (e.g., waistline, hip line, crotch line, knee line, ankle/hem line).

On the BACK waist, hip, and crotch lines, mark the measurement according to the formula below. The + 1 cm (3/8”) in the formula ensures the BACK pattern piece is wider than the FRONT to better reflect the body’s shape.
e = (hip circumference + ease at hip) / 4 + 1 cm (3/8”)
⎯⎯⎯⎯⎯⎯⎯⎯⎯⎯⎯
hip circumference =
ease at hip =

On the FRONT waist, hip, and crotch lines, mark the measurement according to the formula below. The – 1 cm (3/8”) in the formula ensures the FRONT pattern piece is narrower than the BACK to better reflect the body’s shape.
f = (hip cicumference + ease at hip) / 4 – 1 cm (3/8”)
⎯⎯⎯⎯⎯⎯⎯⎯⎯⎯⎯
hip circumference =
ease at hip =

Shift the marking at the FRONT and the one at the BACK waistline. The front is shifted less than the back, as the lower torso is shallower at the front than at the back.
g = 1 cm (3/8”)
h = 3.5 cm (1 3/8”)
From the shifted markings at the waistline, mark the waist width according to the formula below. The added 1 cm (3/8”) in the formula compensates for the 2 cm (3/4”) dart width that you will add to the waist at the BACK.
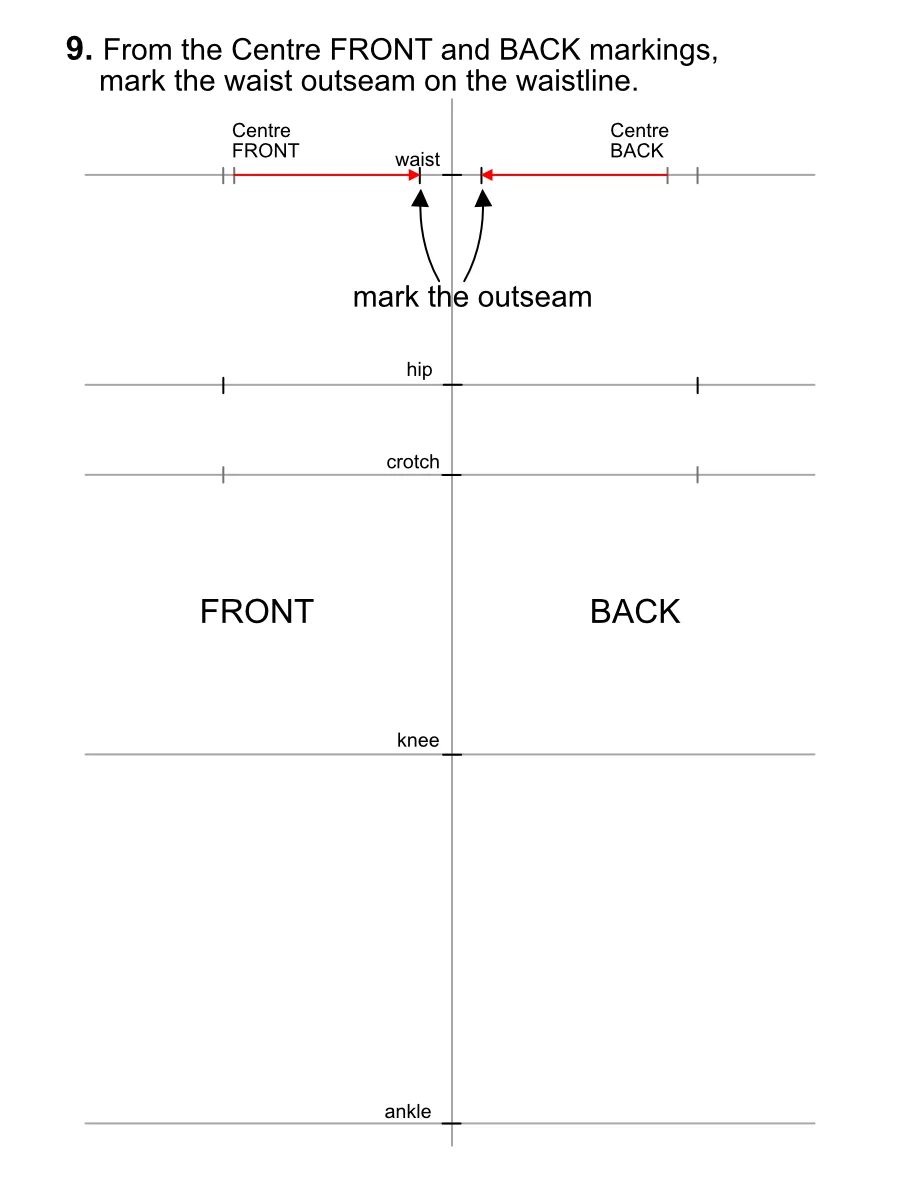
i = (waist circumference + ease) / 4 + 1 cm (3/8”)
⎯⎯⎯⎯⎯⎯⎯⎯⎯⎯⎯
waist circumference =
ease = 1 – 3 cm (3/8 – 1 1/8”)
1 cm (3/8”) = dart width / 2
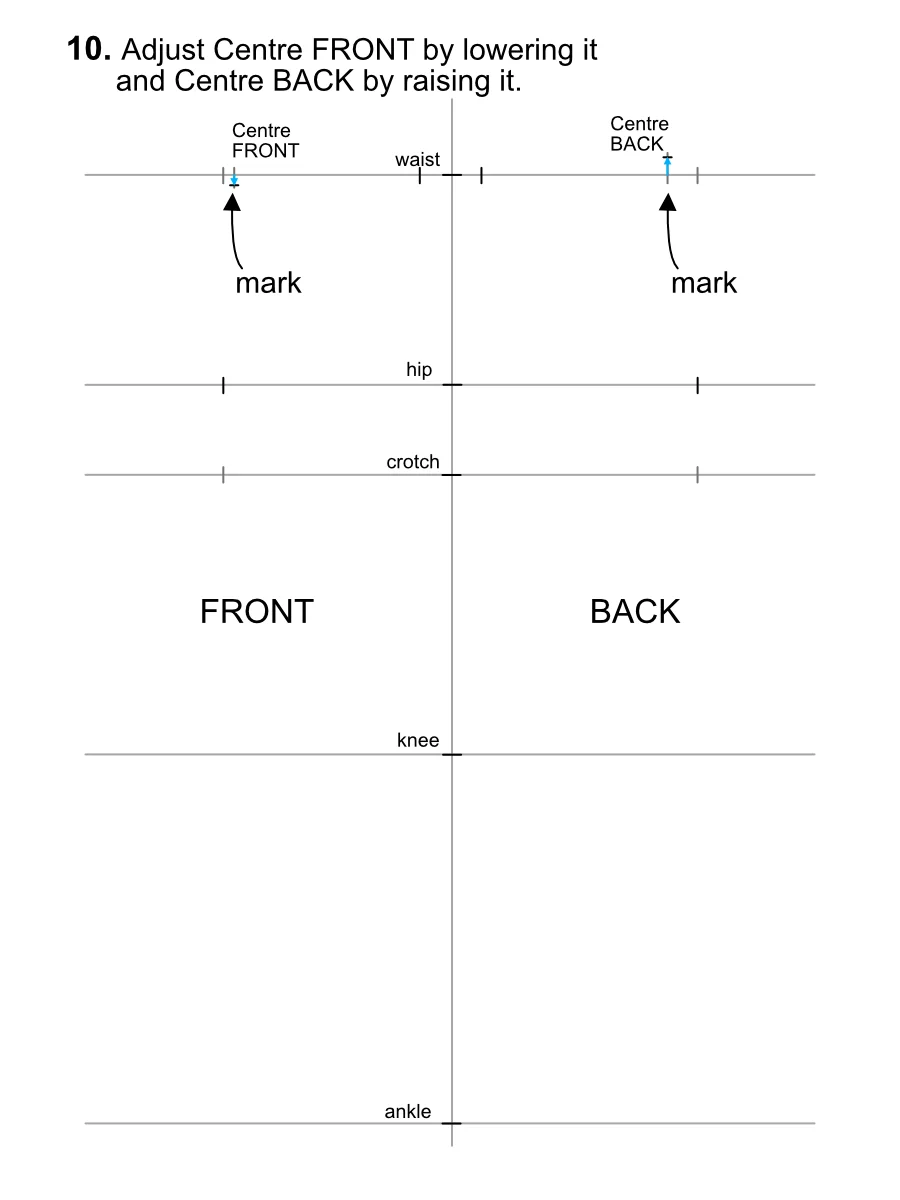
To place the centre FRONT and BACK markings in their proper final positions, lower the FRONT crotch and raise the BACK crotch. This adjustment ensures a better fit, as the front of the body is shallower, while the back needs more room to accommodate the buttocks.
j = 1 cm (3/8”)
k = 2 cm (3/4”)

On the crotch line, you need to add something called a crotch extension. More is added to the BACK and less to the FRONT to accommodate human anatomy. Use the formulas below for the FRONT and BACK extensions.
l = hip circumference / 14
m = hip circumference / 14 + back shift
⎯⎯⎯⎯⎯⎯⎯⎯⎯⎯⎯
hip circumference =
back shift = 3 cm (1 1/8”)

Now, all the foundational construction lines of the lower torso are complete. Use a French curve to draw the FRONT and BACK crotch, waist, and waist-to-hip curves.

Now, locate the position of the dart fold line, placing it 1/3 of the waist measurement from the outseam on the back pattern piece. Use the formula below to calculate this 1/3.
l = waist length BACK/ 3
⎯⎯⎯⎯⎯⎯⎯⎯⎯⎯⎯
waist length BACK =
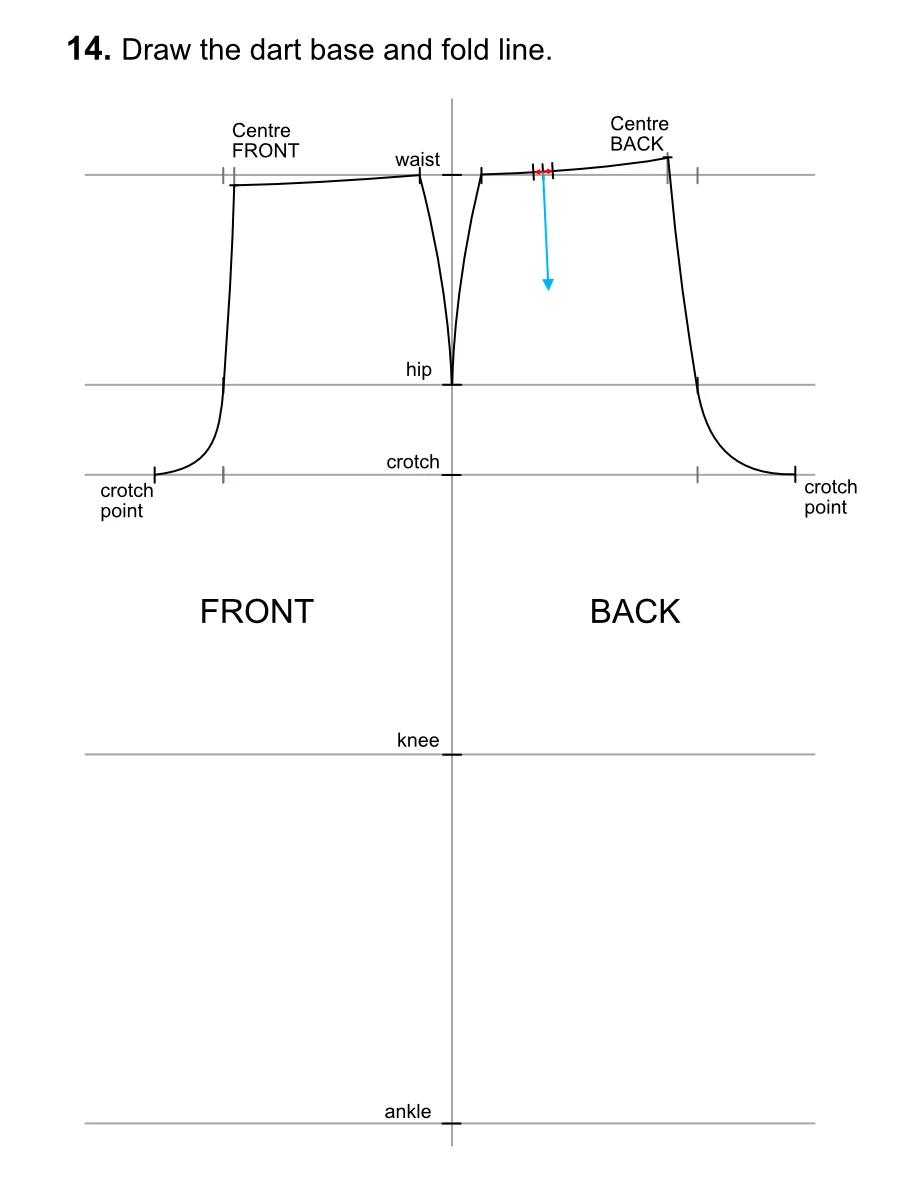
Draw the dart base by marking 1 cm (3/8”) to the right and left of the dart base centre. Then, draw the dart fold line, making it 12 cm (5”) long.
o = 2 cm (3/4”)
p = 12 cm (5”)
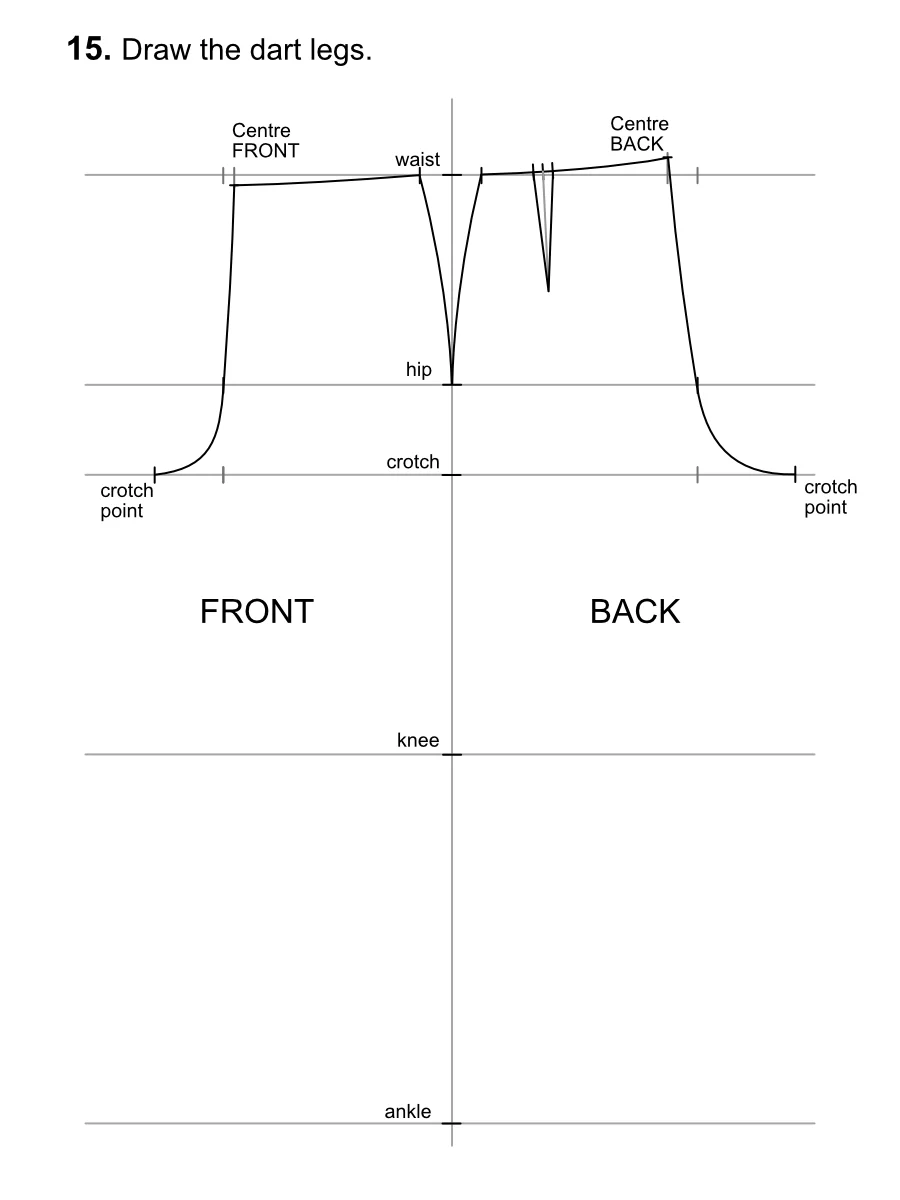
Draw the dart legs from the base markings to the dart point.
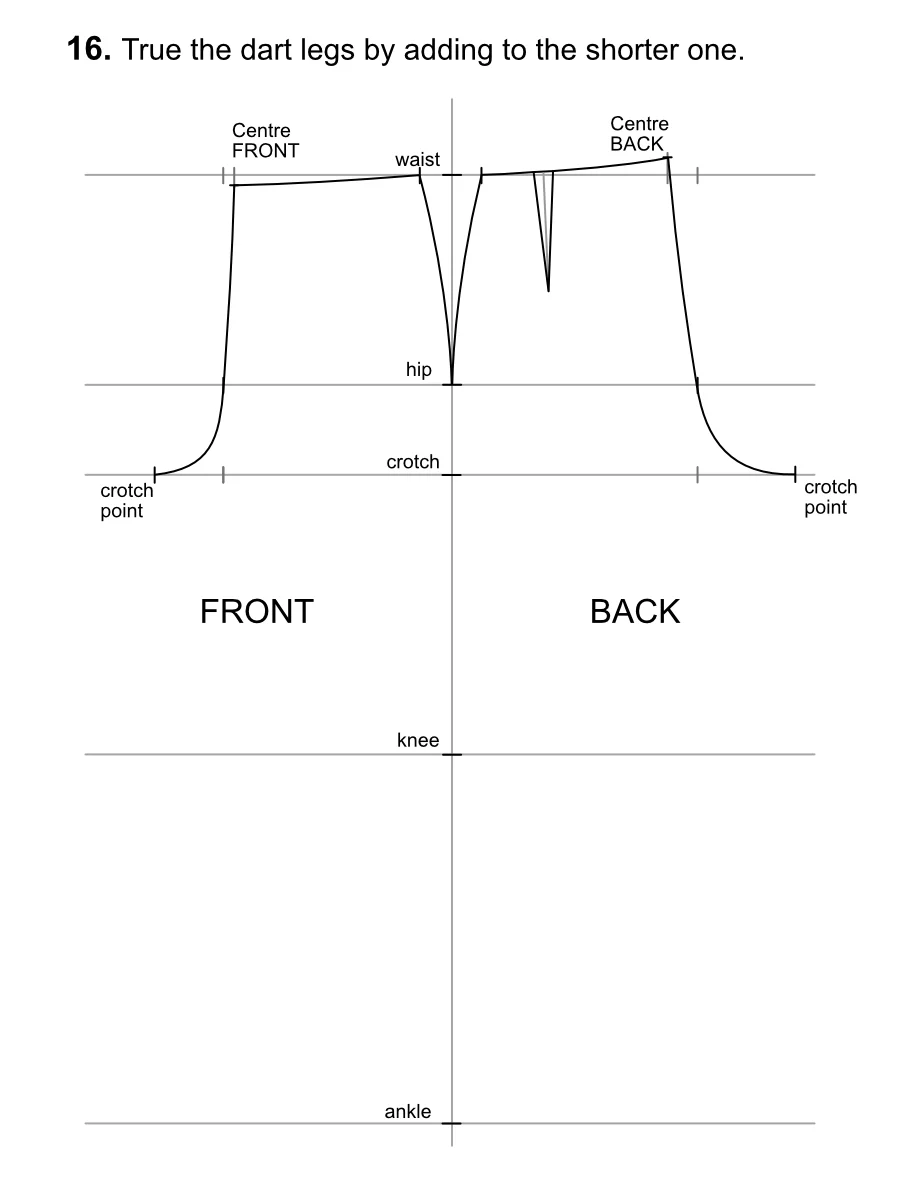
As the dart was drawn on a curve, its legs are not equal in length. True the dart legs: Prolong the shorter dart leg (in this case, the left leg) to match the longer dart leg (on the right). Adjust the waistline between the outseam and the trued dart leg.
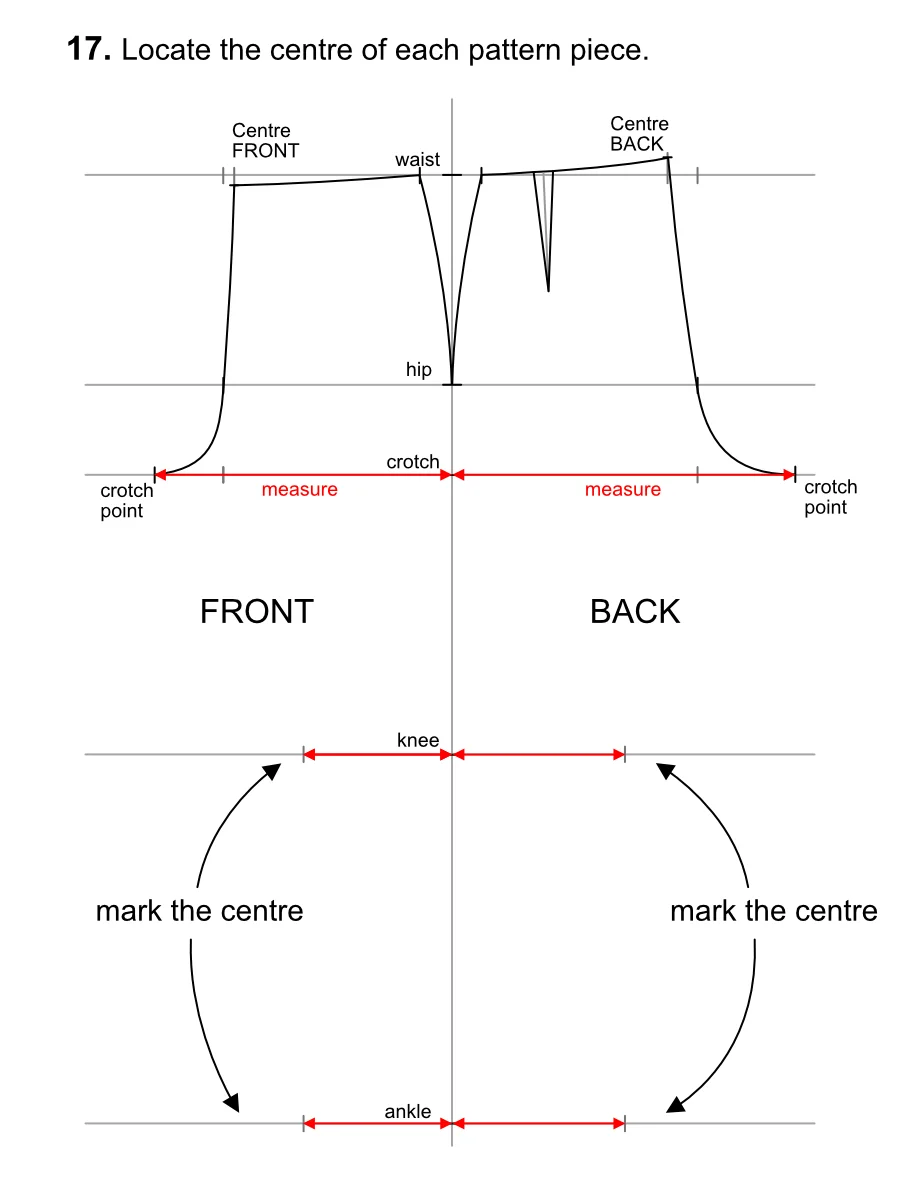
Now, locate the FRONT and BACK pant leg centres. Measure the distance between the vertical line and the crotch point on each pant leg. Divide this measurement by two (see the formulas below). Mark the results on the knee and ankle/hem line.
q = crotch width FRONT
r = crotch width BACK
s = crotch width FRONT / 2
t = crotch width BACK / 2
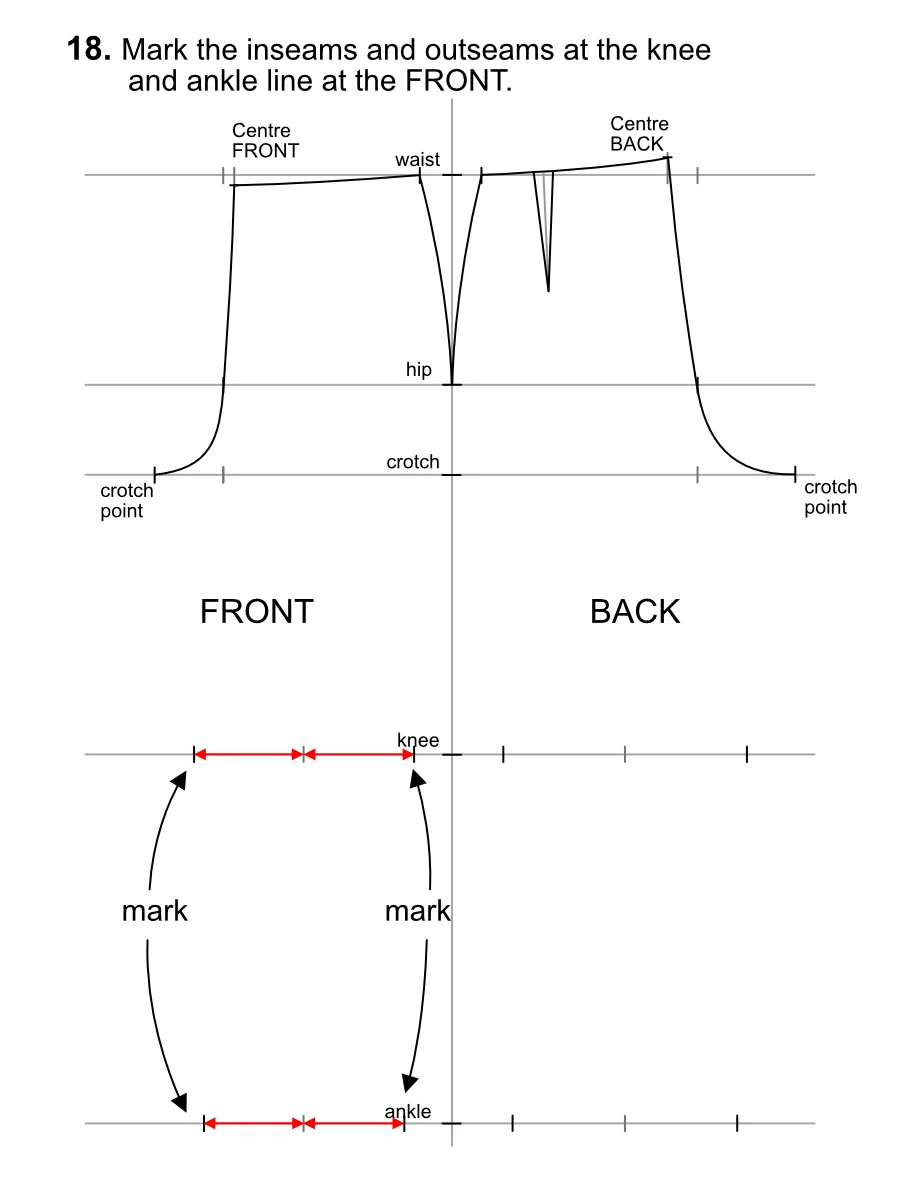
Use the provided formulas to locate the outseam and inseam positions on the knee and ankle lines. The width of the pant leg at the ankle/hem line is slightly narrower than at the knee line (it tapers) to ensure a more tailored look.
u = (thigh circumference + ease at thigh) × 0.9 × 0.47 / 2
⎯⎯⎯⎯⎯⎯⎯⎯⎯⎯⎯
ease at thigh = ease at hip × 0.8
0.9 = slims thigh fit
0.47 = overall FRONT leg share
2 = halves the leg width
⎯⎯⎯⎯⎯⎯⎯⎯⎯⎯⎯
thigh circumference =
ease at hip =
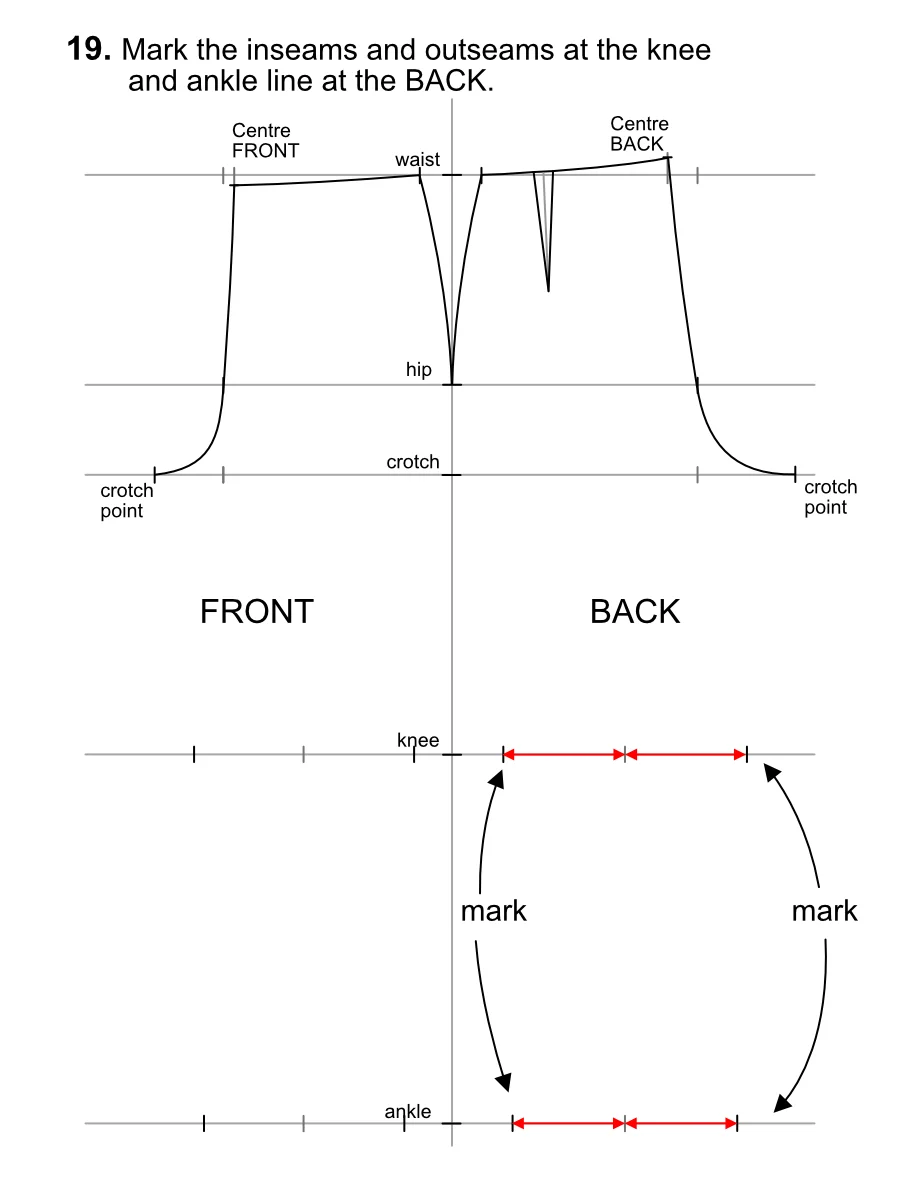
Use the formulas below to locate the outseam and inseam positions on the knee and ankle lines. The width of the pant leg at the ankle/hem line is slightly narrower than at the knee line (it tapers) to ensure a more tailored look.
w = (thigh circumference + ease at thigh) × 0.9 × 0.53 / 2
⎯⎯⎯⎯⎯⎯⎯⎯⎯⎯⎯
ease at thigh = ease at hip × 0.8
0.9 = slims thigh fit
0.53 = overall BACK leg share
2 = halves the leg width
⎯⎯⎯⎯⎯⎯⎯⎯⎯⎯⎯
thigh circumference =
ease at hip =

Locate the ‘flip point’ for drawing the outseam. This is the approximate point where you will flip the French curve from drawing the outer curve to the inner curve. To locate this point, follow the formula below.
y = (hip to knee length) / 2
⎯⎯⎯⎯⎯⎯⎯⎯⎯⎯⎯
hip to knee length =

Now, draw the rest of the pattern and mark the grainline. Use the French curve to shape the lines from the crotch and hip towards the knee line, ensuring smooth, natural curves that follow the body’s contours. Then, use a straight ruler to draw the lines from the knee line down to the hem/ankle, creating a clean, tapered shape.

Now, transfer the finished pattern onto your fabric and sew a muslin to test it.

Additional notes
- Ensure each measurement and marking is done precisely to maintain balance and fit.
- Always add ease to provide comfort and movement, especially around key areas such as the crotch and hips.
- The use of a French curve ruler helps in drawing smooth, natural curves at the waist, thigh, and crotch areas.
- Reduce the amount of ease for a more fitted look, consider using a stretch fabric for the pants.
Working with the basic pants sloper
If you are looking for more inspiration, Patternmaking for Fashion Design by Helen Joseph Armstrong is an excellent resource, with a dedicated chapter on pants and trousers that explores a variety of patterns and creative variations. Following various tutorials in it, you can turn your simple looking basic patterns into an interesting fashion pieces.
Conclusion: Drafting a basic pants pattern block
Creating a basic pants pattern may seem daunting at first, especially with all the different body measurements involved. However, taking it step by step and carefully following the instructions will help you achieve well-fitted pants in the end.
Now that your basic pants pattern is finished, you can move on to drafting additional basic blocks, such as a skirt pattern and a bodice with or without sleeves. My tutorials will guide you step by step to create perfectly basic blocks tailored to your measurements.
Basic pants block drafting FAQs
- Measure your natural waist circumference – the narrowest part of your waist where you placed the elastic band.
- Measure your hips circumference around their fullest part.
- Measure your waist-hip length: from the natural waist vertically to the fullest hip line.
- Measure your tigh circumference at the fullest part.
- Measure your waist to knee lengt: from the natural waist to your knee.
- Measure your waist to ankle length: from the natural waist to your ankle.
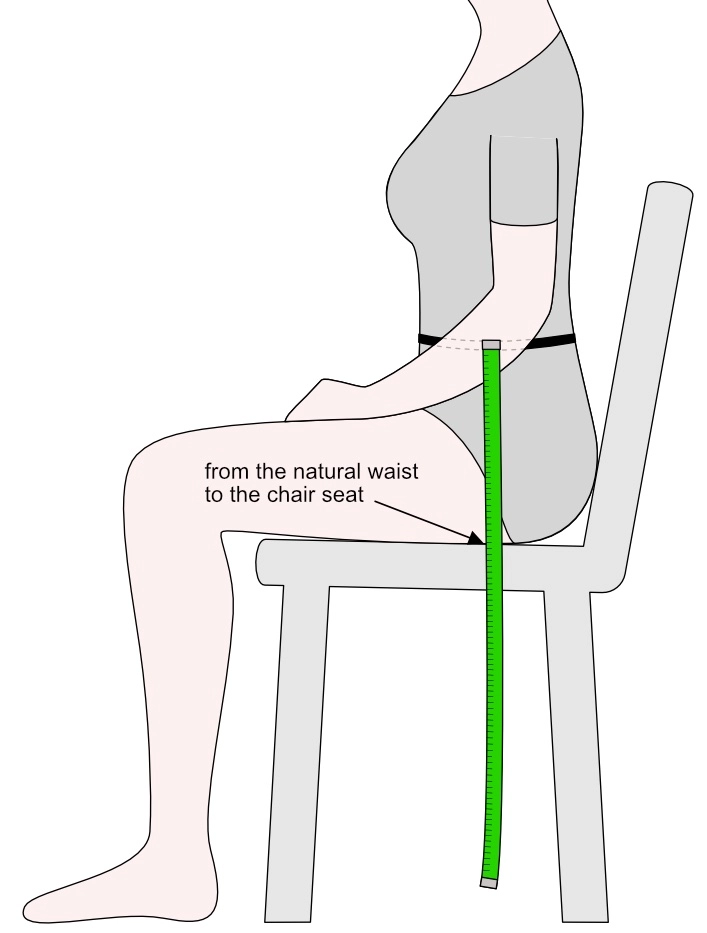
- Measure your crotch depth (body rise) like this: sit on the chair, and measure the distance from the natural waist to the chair seat.