This tutorial guides you step-by-step through drafting a basic set-in sleeve block that fits your body and bodice. Follow the guide as-is, or use the interactive tutorial to generate a custom-fit PDF tutorial or full-scale pattern with your measurements.
This page also contains:
- What is a basic sleeve
- Tools and measurements you will need
- Taking body measurements
- Interactive tutorial for drafting the basic sleeve
- Drafting the basic sleeve pattern step-by-step
- Conclusion
- Basic sleeve FAQs
What is a basic sleeve
The basic set-in sleeve pattern is one of the most important sewing patterns for dressmaking. You may add pleats, folds, flounces, or gathers to the sleeve and create endless variations of an otherwise very simple and basic design. For a detailed look at the individual sleeve parts, including how to distinguish front and back and understand their roles in a basic sleeve, see the Sleeve Construction Basics overview.
Draft your own bodice with this beginner-friendly Basic Bodice Pattern Tutorial. No math, no confusion. A clear, step-by-step approach.
Tools and measurements you will need
Tools: Large sheet of paper or tissue paper, pencil, thin marker (Sharpie), long ruler, French curve.
Pattern base: The bodice you are drafting the sleeve for (it should NOT be designed as a sleeveless).
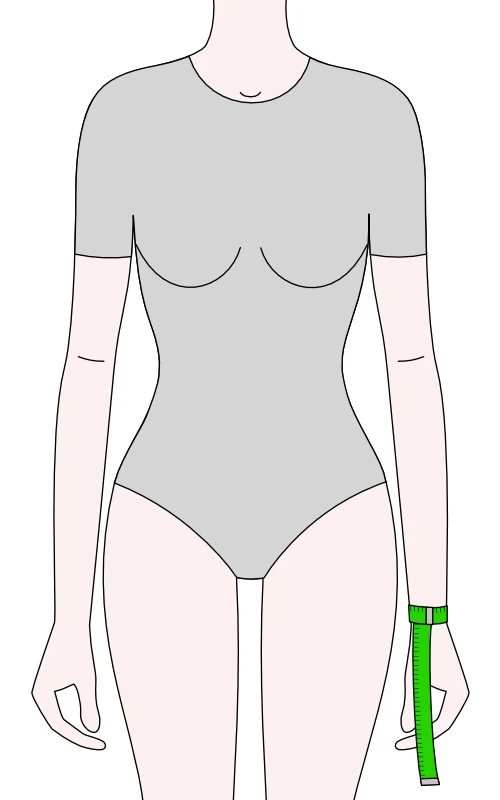
Measurements: Bodice armscye FRONT length, armsyce BACK length, arm length, upper arm circumference and wrist circumference.
How the interactive tutorial works in 3 easy steps
1. Fill in your measurements
Enter your measurements following the illustrations in the interactive form.
2. Prepare personalised results
Click “Prepare tutorial” to prepare your personalised drafting guide or pattern.
3. Download a PDF instantly
Download your customised PDF tutorial or full-scale pattern instantly.
How to draft a set-in sleeve: interactive tutorial
Use the interactive tutorial to preview your custom drafting steps and calculations. Download the full PDF tutorial for complete custom-fit values and complete drafting instructions, or get your full-scale PDF pattern.
Bodice FRONT armscye length
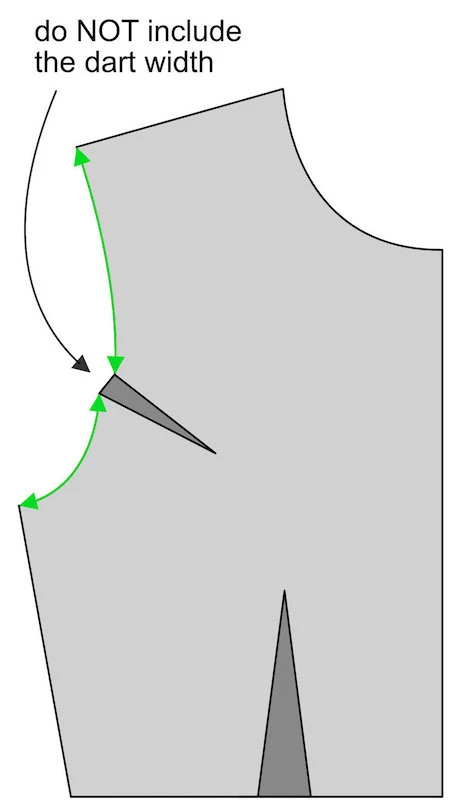
Bodice BACK armscye length

Cap height
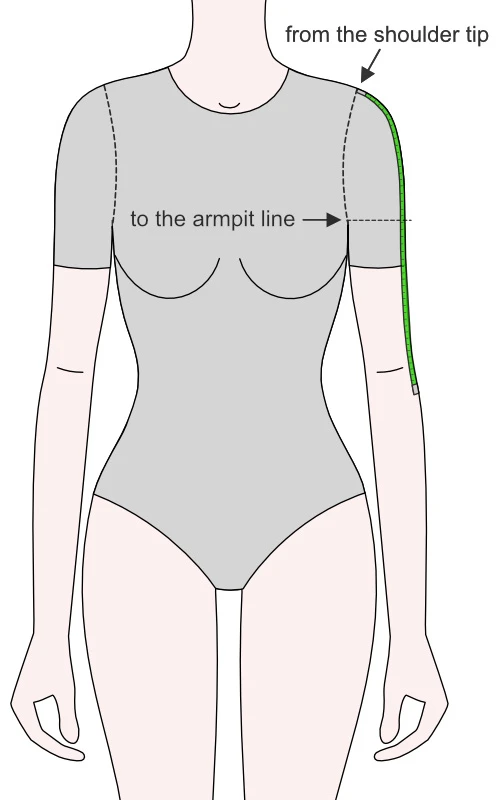
Arm length

Upper arm circumference

Wrist circumference
Seam and hem allowance
What’s included after you complete the interactive tutorial
Online tutorial
FREE
✓ PREVIEW of custom-fit drafting dimensions
✓ Step-by-step illustrations
✓ Formulas for calculated values
PDF tutorial
$3.99
✓ COMPLETE custom-fit drafting dimensions
✓ Step-by-step drafting illustrations
✓ Formulas for calculated values
✓ Your measurements overview
✓ Approximate fabric consumption
PDF pattern
$7.49
✓ Full-scale custom-fit basic sleeve pattern for home print
✓ Your measurements overview
✓ Approximate fabric consumption
✓ Easy pattern assembly layout
✓ Pattern symbols overview
✓ Printer settings for best results
How to draft the basic sleeve pattern step-by-step
Draw grey lines in pencil as guidelines, and black lines with a Sharpie as the pattern lines. Iron the tissue paper if needed and avoid using creased or crumpled paper.

On the prepared sheet of paper draw a long vertical line.

At the top of the paper, draw a small marking called shoulder. At the bottom mark the wrist. The distance between the two is your measured arm/sleeve length.
a = measured arm length
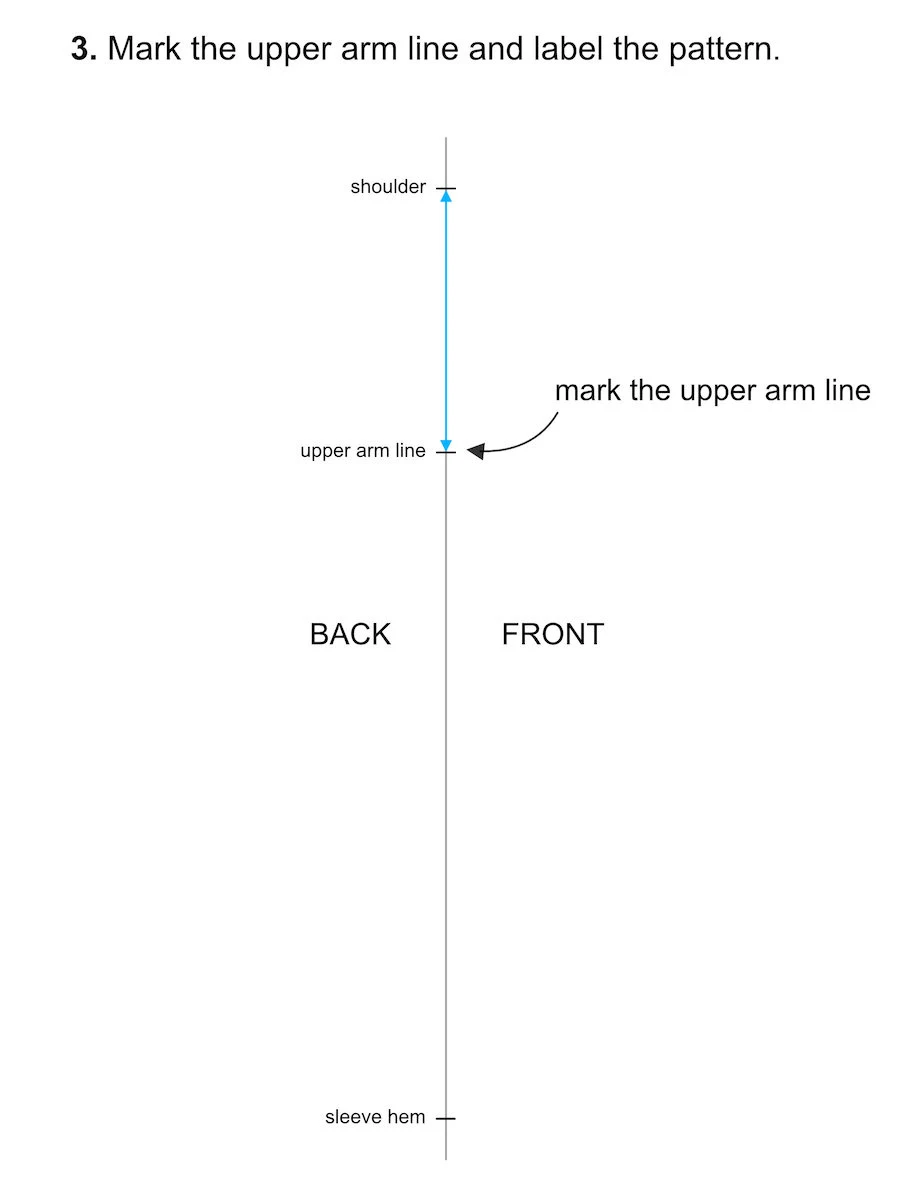
Draw a marking for the upper arm line – this is the cap height, you have measured as the distance from the tip of your shoulder to the armpit line.
b = cap height

Draw the upper arm (biceps) line and the wrist (hem) line.

On the upper arm line, mark the underarm seams. The distance between the shoulder and the underarm marking is calculated according to the following formula:
c = (bodice FRONT armscye + bodice BACK armscye)/2
d = (bodice FRONT armscye + bodice BACK armscye)/2

Connect the shoulder and underarm seam markings. These two diagonal lines are the base for drawing the basic set-in sleeve cap.
Now, measure the distance between the two underarm seams. It should be larger, than the circumference of your biceps.

Divide both diagonal lines you have drawn in the previous step into quarters. Each quarter has the same length (in this tutorial labeled as e). Mark A, B, C, D, E and F.
e = (diagonal line length)/4

From the diagonal lines, square out* short lines towards the outside or inside of the diagonal lines. You will use them to draw the sleeve cap.
Use the following measurements:
A (inside): 1 cm (3/8″)
B (outside): 0,5 cm (1/4″)
C (outside): 1,5 cm (5/8″)
D (outside): 1,8 cm (3/4″)
E (outside): 0,8 cm (5/16″)
F (inside): 1,3 cm (1/2″)
* To square out the small lines means to draw them at a right angle (perpendicular) to the diagonal line.
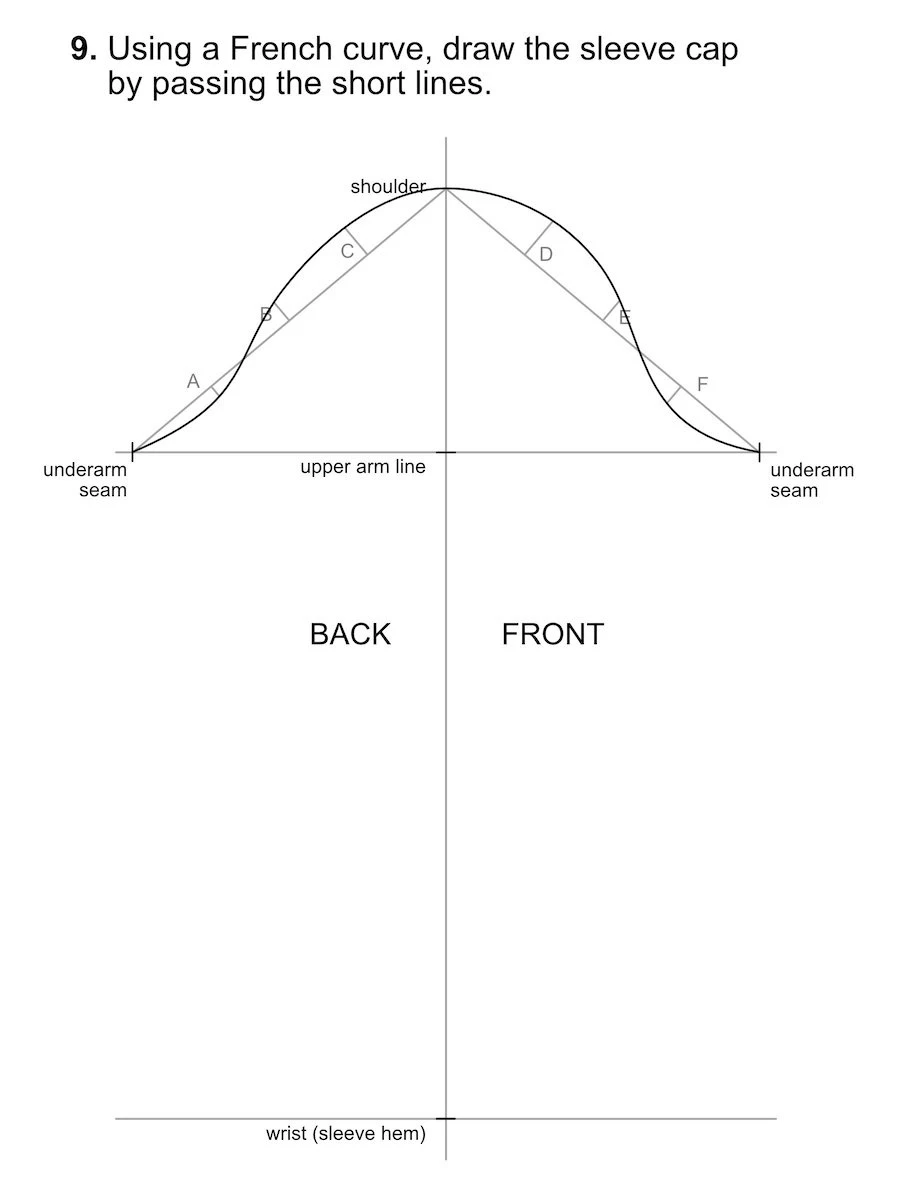
Using a French curve, draw the shaped sleeve cap by passing the tips of the short lines. Make sure not to cross the short lines. It may take a minute or two to find the proper portion and position of the French curve, so be patient :).
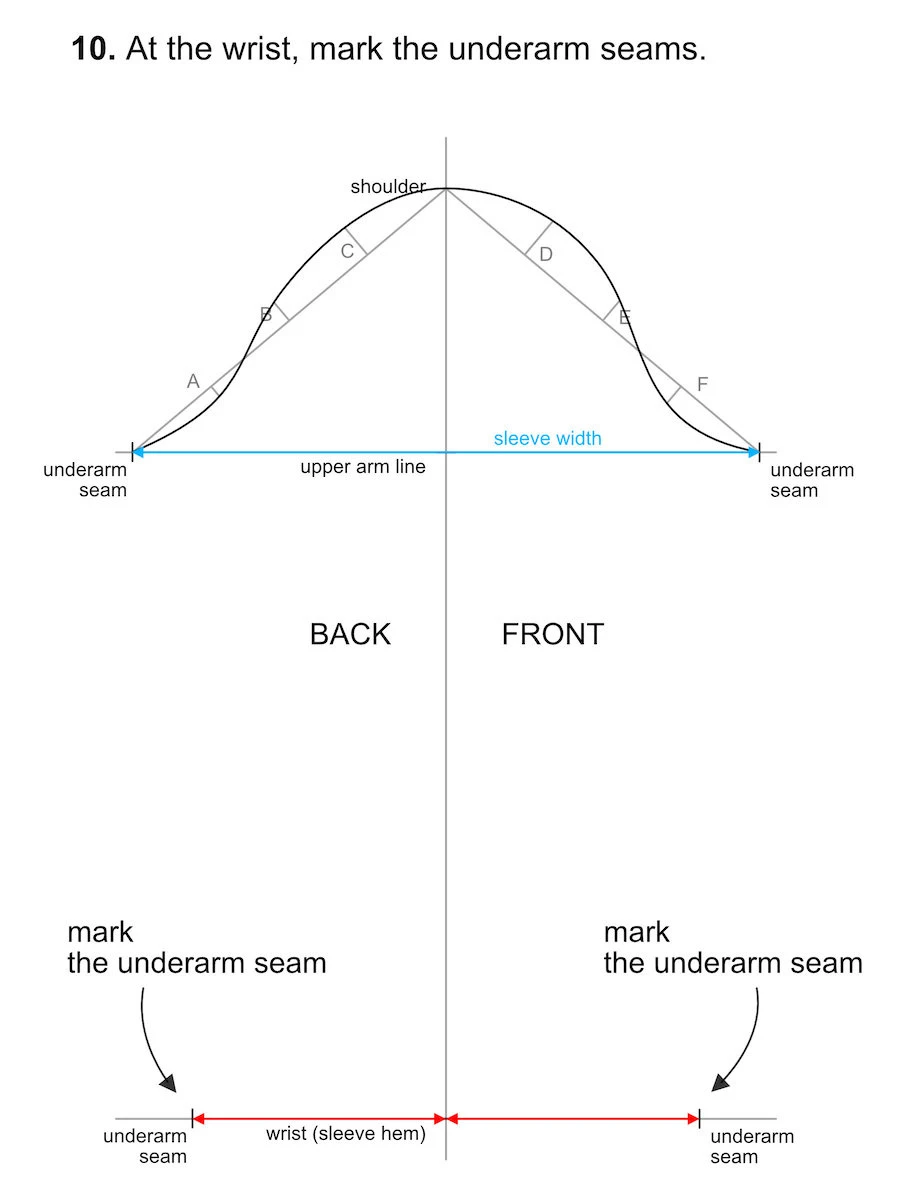
On the wrist line, mark the underarm seam.
f =
sleeve width/2 – 2”
g =
sleeve width/2 – 2”
f =
sleeve width/2 – 5 cm
g =
sleeve width/2 – 5 cm

Using a long ruler, draw the wrist and underarm seams.

On the BACK part of the sleeve cap, mark the length of the bodice BACK armscye. On the FRONT of the cap, mark the bodice FRONT armscye length.
To do so: use a tape measure, measure the bodice armscyes, and transfer the measurements. Alternatively, you can walk the bodice pattern along the sleeve pattern.
h = bodice BACK armscye length
i = bodice FRONT armscye length
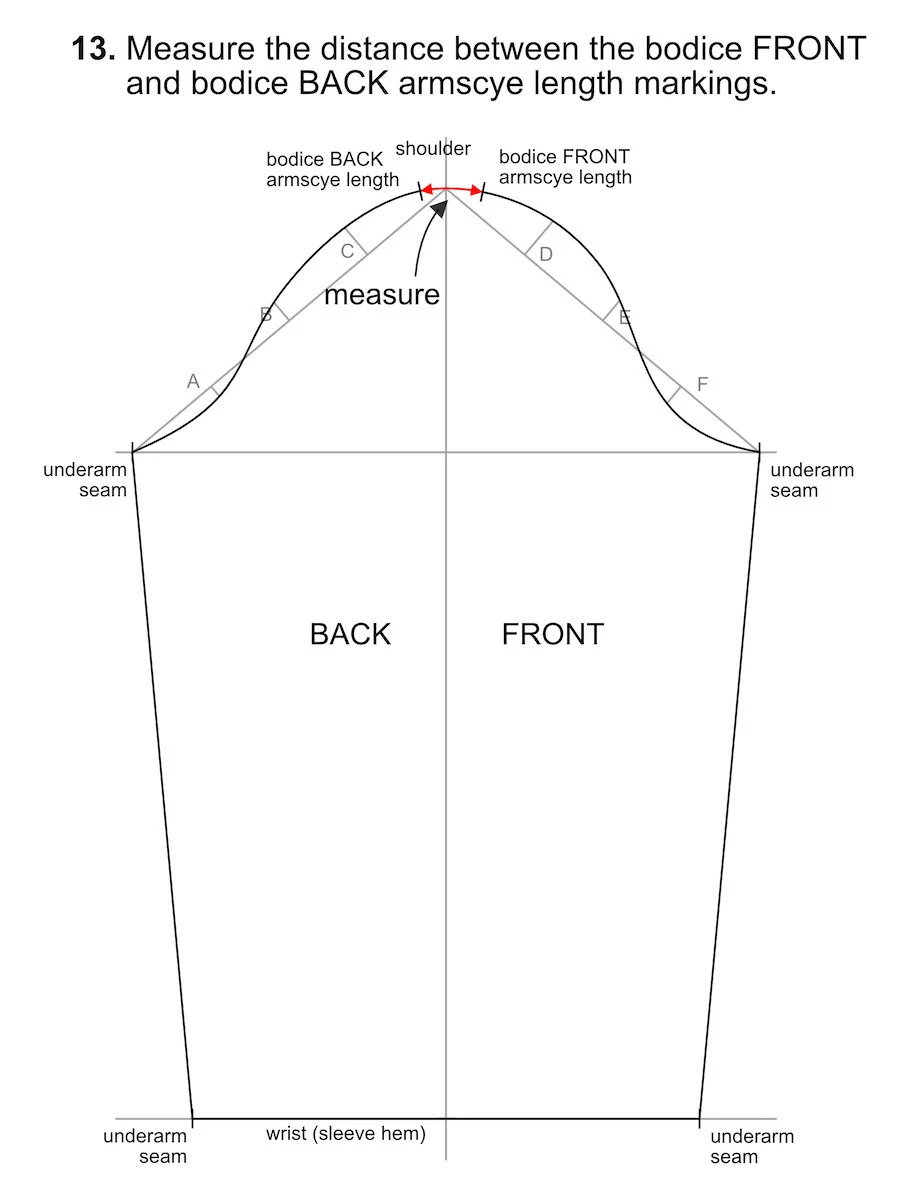
Measure the distance between the armscye markings. This distance is the ease of the sleeve cap.
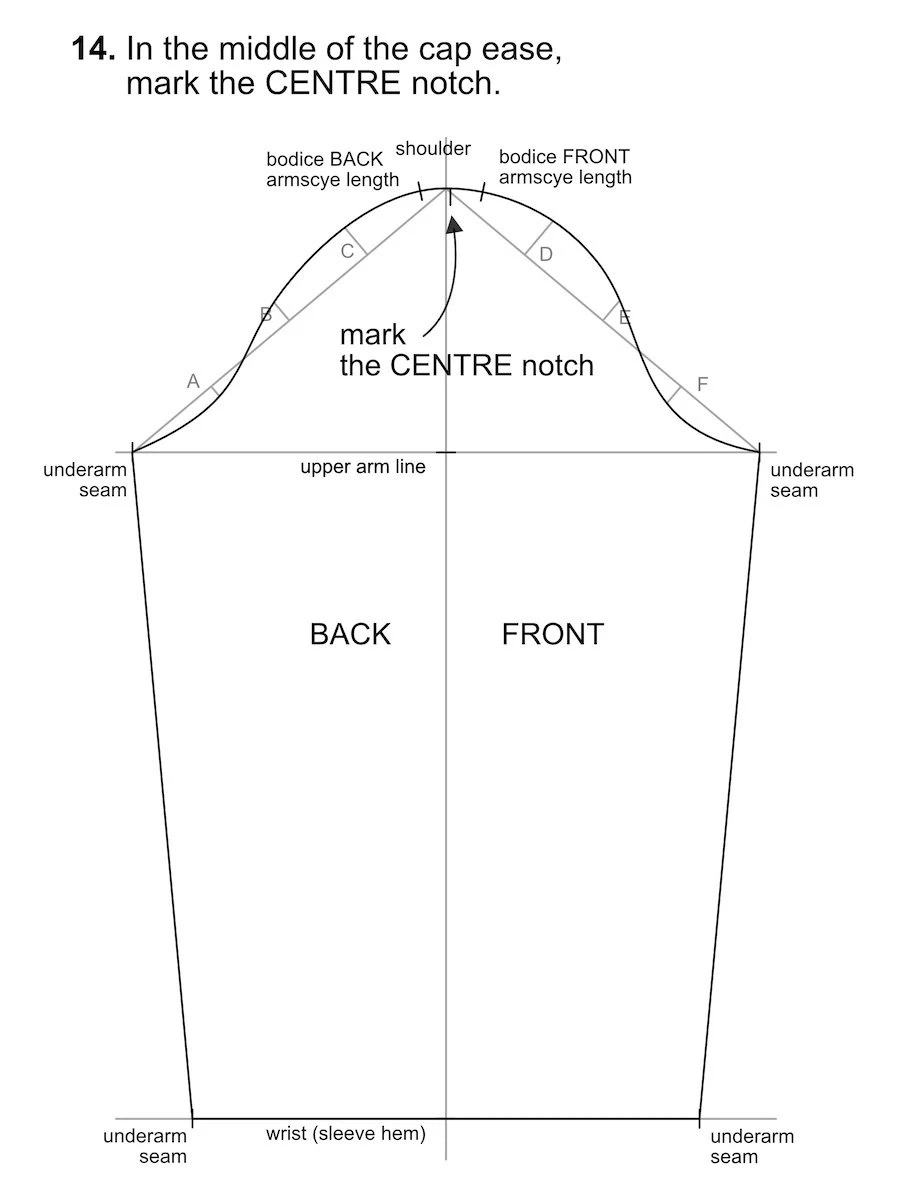
In the middle of the measured sleeve cap ease, mark the CENTRE notch. This notch may not be aligned with the central vertical line you have drawn at the beginning. This does NOT mean, that you have drafted the sleeve incorrectly.
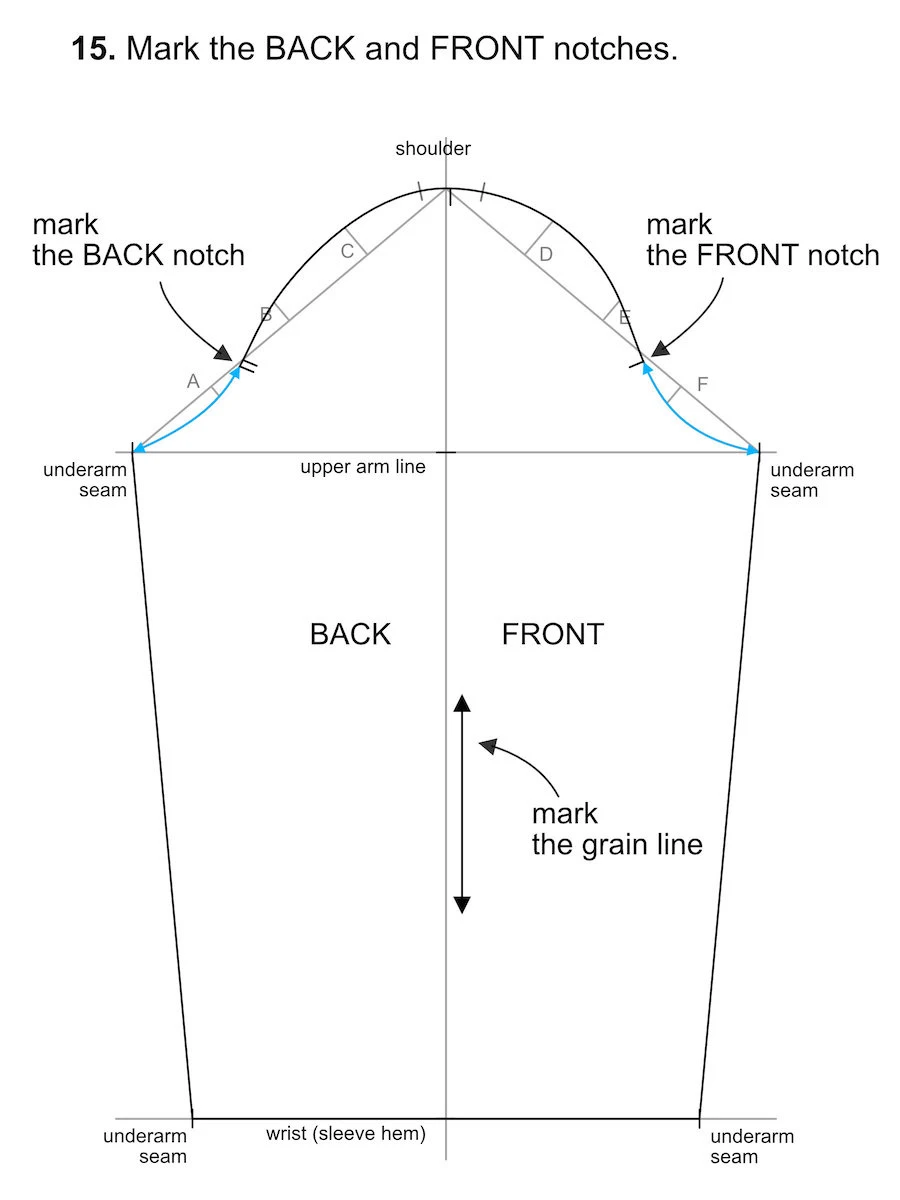
On the sleeve cap at the BACK, mark 1/3 of the bodice BACK armscye length. Drawing two short lines, you will mark the BACK notch for the sleeve.
On the sleeve cap at the FRONT, mark 1/3 of the bodice FRONT armscye length. Drawing one short line, you will mark the FRONT notch for the sleeve.
j = (bodice BACK armscye length)/3
k = (bodice FRONT armscye length)/3

The sleeve pattern is finished. Now, you can sew and test it with your bodice.


How to use the pattern?
Sew it and test with the bodice you drafted the pattern for and see how it fits. Apart from using the pattern you have drafted in this tutorial, you can further modify it to make other types of sleeves and sleeve designs.
A great book for every beginner. Learn the basics to modify a basic bodice, circle skirts, pencil skirt, or sleeve slopers to create your fashion designs. To learn more, read my review of Make Your Own Dress Patterns.
A comprehensive book for both beginner and advanced sewers and fashion designers, that contains tutorials on creating all the basic pattern blocks. Plus about 800 pages of interesting fashion design ideas.
Conclusion:
As you can see, drafting the pattern is not as complicated as it might look at first sight. Now, that you have succeeded in making your basic block, you are free to create any other design you like.
Basic sleeve block drafting FAQs
- Arm length: from shoulder tip to wrist (or desired sleeve end).
- Arm circumference: at bicep, elbow, and wrist.
- Shoulder slope and shoulder width.
- Armscye circumference: the opening where the sleeve attaches to the bodice.