

In my previous blog posts, I describe how to hand pleat fabric at home by applying heat in order to create permanent accordion pleats or permanent knife pleats. This time I am showing how to create a more advanced permanently pleated fabric.
For demonstration purposes, I’ll be working with a piece of chiffon fabric that is the size of A4 paper that is easy to handle. For big-scale projects you can apply the very same technique; just use a larger piece of fabric and a corresponding paper size.
If you have never pleated fabric before, please read my first blog post about accordion pleats that describes the whole process in more detail.
1. Prepare tools for hand pleating fabric at home
For pleating with heat, you will need the tools listed below.
- 2 pieces of A4 kraft paper at least 200 gsm (grams per square meter) for creating 2 pleating moulds
- Long ruler
- Quilting/omnigrid ruler (optional)
- Mechanical or classic pencil (for drawing the pleating pattern)
- Art knife
- Cutting matt
- Cotton twill tape
- Iron or oven
- 100% polyester fabric
2. Pretreat the fabric before pleating
Pretreat the fabric the same way you are going to threat the final garment. Wash, let dry or tumble-dry the fabric and iron it with a mild steam, if necessary. By the way, if you would like to learn more about preparing fabric for your sewing projects, you can read my blog post How To Prepare Your Fabric For Sewing.
Also hem the fabric before pleating. Hemming a fabric that has already been pleated may result a visually unappealing design.
Hem the fabric before pleating. How to do so, please read this blog post .
When your fabric is ready, cut out a piece that is slightly smaller than your A4 kraft paper. To create a perfect square or rectangle, I recommend using the method of pulling threads.
In this tutorial, I am using 100% polyester chiffon (see the image below).

3. Prepare the pleating pattern on the kraft paper
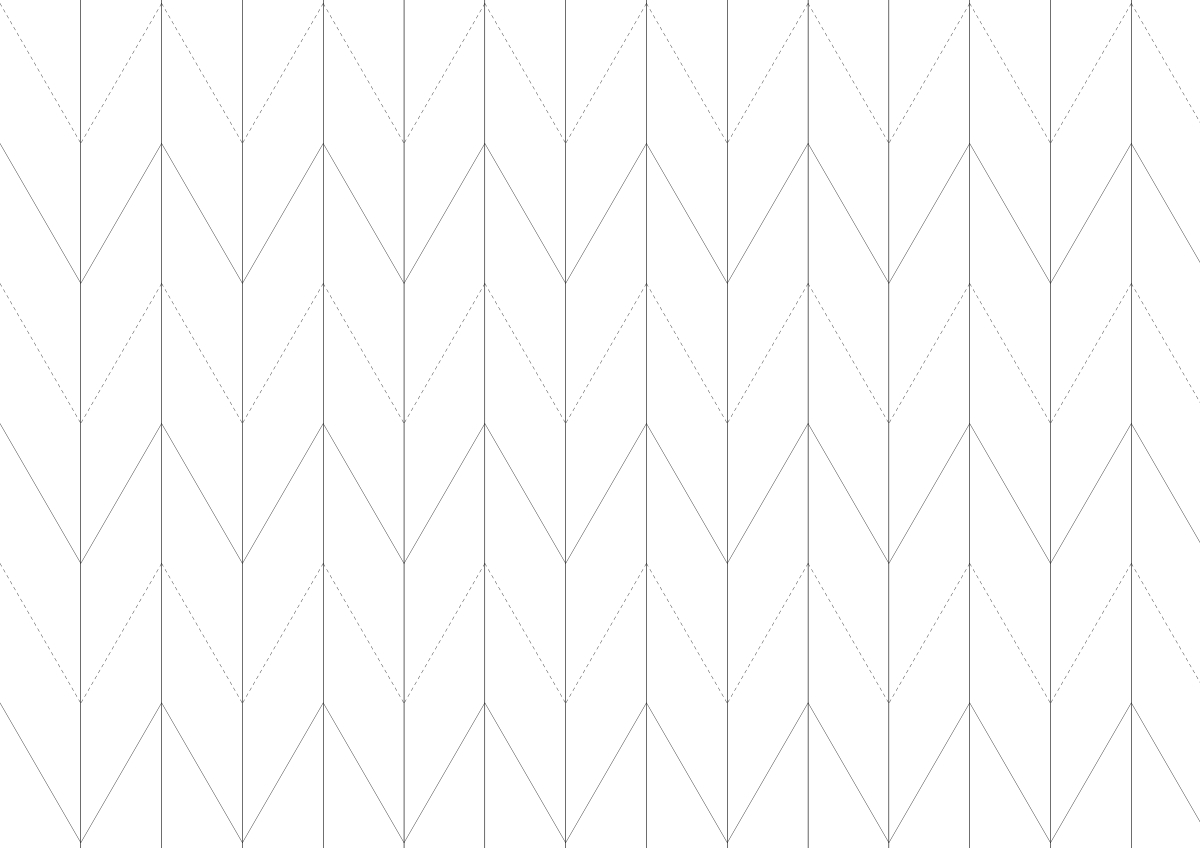
There are two ways of transferring the pleating pattern you can see in the image below to your A4 kraft papers.
Method a) Print the pattern out on your home printer directly on the kraft papers
CHECK THE POSSIBILITIES OF YOUR HOME PRINTER FIRST. NEVER USE PAPER WITH HIGHER GSM THAN YOUR HOME PRINTER ALLOWS YOU TO. IT MAY DAMAGE YOUR PRINTER!
USE A LASER, NOT AN INKJET PRINTER. INK FROM AN INKJET PRINTER MAY BLEED LATER ON DURING THE PLEATING PROCESS AND STAIN YOUR FABRIC!
Once you have found out the maximum paper gsm of your printer, decide whether you will print the pattern directly on the paper that will become a pleating mould.
Method b) Draw the pattern manually
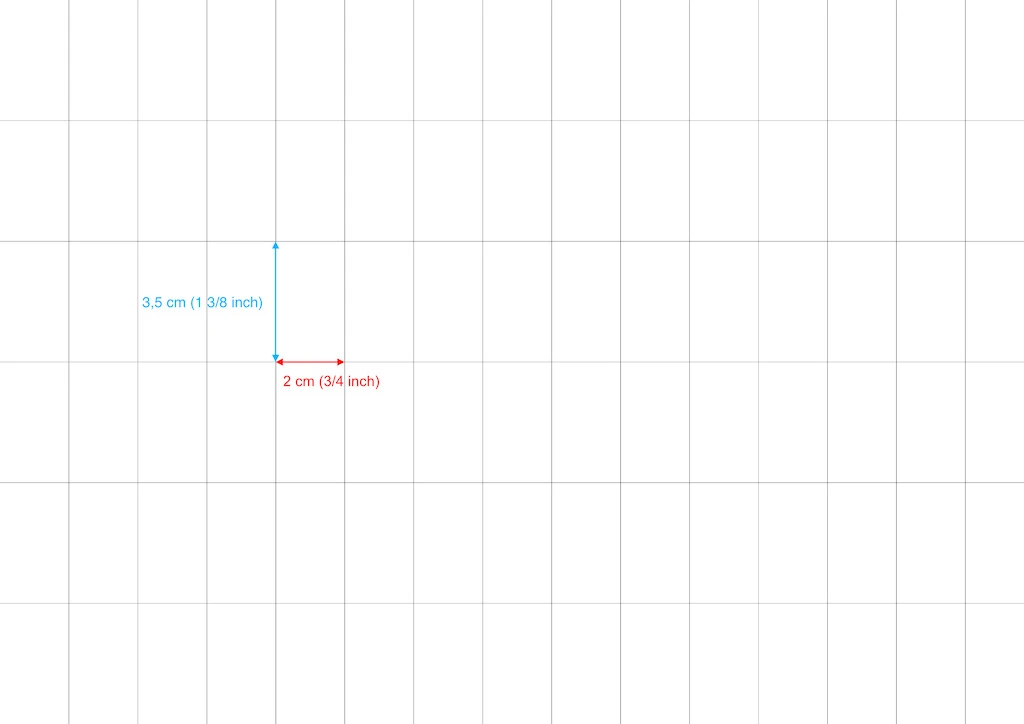
Pick your kraft paper, ruler and mechanical pencil and follow the scheme and instructions below in order to draw pleating pattern above. Draw vertical lines 2 cm (3/4 inch) from each other and horizontal lines 3,5 cm (1 3/8 inch) from each other.
- Draw pairs of markings 2 cm (0 3/4 inch) apart with a quilting ruler. Start at the very edge of the paper (I always start on the left-hand side) and progress towards the opposite edge of the kraft paper (see the images below).

The pairs of markings look like this:

2 ) Connect these markings with a ruler to create vertical lines. These will be 2 cm (0 3/4 inch) apart.
3) On the first and last vertical line draw markings 3,5 cm (1 3/8 inch) apart from each other.

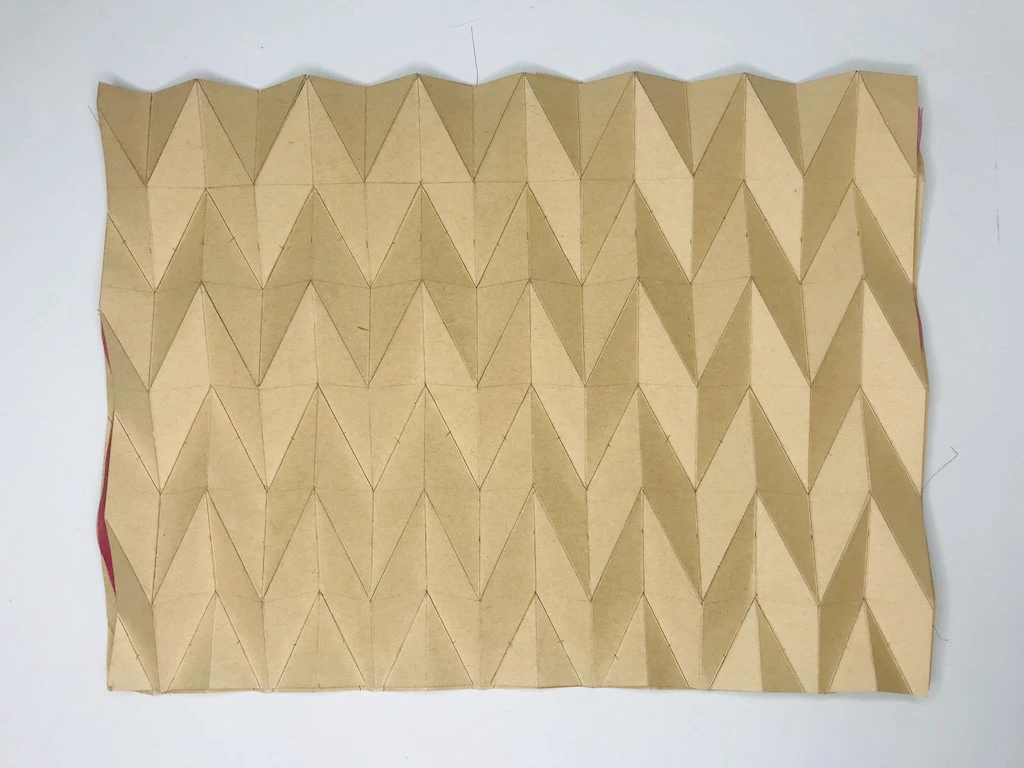
4) Connect the opposite vertical markings and you will get a grid that looks like the one in the image below:

5) Fill the grid with diagonal lines and create V shapes (see the image below). On every second line mark the diagonal lines with a small stroke. This will indicate the lines that should be pushed downwards while folding the paper. The diagonal lines without a stroke will be pushed upwards.

4. Pre-press the lines on the kraft paper
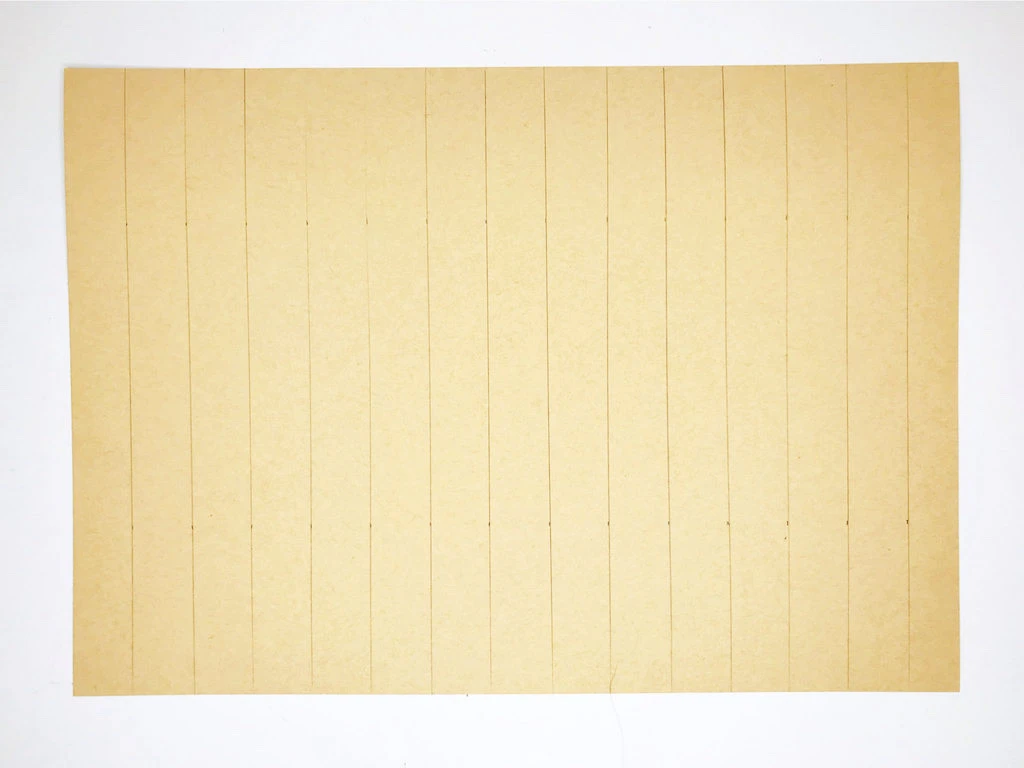
Using an art knife and ruler, pre-press all the vertical and diagonal lines on both kraft papers (see the images below). You do not need a super sharp art knife since the pleats are going to be pre-pressed with its spine (not the blade).
Be as accurate as possible while pressing the lines to achieve high-quality results.
The two moulds have to be identical otherwise the resulting pleats on the fabric will not be nice and sharp. Make sure you are using a cutting matt so that you do not damage your table with the art knife.

5. Fold and the kraft paper according to the pre-pressed lines
Create and accordion first.
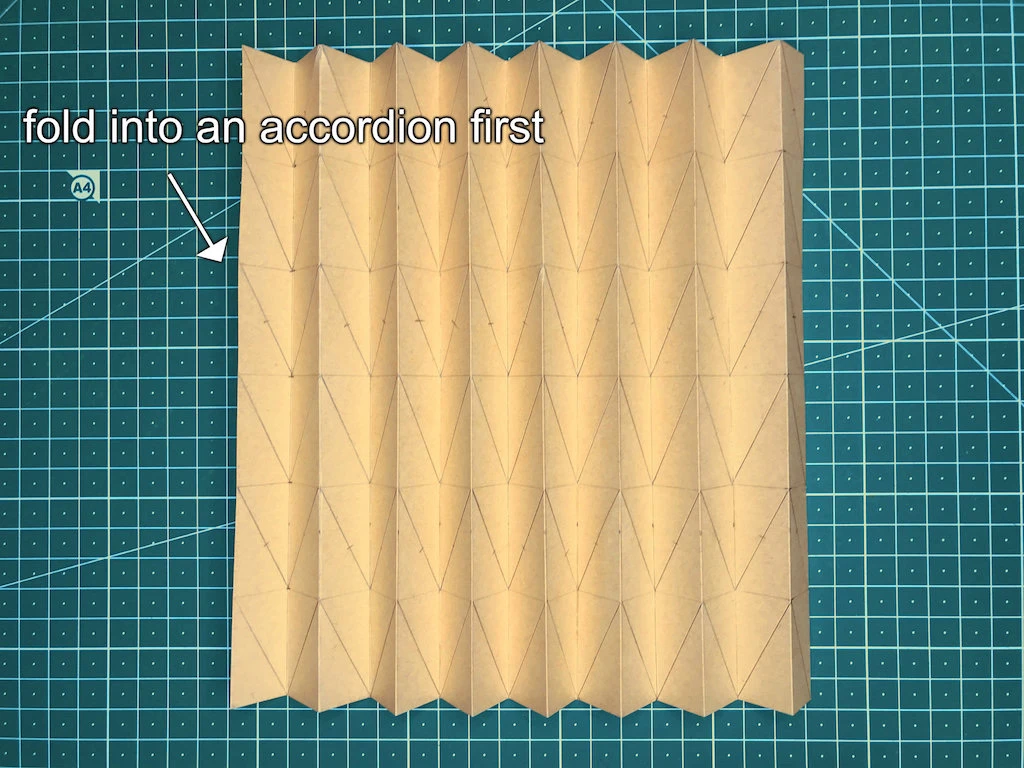
Now push the dotted/stroked lines downwards and the solid lines upwards. I usually start at the left-hand side of the pleating mould and fold the V shapes along the vertical line (see the images below).
It is a little tricky process and you may struggle with the paper for some time until you learn this skill. The demanding folding is one of the reasons for working with a high gsm paper. Low gsm paper would be easily damaged and creased by trying to push the pressed lines into their proper position.

After you have finished pushing all the lines upwards and downwards, squeeze the mould together in order to define its final shape (see the images below).
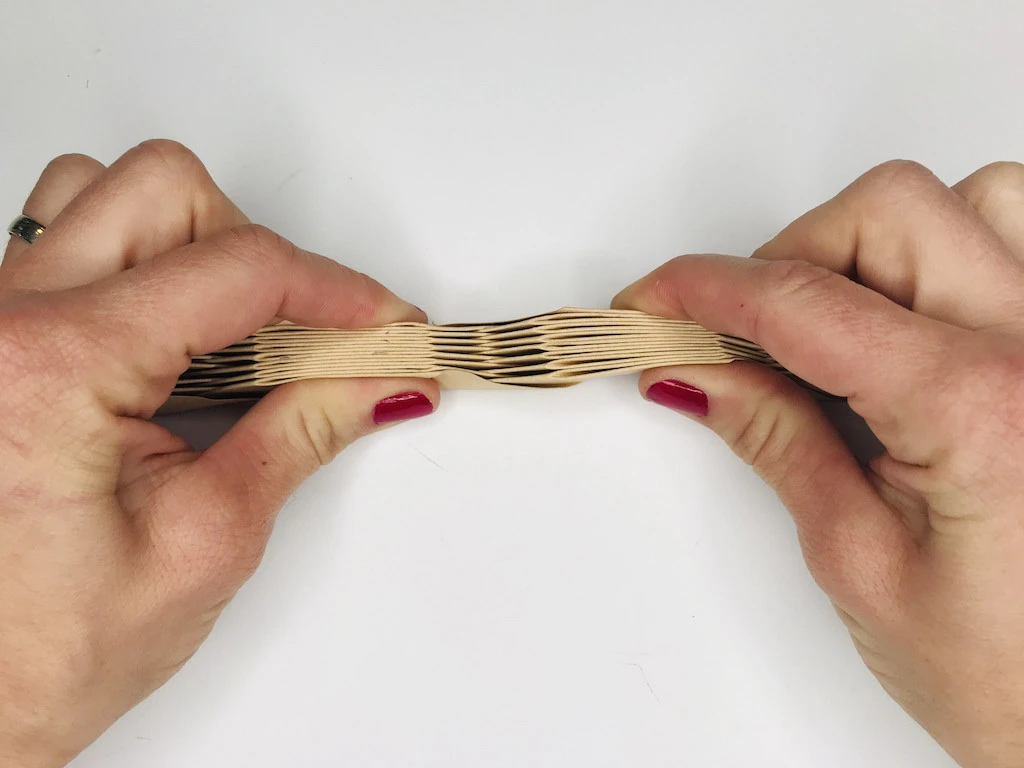
6. Straighten the moulds and place the fabric
First straighten both moulds with your hands. Then choose one of them (it does not matter which one) that will become the bottom mould (see the image below).

Place the fabric you have prepared on this mould (see the image below). Align the left edge of the fabric with the left edge of the mould.

Carefully place the other mould onto the fabric (see the image below).
Squeeze the two moulds with the fabric in between and tie them with a cotton twill tape.
5. Create permanently pleated fabric by applying heat
You can choose between steaming the fabric with an iron or its ‘baking’ in a conventional oven. This depends mostly on the size of your pleating moulds. The ones that are too big for a conventional oven, have to be steamed with an iron.
a) Steam with iron
Set the temperature on your iron to the maximum degree and set the steam control to its minimum. Hover the iron above the moulds at least 5 minutes from one side, and 5 minutes from the other side. With the steam control on, do not touch the mould.

Do not steam too close to the moulds. Otherwise, the kraft paper might absorb too much moist, get wavy and the fabric inside will copy this deformed shape.
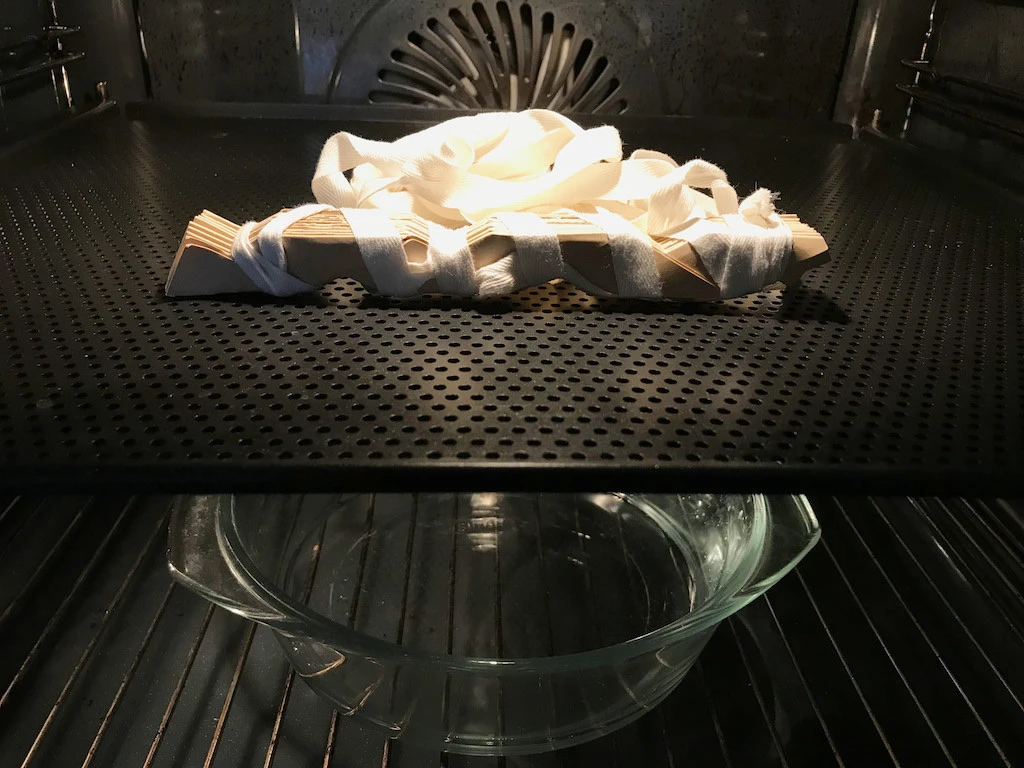
b) ‘Bake’ in your oven
Place the prepared ‘sandwich’ on a grid in the oven. Place a bowl with water under the grid. Set the oven temperature to 170 degrees Celsius (338 degrees Fahrenheit) and ‘bake’ for 20 minutes.
Observe the oven and moulds while baking the pleats. DO NOT LEAVE THE OVEN UNATTENDED!
When the time is out, take out of the moulds. Use a pot-holder to protect your hands as the moulds are really hot!
6. Let sandwich cool down and take out the permanently pleated fabric
After you have done ironing or finished baking your pleats, let the moulds with the fabric inside cool down. The longer you wait, the better. After a while the moulds might seem cold enough, yet, inside there is still a lot of folded fabric which needs to cool down properly as well.
If you take out the fabric when it is still warm, the polyester fibers might get distorted. This time in an undesired way, so patience is a vital ingredience here.
When everything has cooled down, you can finally take out the fabric. Untie the cotton twill tape and spread the moulds a little. Lift the upper mould and take out the fabric. Now the pleated fabric can be further used for your project.

Conclusion: Permanently Pleated Fabric – Advanced Pleats
If you have become a pleating fan, I highly recommend buying Paul Jackon’s book about pleating. You will find out how to design advanced pleats yourself. If you decide to use permanently pleated fabric in your sewing projects you might find useful this blog post about hemming pleated fabric.
If you liked this tutorial, share it with others please. If not, come back to me and let me know what you think. Thank you.


