


You can find darts on bodices, skirts, pants and even on some types of sleeves. They are little “folds” of fabric that enable one piece fabric to accommodate different body parts with different widths. The basic principle of darts in sewing patterns is that they originate from a narrower part and point towards a wider one. Usually they are positioned at the bust, waist, hips, shoulder, or elbow. As such they are a very important element for shaping fabric to contour the natural curves of the body. Their purpose is both functional, and also decorative.
As their role is pivotal in achieving a garment that fits and flatters, on this page, I will describe the function of darts in pattern making on a basic skirt pattern block.
This page contains:
- What is a dart
- Types of darts
- The function of darts in sewing patterns
- The anatomy of a dart
- Examples of using darts on a basic skirt block
- How to transfer darts onto fabric
- Wide darts and trimming away extra bulk
- Conclusion
What is a dart
A dart in a sewing pattern is a triangular (standard dart) or diamond-shaped (contour dart) fold of fabric that is sewn to create shape in a garment. It helps transform a flat piece of fabric into a three-dimensional form, allowing the garment to fit the curves of the body.
Types of darts
There are two types of darts you can find in sewing patterns.
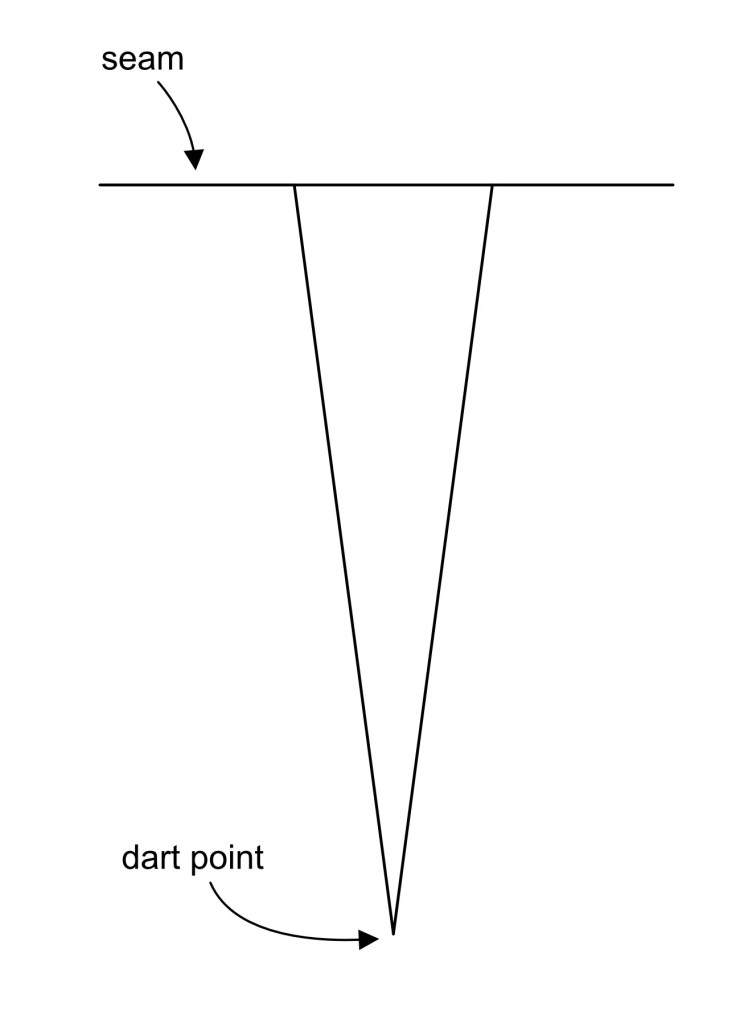
Standard darts like bust, French, shoulder, or waist darts. They originate at a seam of a pattern piece and have one dart point (see the image below).
Contour darts that have two dart points. The first dart point is under the bust apex. Its base of the dart lies at the waist line. The second dart point ends above the hip line (see the image below).

The function of darts in sewing patterns
Remember that darts are used to shape fabric and address differences in volume between two areas of your body. For example, the waist is typically smaller than the hips. Also, the waist is usually smaller than the bust circumference. You need to use darts to overcome this difference in order to create a fitted or semifitted design. There are also other ways to achieve shaping (like gathers, darts turned into seams, tucks, etc.), but I will further explore those in different blog posts. The rules for dart placement and control apply to all garment: women’s, men’s or children’s.
Without proper dart placement, fabric cannot follow natural curves and would create excess fabric where none is needed and the result would be in an ill-fitting garment. This is why darts in sewing patterns play a crucial role in achieving a structured and well-fitting design.
The anatomy of a dart
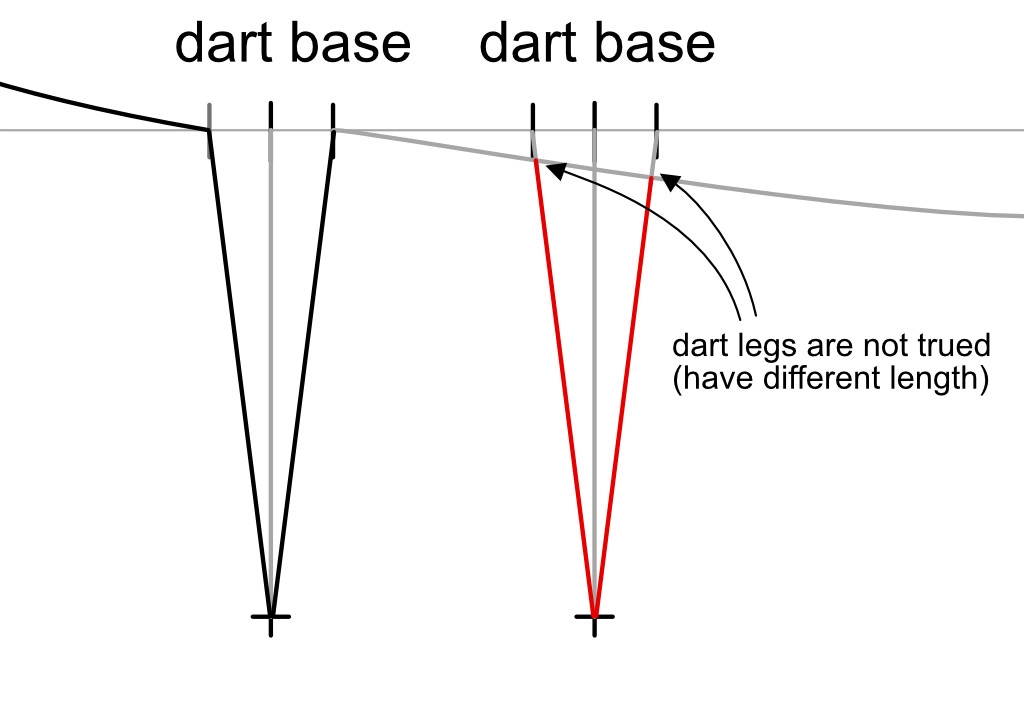
Dart base – the widest part of the dart, placed at the seam or edge of the fabric where the fabric is taken in to create shaping.
Dart legs – the two lines that start at the dart base and spread all along to the dart point. The legs of the dart are sewn together to create the shaping.
Dart point (apex/tip) – the tip of the dart where the two dart legs meet. It points toward the fullest part of the body, such as the bust or hip. It should NEVER be placed directly on the fullest part but slightly away from it to make a smooth shape.
Fold line – the line at the centre of the dart that is created is when it is folded in half before sewing.


Dart depth – the distance from the dart base to the dart point. This determines how long the dart is and how much shaping it provides. You measure the dart depth by measuring the length of the fold line.
Dart bulk (excess/volume) – The extra fabric that remains after the dart legs are sewn together. This fabric has to be pressed to one side (right or left).
Dart truing – the process of making the legs of the dart equal in length If the dart legs have even length, we say, that they are trued. This is usually done by adding to the shorter leg so that seam remains smooth. After truing the dart, you have to redraw the seam that originates in the adjusted dart leg.

Dart manipulation – the process of moving, splitting, pivoting, slash-and-spread technique, shaping or combining darts while maintaining the same shaping effect. This is one of the basic principles of creating new fashion designs from basic blocks.

Examples of using darts on a basic skirt block
A no-dart approach
In the image below, you can see a piece of fabric that comfortably accommodates the hips. However, without darts or side seam intake, it fails to fit the narrower waist. To make the skirt hold at the waist, you need to use side seam intakes and darts to remove excess fabric. Alternatively, you can gather the fabric at the waist to create a gathered skirt. However, this page is about darts in sewing patterns, so we will add some to achieve the shaping.

A side-seam only approach
One way to address this issue is by taking in the side seams to shape the waist. In the cases of small waist-hip difference, this will solve the issue quite easily. This applies mostly to a basic skirt block for kids. However, for an adult, with more pronounced hips, using a side-seam intake only, poses the following challenges:
- Unnatural waist-to-hip curve: Over-reliance on the side seam can distort this curve, resulting in a look that doesn’t mimic the body’s natural shape (see the image below).
- Bias on the side seam: The larger the intake, the more its shape gets closer the fabric bias , which may affect the drape and stability of the fabric.
A maximal 1 1/8” (3 cm) side seam intake is recommended.
In the image below you can see a side-seam intake solution only. Notice the awkward shape of the side seam curve.

Side-seam intakes and one dart
Adding one dart per panel (four darts for the whole basic skirt block) helps distribute the intake more evenly between the side seam and the dart. This method creates a better shape and lessens the side seam’s burden. However, it may still leave the fit lacking. The problem may be that it is still too tight at the centre FRONT and/or BACK of the skirt and that the side seam still doesn’t look nice. Although the image below seems okay at first sight, the fit can be improved to look better and achieve a more balanced silhouette. We will do this by adding another dart to the pattern.

A maximal 1 1/8” (3 cm) side seam intake and 1 1/8” (3 cm) dart width is recommended.
Side seam intake and two darts
For many adults, this may be the best approach to shape the waist-hip area. Two darts (altogether 8 darts on the basic skirt block) offer an excellent opportunity to shape the pattern around the waist. In my basic skirt pattern block, I use this approach for the waist-hip difference 9 7/16″ – 14 3/16″ ( 24 – 36 cm). If the difference exceeds this range, it is important to identify the area, where this difference is the most significant and additional shaping is necessary. In the case of a basic skirt block, this will probably be at the back waist arch and back hip arch. That means you would have to add more shaping (adjusting the number of darts and their base width) to the back rather than to the front of the garment.

More darts, or different number of darts at the front and back of a pattern
In the examples above, I have show you some cases, in which a certain number of darts is necessary. You can, of course, change their amount to fit your intended design, style, or particular shaping. Instead of using 1 dart that is 1 1/8” (3 cm) wide, you can use 2 darts. Divide the dart width equally or make one of the wider and the other one more narrow. Or, instead of one narrow dart you can adjust the side seam intake. In any of these cases, keep in mind that it is important to maintain a proper shaping, design balance and avoid too much dart bulk.
How to transfer darts onto fabric
Darts unlike other parts of pattern pieces are not positioned on the edge of a pattern. Therefore you cannot trace them simply by drawing around the pattern.
To trace darts in sewing patterns, you have multiple options at hand. Selecting, which one to use, depends on your equipment, type of fabric you are working with, and personal preference. Choose one from these methods: tracing wheel and a tracing paper, or use an awl.
Tracing paper and tracing wheel
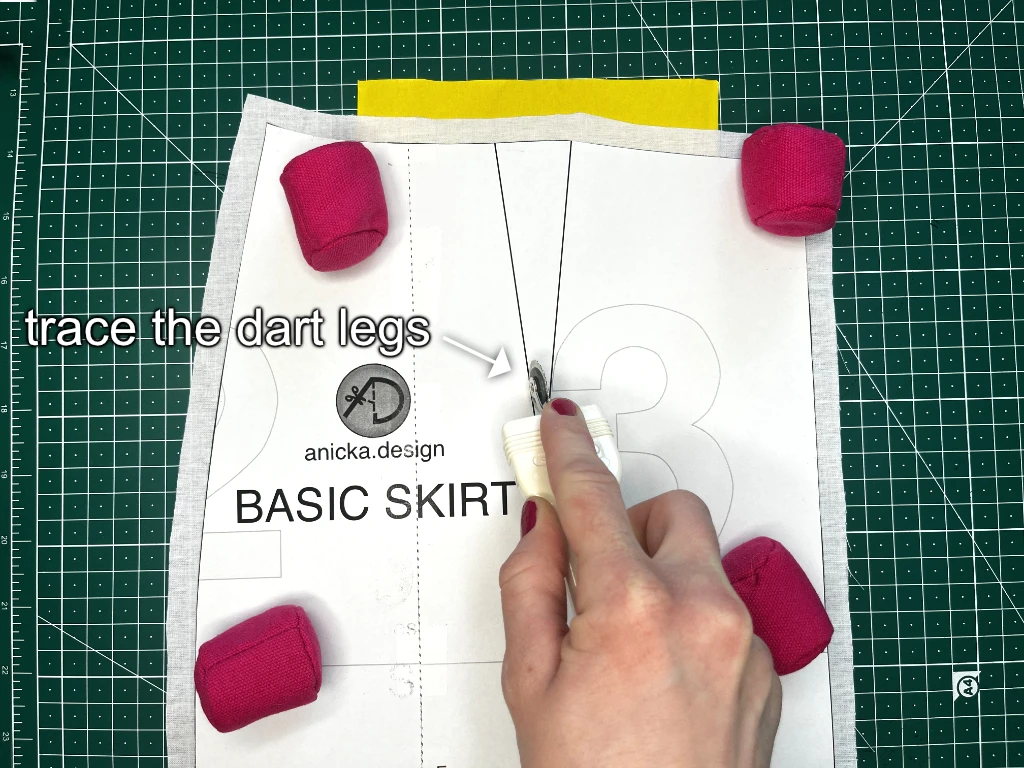
1. Cut out your pattern piece from the fabric and place the paper pattern onto the fabric. Make sure the it faces the paper pattern with its RIGHT SIDE (see the image below). My custom-fit basic skirt pattern has no seam allowances, therefore the edges of the paper and fabric do not align. If the pattern piece you are working with includes seam allowances, make sure its edges align perfectly with the fabric.

2. Use pins or pattern weights in order to prevent the pieces from moving. If you decide to pin, do so within the area of the seam allowance. I’ll use pattern weights (see the image below).

3. Place a tracing paper under the fabric. It should be facing the WRONG SIDE of the fabric. (My tracing paper came folded and is quite large, so I cut a smaller piece to use for small parts of patterns, such as darts or appliqués.)

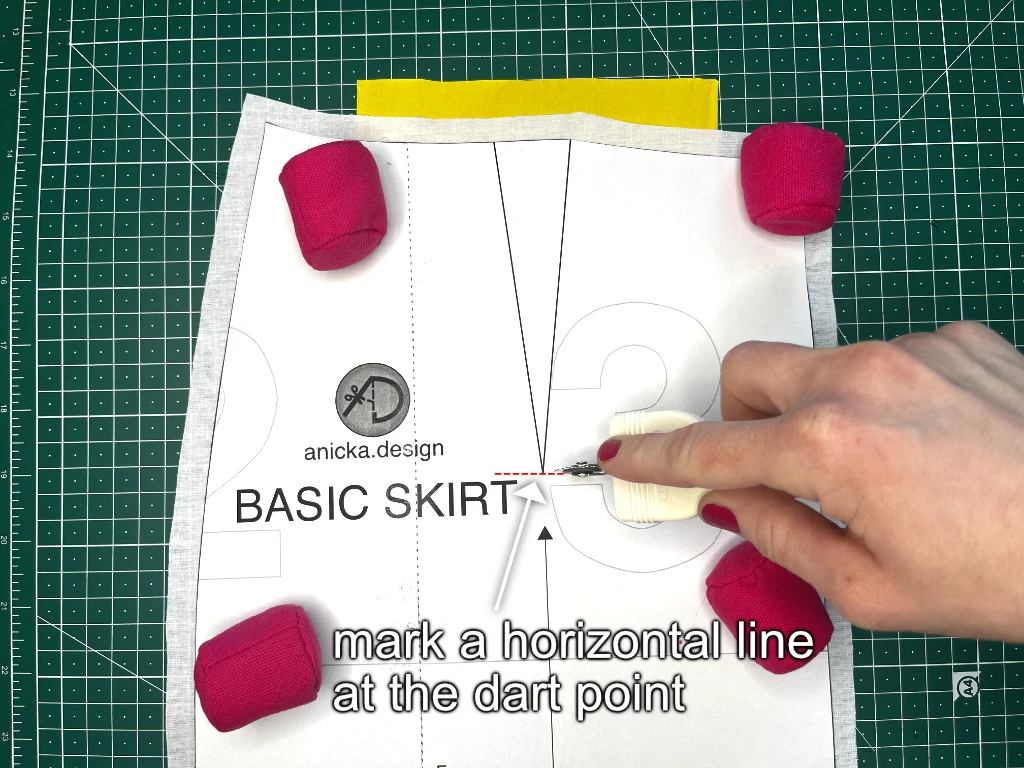
4. Take your tracing wheel and trace along the legs of the dart. You can also mark a short horizontal line that indicates the tip of the dart (see the image below). I have a tracing wheel that has round teeth and does not make small holes into the paper while tracing the dart (see the image below). This helps significantly reduce wear and tear on the pattern.
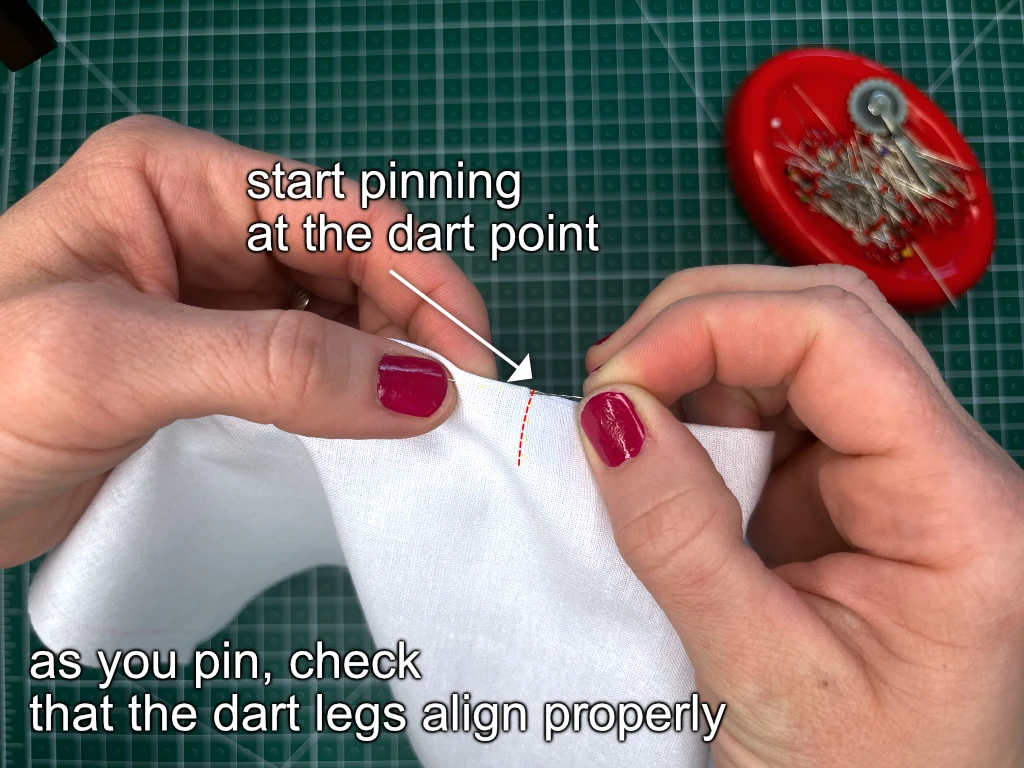
5. Fold the dart along its fold line and starting at the dart point gradually the dart legs (see the image below). As you pin, check that the legs are correctly aligned. You know that the dart legs are aligned if the pin enters one leg and comes out at the corresponding point on the other leg.
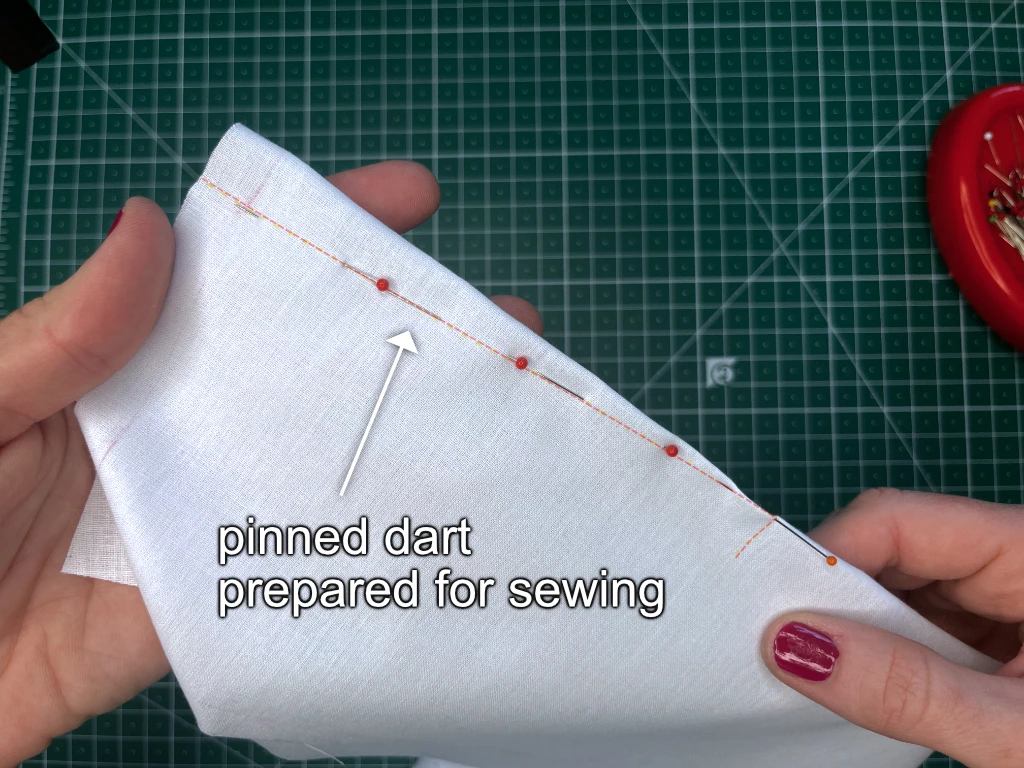
Once you pin along the whole dart, it is prepared to be stitched. The horizontal marking you made at the beginning will help you while sewing the dart. You can easily spot where the thread should be off the dart.

Punching holes with a tailor’s awl
This method is a bit tricky, especially for beginners, as its main purpose is to create small holes in the fabric to mark the dart placement. If you choose this method, avoid handling the fabric too much. The holes are created by slightly pushing the fabric’s yarns apart with the awl, but with time and manipulation, they gradually return to their original position. Tightly woven or stiff fabrics may hold the holes longer, loosely woven or delicate fabrics may close up more quickly. Please note that this is a beginner-friendly approach to using an awl for marking a dart. The industry standard places the marking deeper within the dart bulk (1/2” – 1,2 cm from the dart point, 1/8” – 0,3 cm from the dart base).
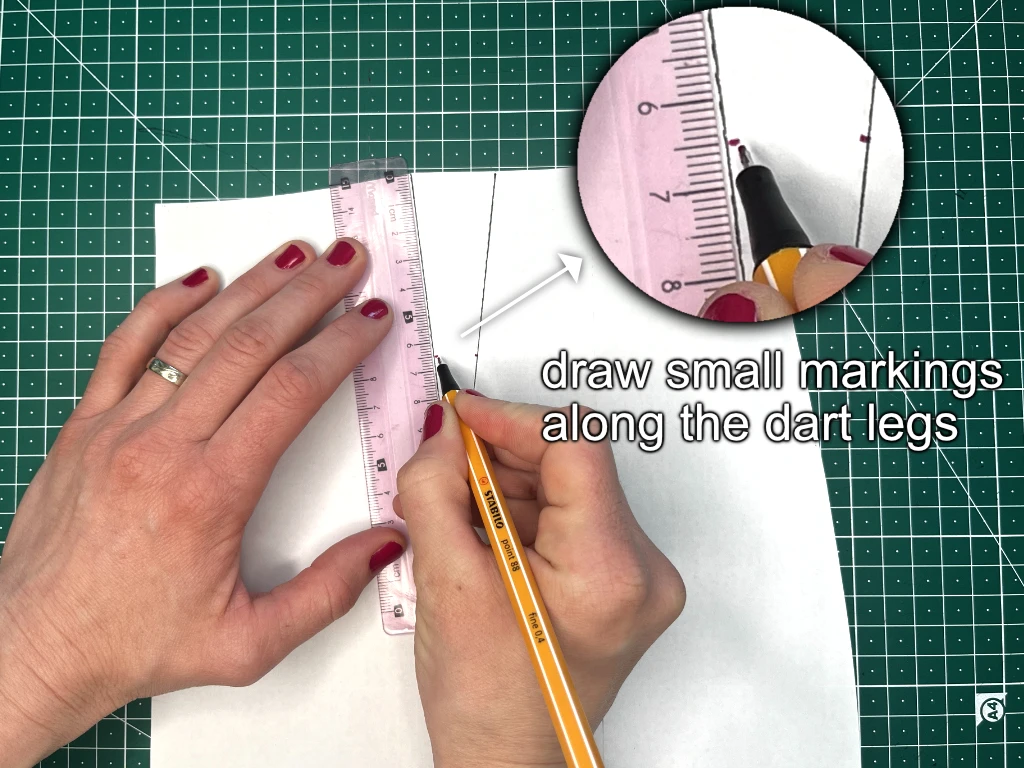
1. On both dart legs, mark points at the centre of each leg. Do this within the bulk area (see the image below).
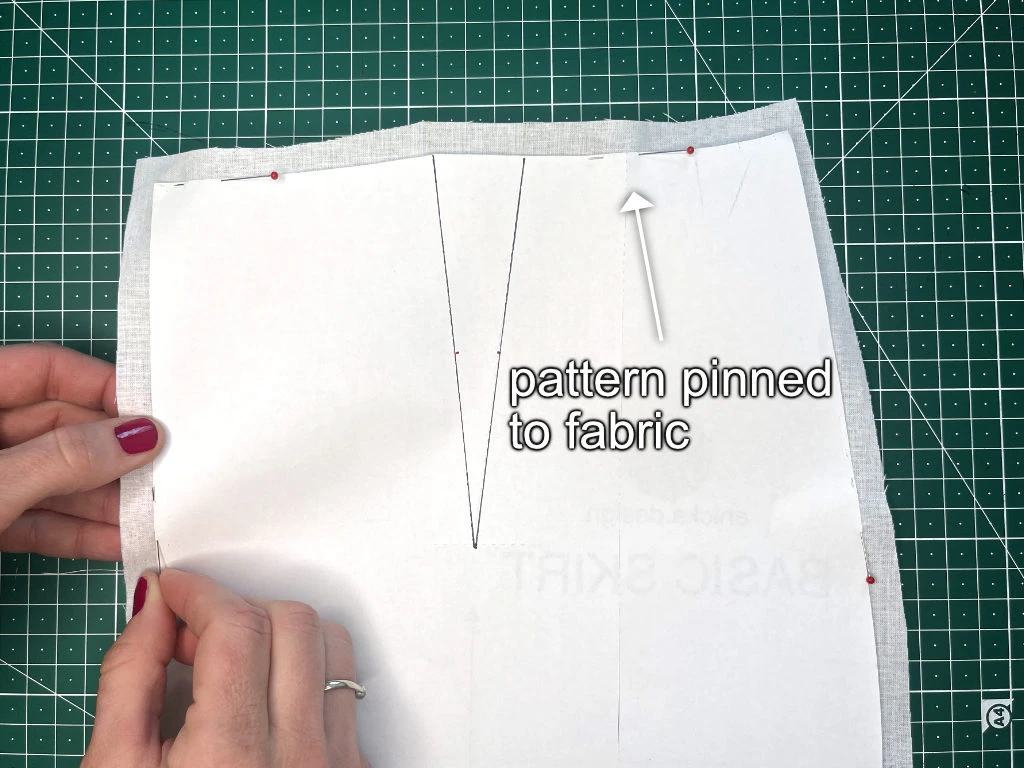
2. Pin together the fabric and the pattern (see the image below). Use pattern weights before you start pinning to prevent the pattern from shifting. (As my pattern comes without seam allowances, I pinned very close to the edge of it.)
3. With the tailor’s awl, punch three little holes inside the dart bulk. One slightly ABOVE the dart point and two at the markings you have made at the beginning (see the images below). Make sure the fabric is touching the pattern. If it doesn’t, you will punch a hole in a different spot on the fabric.


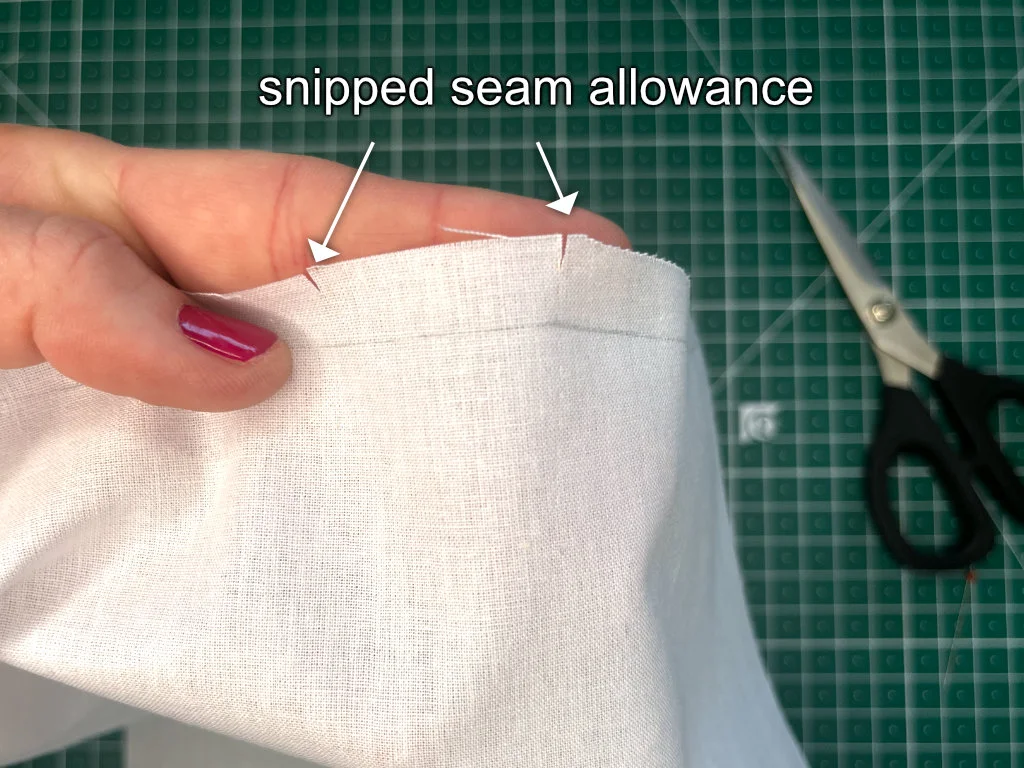
4. Using small sharp scissors, snip into the seam allowance where the dart legs end (see the image below). Along with the small holes made by the awl, these small cuts will help you correctly align the dart legs.

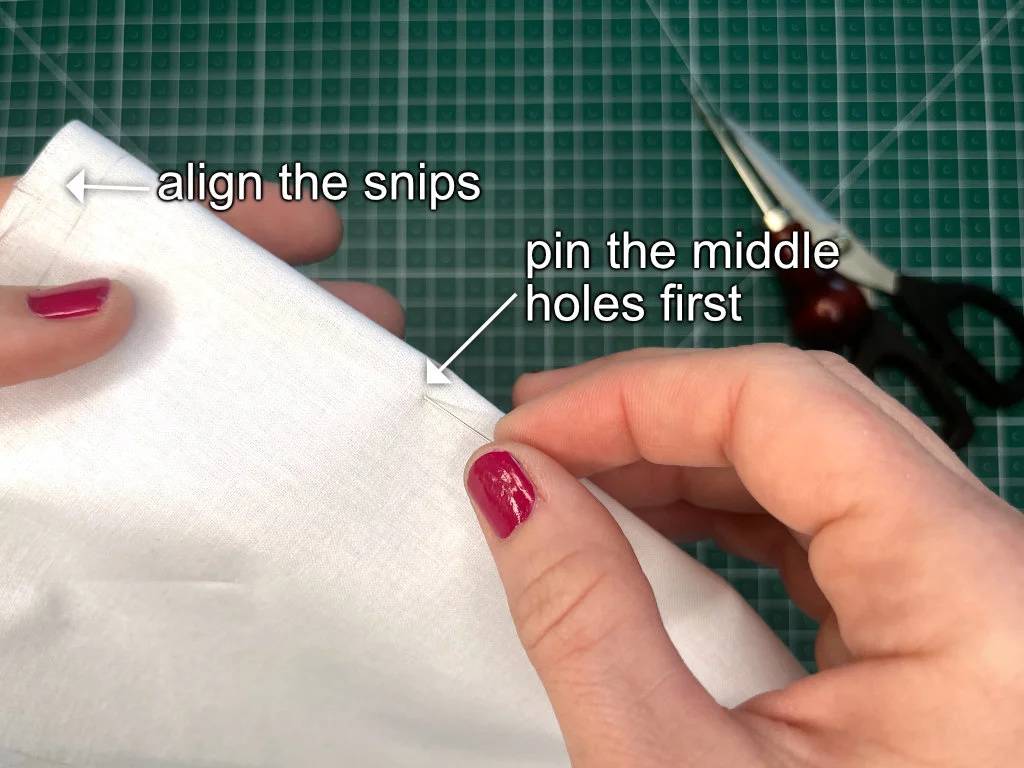
5. Fold the dart along its fold line. Start at the dart point and align the snips. Place the first pin through the holes at the centre of the dart legs (see the image below).
6. Place the next pin perpendicular to the fold line at the dart point, then pin the rest of the dart (see the images below). This pin indicates where the thread should be off the dart.

No matter how you choose to trace the dart onto your fabric, you can consider basting it instead of pinning. Basting gives you the advantage of testing the dart fit before sewing it. For slippery or delicate fabrics, basting is often a better option as it holds everything in place more securely. On the other hand, thick fabrics may be too bulky to pin properly, so basting would be advisable in that case too.
Wide darts and trimming away excess bulk
If a dart has 1 3/8″ – 2″ (3,5 – 5 cm) base width, it is recommended to trim excess. For 2” (5 cm) or more, it is necessary to do so. Pressing darts with too large bulk would create an unflattering design. Especially, if you are working with stiff fabrics like wool, thick tweed, denim, brocade, etc. In such cases, you would indeed sew the large dart intake and cut away the bulk after stitching the dart. In the example below, I will show you how to reduce dart bulk using a medium-weight fabric to demonstrate the technique, as I don’t have a bulky fabric at hand at this moment.
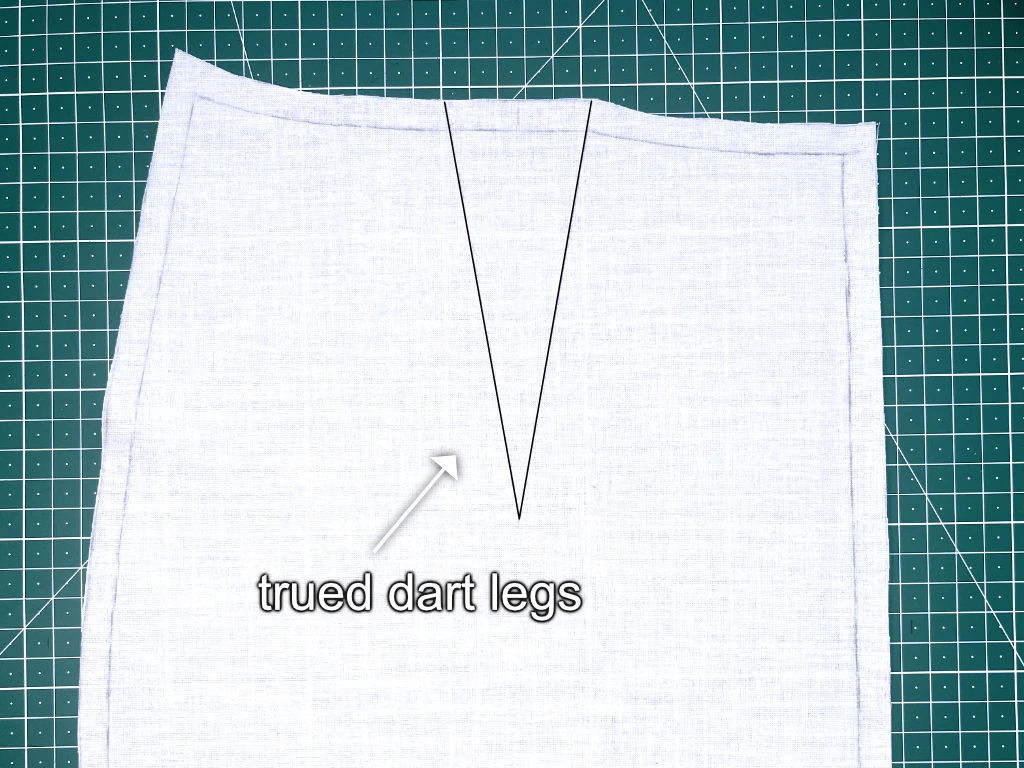
1. Make sure that the dart legs are true (they have equal length), make any necessary adjustments to the dart legs or the pattern in advance.
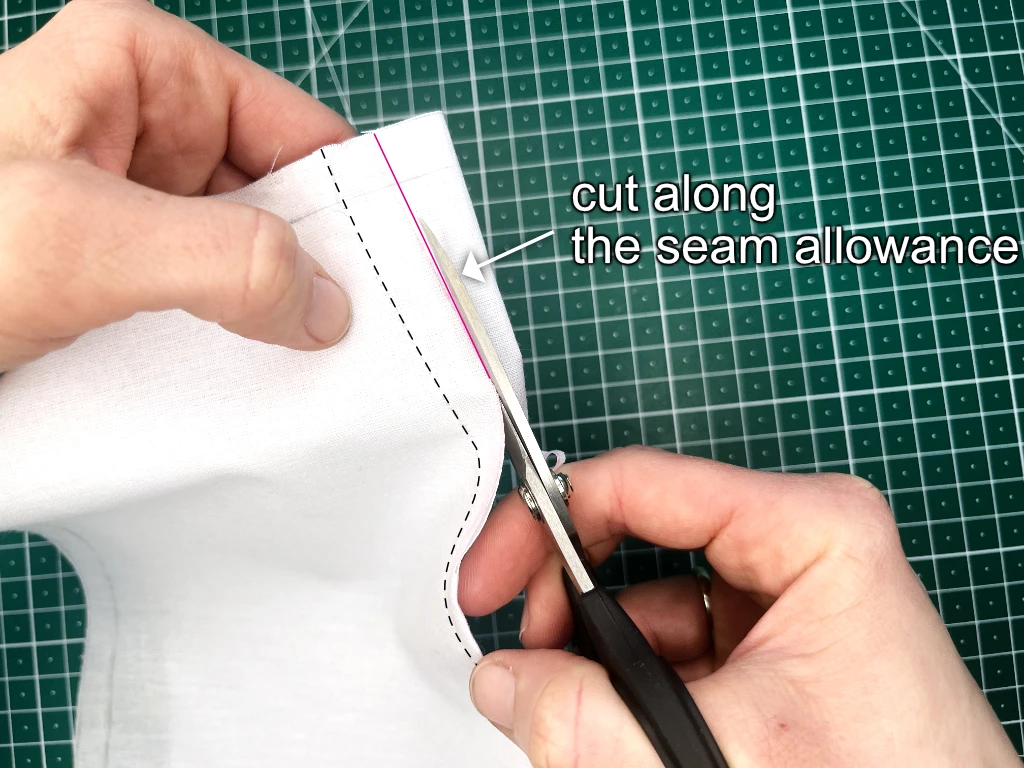
2. Draw a 3/8” (1 cm) seam allowance to both dart legs (see the image below). This means drawing inside the dart bulk area. You can, of course, use a larger seam allowance like 9/16” (1,5 cm), which would give you more space to do some twists and tweaks.


3. Sew the dart all the way from its base to the tip of the dart (see the image below).

4. Check whether you are happy with the overall fit, and cut away the excess along the 3/8” (1 cm) seam allowance (see the image below). Make sure that this seam allowance adheres to the dart legs in case you have made any changes to it.

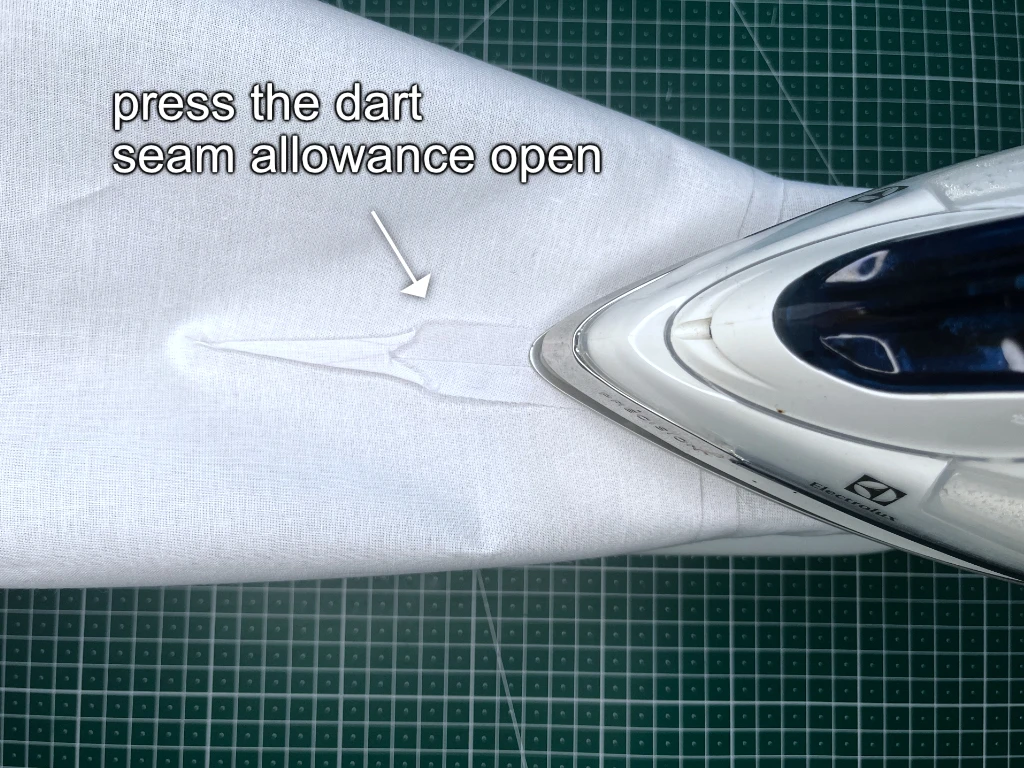
5. Now, press the seam allowance of the dart open. Keep in mind, that you are doing this because of bulky fabric. Therefore, you do not want your seam allowances to be pressed to one side only as you would do with a standard dart (see the image below).
6. The dart with trimmed away dart bulk is finished (see the images below).


Conclusion: Darts – how many, where and why?
Understanding the basic principles of the function of darts in sewing patterns, their placement, and how to manipulate them is key to transforming a two-dimensional fabric into a three-dimensional garment that fits.. Working solely with side seam intakes or incorporating darts in sewing patterns to control the shaping of the garment depends on the body proportions and, of course, your design choice and the style you wish to achieve. When working on new ideas, experiment with various dart configurations to achieve both balanced and appealing fit.