


In all sewing patterns, whether from large brands that have sold patterns for decades or new small indie brands, one thing is common (or at least should be :)) – symbols and signs. These markings help you assemble and match individual pattern pieces, as well as indicate other important aspects of the pattern. Some of these markings are transferred directly to the fabric, while others are not. In this blog post, I’m going to list and describe all the symbols you may come across in my patterns or any others.
Cutting lines – You will find these on graded patterns. You have to select your size and follow the corresponding line in order to cut the pattern piece. You will use the same line type and/or colour for all pattern pieces. Some lines can be stacked on top of each other. Like the hem of the pants. In that case this single “combined” line applies to all sizes.
Place on the fold – This indicates that you should fold your fabric and align the marked edge of the pattern piece with the fabric fold. Then, trace the pattern and cut through both layers of fabric. Do NOT cut along the folded edge.
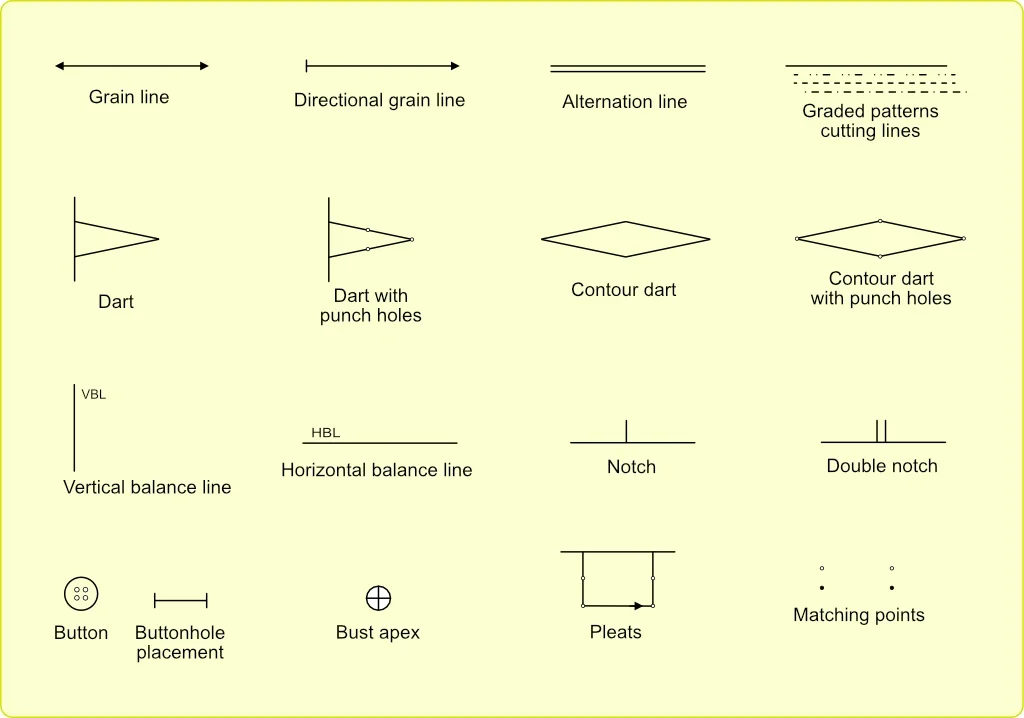
Grainline – Indicates how the pattern should be positioned in relation to the grainline of the fabric. It can be placed on the lengthwise grain, crosswise grain (for fabrics with decorative selvedge/selvage line) or on the bias.
Directional grainline – This is important for patterns designed for fabrics with a directional print or a nap, such as velvet. All pattern pieces must follow the same fabric direction along the grainline. Examples include velvet, corduroy, faux fur, and suede, as well as fabrics with one-way designs like stripes, plaids, border prints, and text-based patterns.
Dart – Trace the dart onto your fabric. Fold and sew it so that the dart legs are perfectly aligned.
Dart with punch holes – Trace the dart with a tracing wheel or use a tailor’s awl and punch holes where indicated.
Buttonhole – The designated place where a buttonhole is sewn. Use a buttonhole cutter to carefully cut through the fabric.
Button position – The placement of an individual button.
Bust point – This marks the location of the bust apex, and bust darts on bodices should be directed towards this point. When slashing and spreading or pivoting bust darts, always extend them to the centre of the bust point.
Notch and double notch – These indicate where individual pattern pieces should be aligned for a proper garment fit. Different companies may mark them in various ways, such as small lines, T-shaped lines, or small triangles. Regardless of their shape, they should always be perpendicular to the pattern edge.
Alteration lines – These lines indicate where a pattern can be altered, typically to lengthen or shorten a pattern piece. They are usually represented by double horizontal lines, sometimes labelled ‘Lengthen or shorten here’.
Matching points – These points are usually located inside the pattern piece. They indicate the alignment and positioning of pockets, pocket flaps, and other garment parts.
HBL – Horizontal Balance Line – A line drawn on the garment that should always remain horizontal during fitting.
VBL – Vertical Balance Line – A line drawn on the garment that should always remain vertical during fitting.
Pleat – Fold the fabric in the direction indicated by the arrow, aligning the punch holes.
Conclusion
In the end, understanding the signs in sewing patterns is key to bringing your project to life with precision. Whether it’s aligning a grainline, tracing a dart, or adjusting an alteration line, these markings guide you through every step. With this knowledge, you’re well-equipped to tackle patterns from any brand—big or small—and create garments that fit beautifully. Happy sewing.