To any hobby sewist or beginner who wants to draft a basic bodice pattern. You too can use a math-free approach. Learn how to draft a bodice block that fits with confidence, and without frustration. Use this free interactive bodice block tutorial and draft your basic block from scratch easily.
This page also contains:
- What is a basic bodice block
- Tools and measurements you will need
- Basic bodice block pattern – interactive tutorial
- Tools you need to draw the pattern
- How to draft a basic bodice pattern
- Basic bodice block drafting FAQs
What is a basic bodice block
The basic bodice block (or basic bodice sloper),along with the basic skirt block, sleeve and dress block, is a foundational pattern in fashion design. Once drafted to your measurements, it becomes a perfectly fitting base for tops and dresses. By adjusting darts and adding style lines, gathers, or yokes, it can be transformed into countless designs. This bodice is designed to be used with set-in a sleeve. The front and back are drafted separately for clarity.
Tools and measurements you will need
Tools: large sheet of paper, pencil, pen or Sharpie, long ruler, French/flexible curve.
Measurements: Accurate body measurements are essential for drafting a well-fitting bodice. Before measuring, mark a few key points on the body to improve accuracy (see images below). If possible, ask a friend to help with measurements taken at the back.

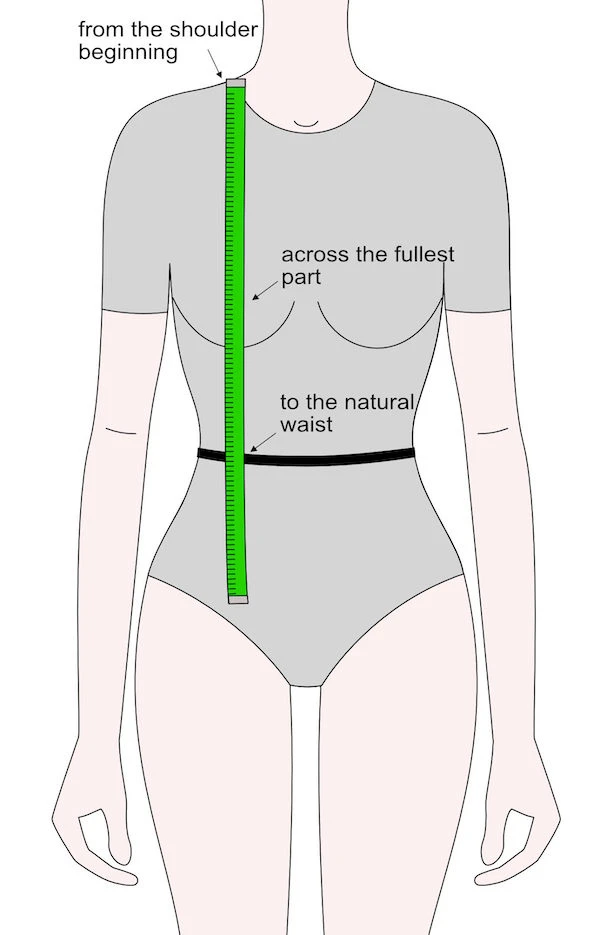
Use an elastic band to mark the natural waist, and use it as a reference for length measurements.

Use small stickers, a washable marker, or pins to mark the shoulder beginning, tip of the shoulder, neck FRONT and armscye position.
- Stand naturally (do not suck in or push out).
- Keep the tape measure snug but not tight
- Measure twice to ensure accuracy
How the interactive tutorial works in 3 easy steps
1. Fill in your measurements
Enter your measurements following the illustrations in the tutorial.
2. Get personalised results
Click “Design tutorial” to get your personalised drafting guide.
3. Download a PDF instantly
Download your customised PDF tutorial instantly.
How to draft a bodice block – interactive tutorial
Body height

Bust circumference

Natural waist circumference

Shoulder to waist length at the front
Neck to waist length at the front

Bust to waist length at the front
Neck circumference

Bust divergence
Armscye centre width at front

Shoulder length
Shoulder slope

Armscye centre width at the back
Shoulder to waist length at the back
Neck to waist length at the back
Seam allowance
What’s included after you complete the interactive tutorial
Online tutorial
FREE
✓ Step-by-step illustrations
✓ Custom-fit drafting dimensions
✓ Formulas for calculated values
PDF tutorial
$2.99
✓ Step-by-step drafting illustrations
✓ Custom-fit drafting dimensions
✓ Formulas for calculated values
✓ Your measurements overview
✓ Approximate fabric consumption
How to draft the basic bodice block step-by-step
Draw grey lines in pencil as guidelines, and black lines with a Sharpie as the pattern lines. Iron the tissue paper if needed and avoid using creased or crumpled paper.
How to draft the basic bodice block – BACK pattern piece
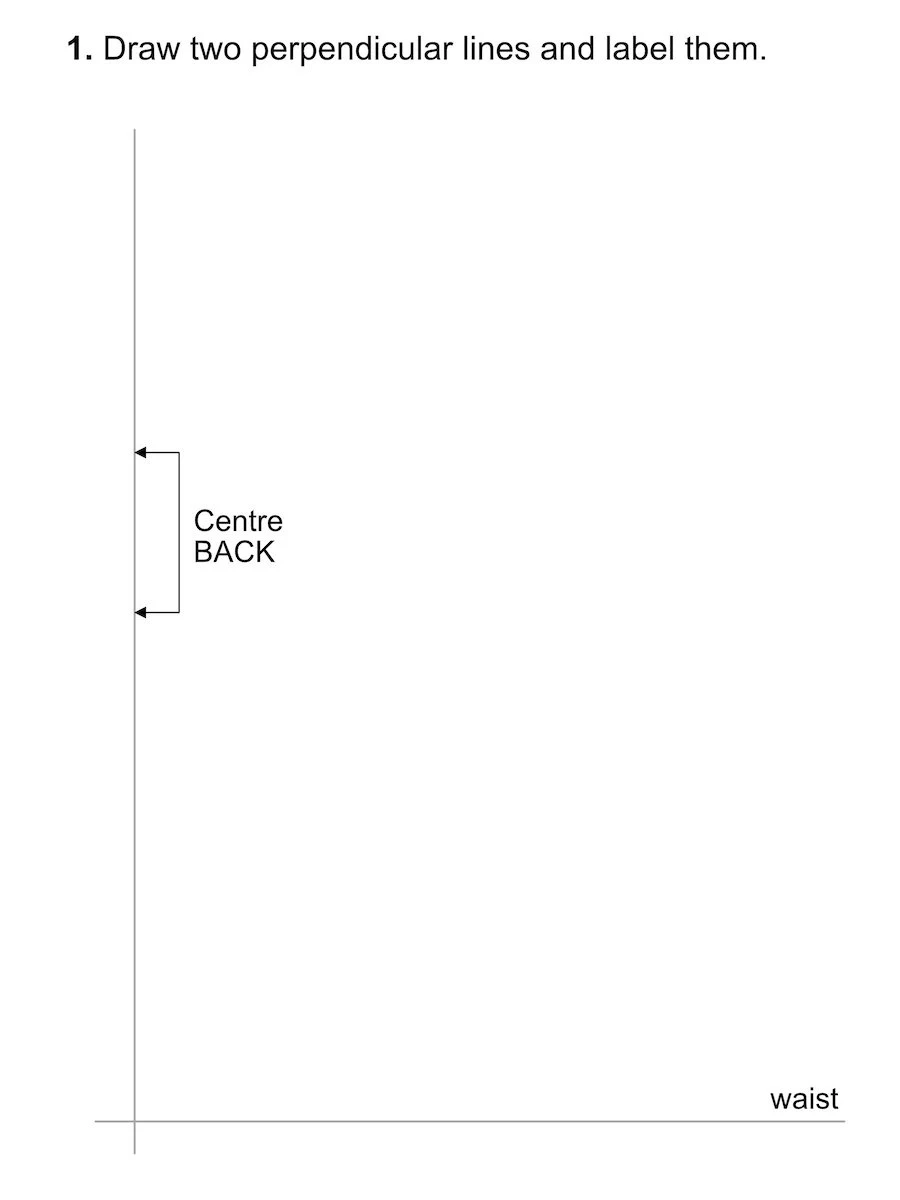
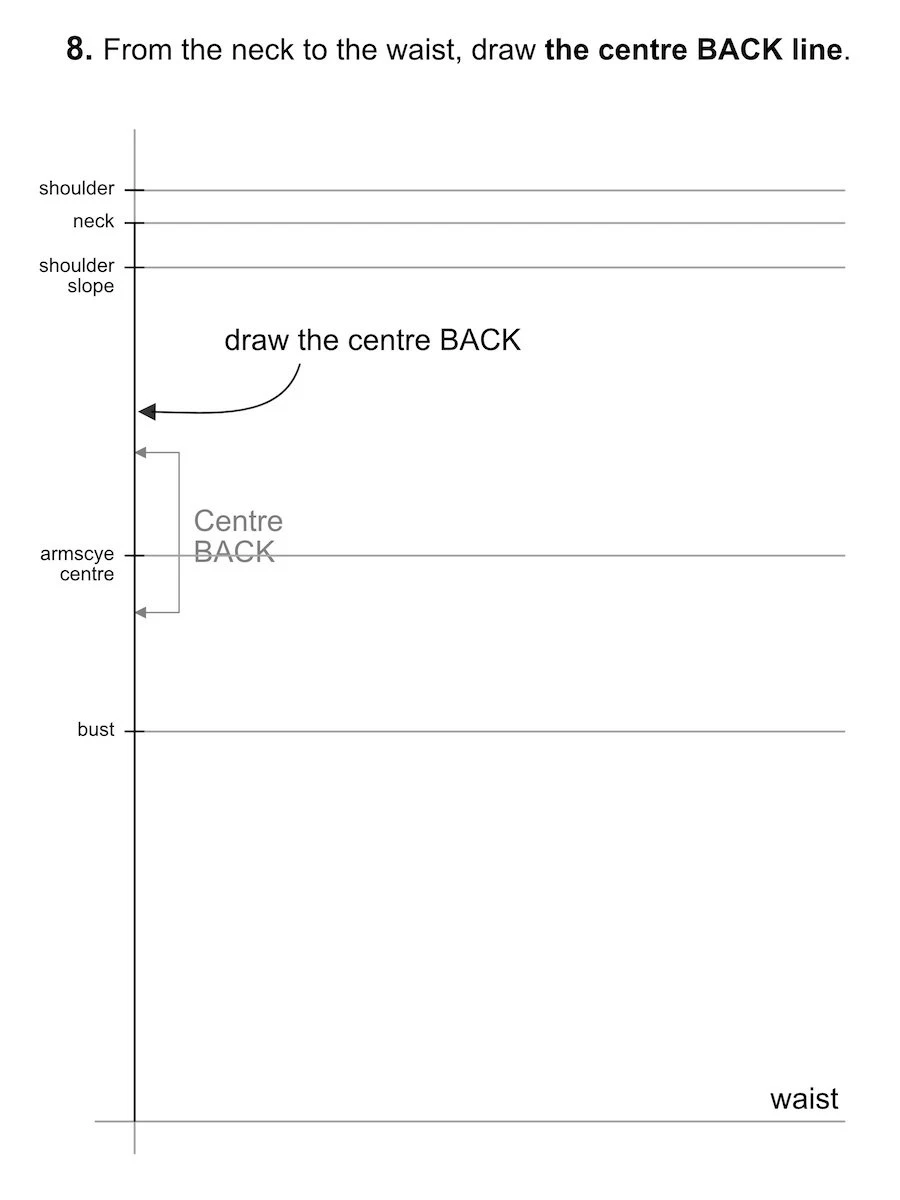
On a large sheet of paper, draw two perpendicular lines. The vertical one will be the centre BACK and the horizontal one will be the waistline.

Draw according to the following measurement:
a = shoulder to waist length at BACK
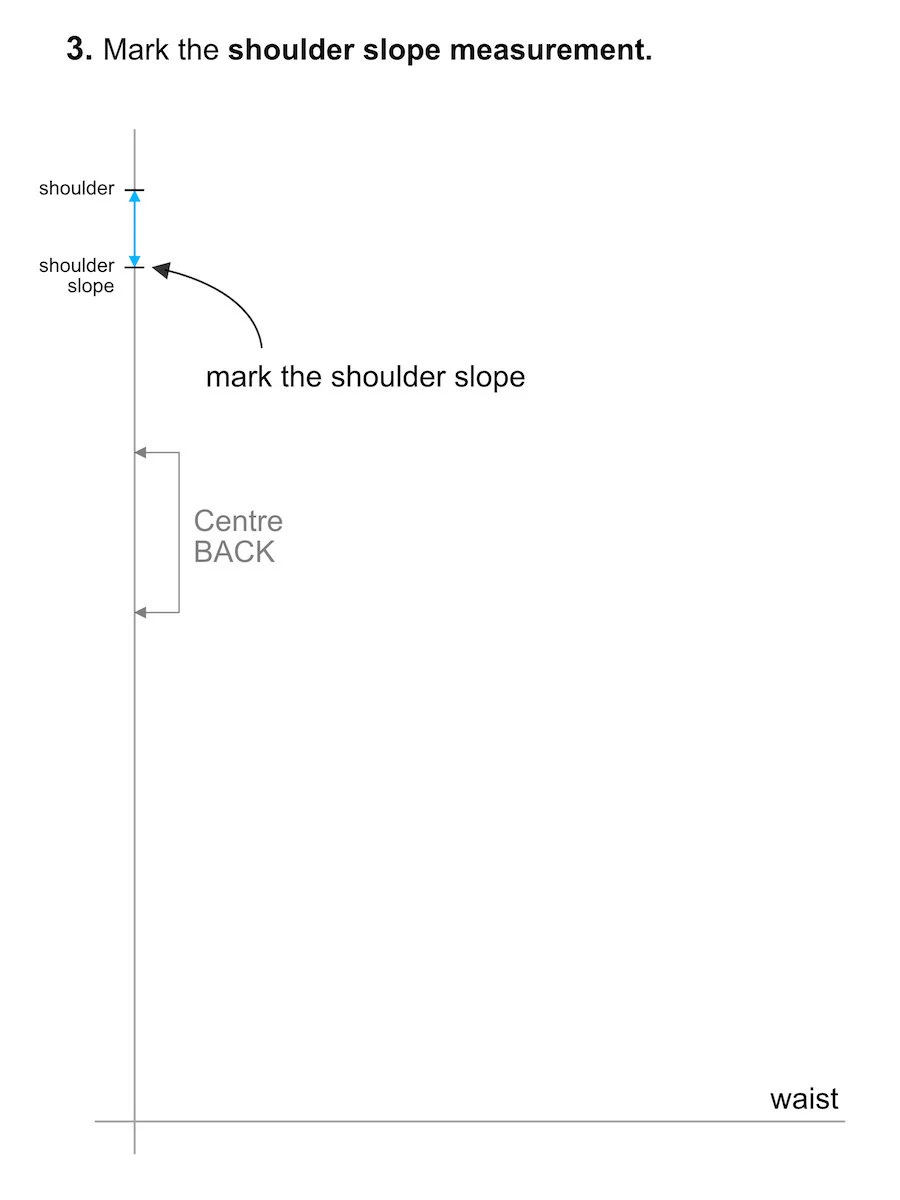
Draw according to the following measurement:
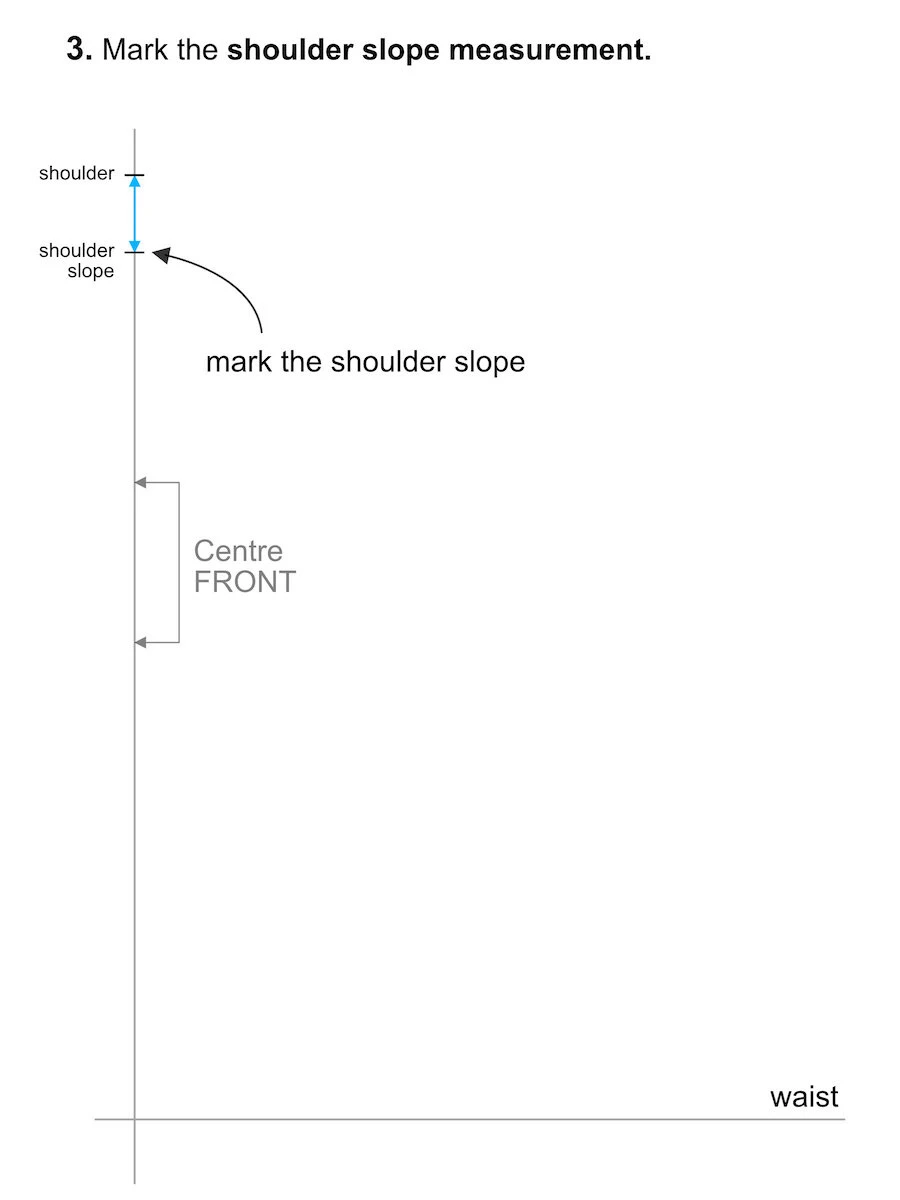
b = shoulder slope

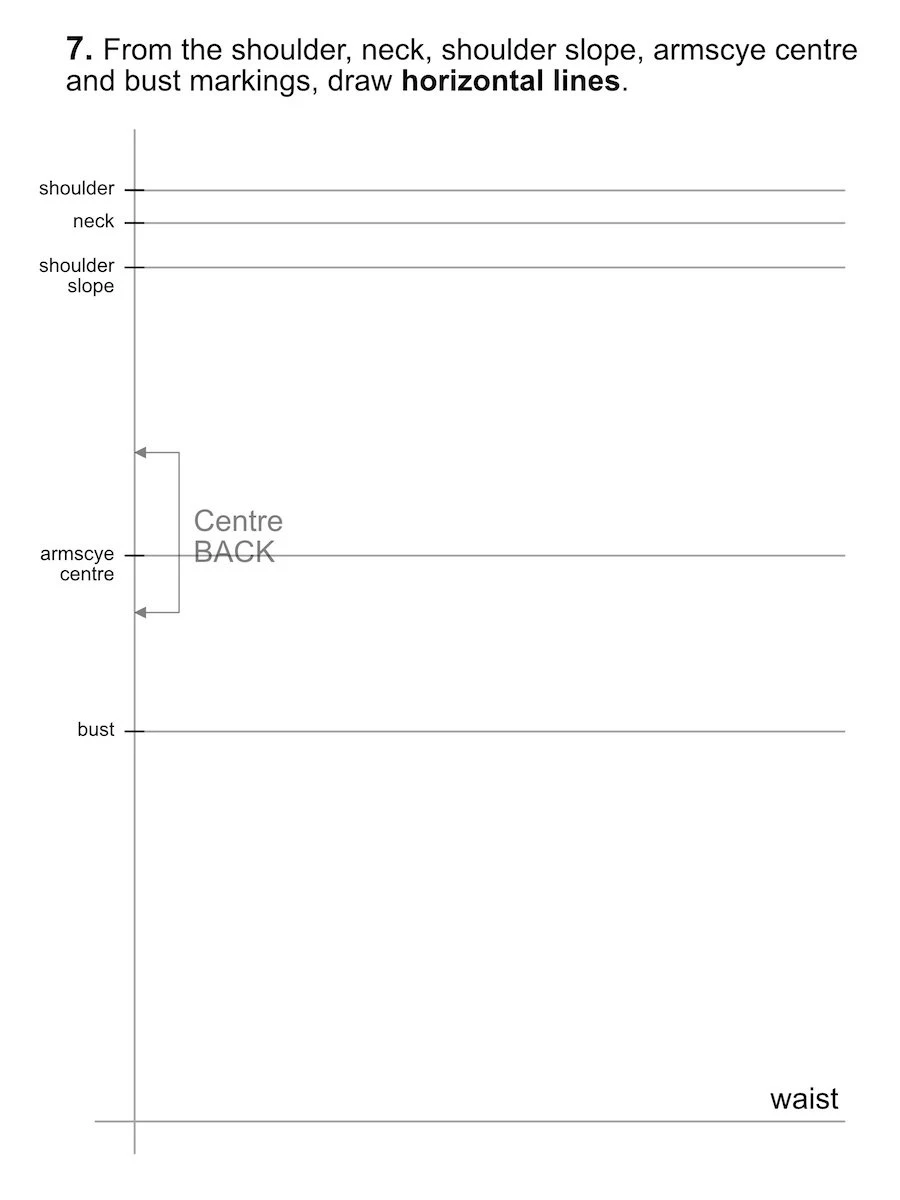
Draw according to the following measurement:
c = neck to waist length at BACK

Draw according to the following measurement:
d = bust to waist length

Draw according to the following formula:
e = (neck to waist length at BACK – bust to waist) / 3
————
neck to waist length at BACK =
bust to waist =
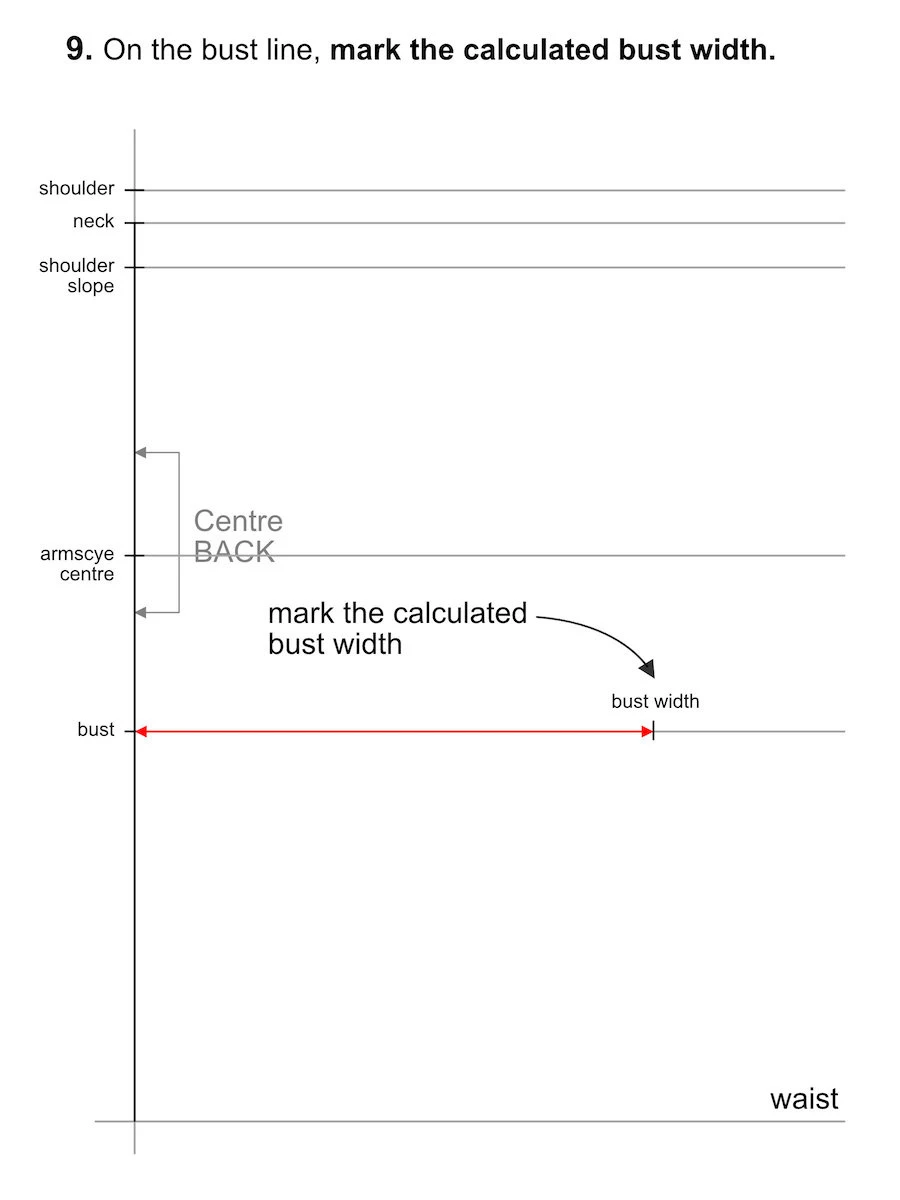
Draw according to the following formula:
f = (bust circumference + ease)/ 4
———— bust circumference = bust ease =

Draw according to the following formula:
g = bust divergence / 2
————
bust divergence =
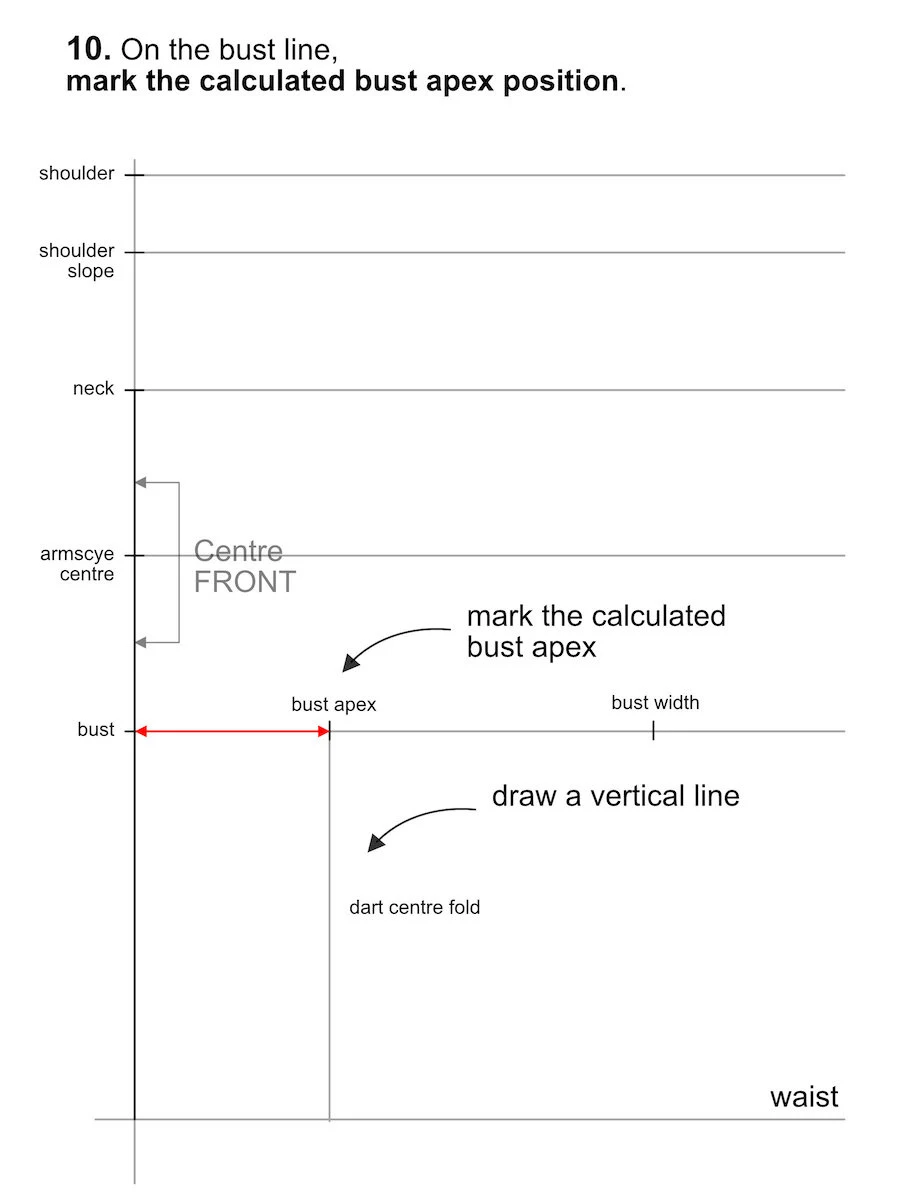
The vertical line drawn downwards from the dart point is the centre fold line of the future dart at the waist. It will cross the centre of the dart base you will draw in one of the following steps.

Draw according to the following formula:
h = (waist circumference + ease) / 4 + dart width
= dart width = ((bust circumference + ease) – (waist circumference + ease)) / 8
The waist circumference with added ease has to be divided by 4 (again, because of drafting 1/4 of the whole bodice pattern). However, the dart width has to be added to this calculation, so that you can create a dart at the waist.
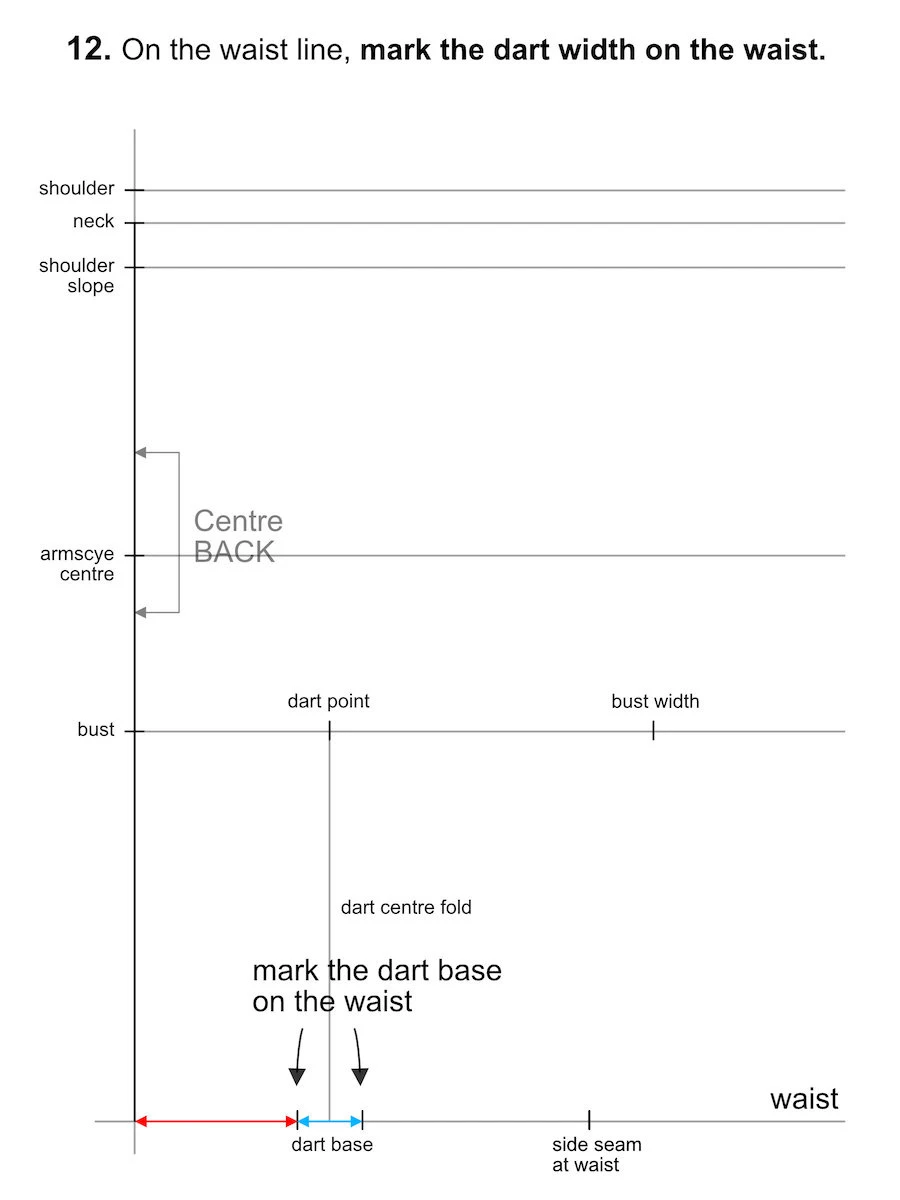
Draw according to the following formula:
j = (bust divergence – dart width) / 2
——
bust divergence =
i = dart width
Draw the dart base under the dart point. Make sure the vertical line crosses its centre. The measurement between the centre back and the dart base marking on the left should match the formula (bust divergence – dart width) / 2
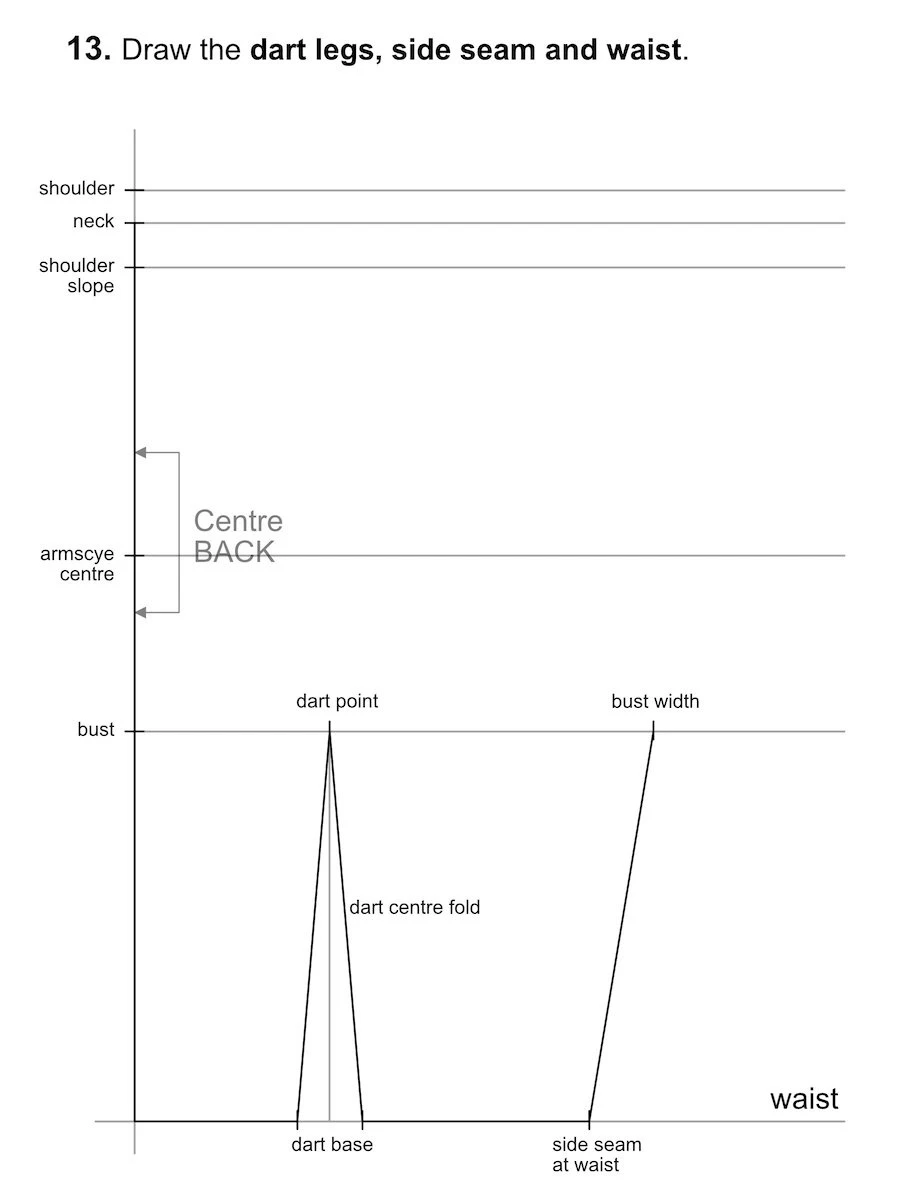

Draw according to the following formula:
k = armscye centre width at BACK / 2
——
armscye centre width BACK =
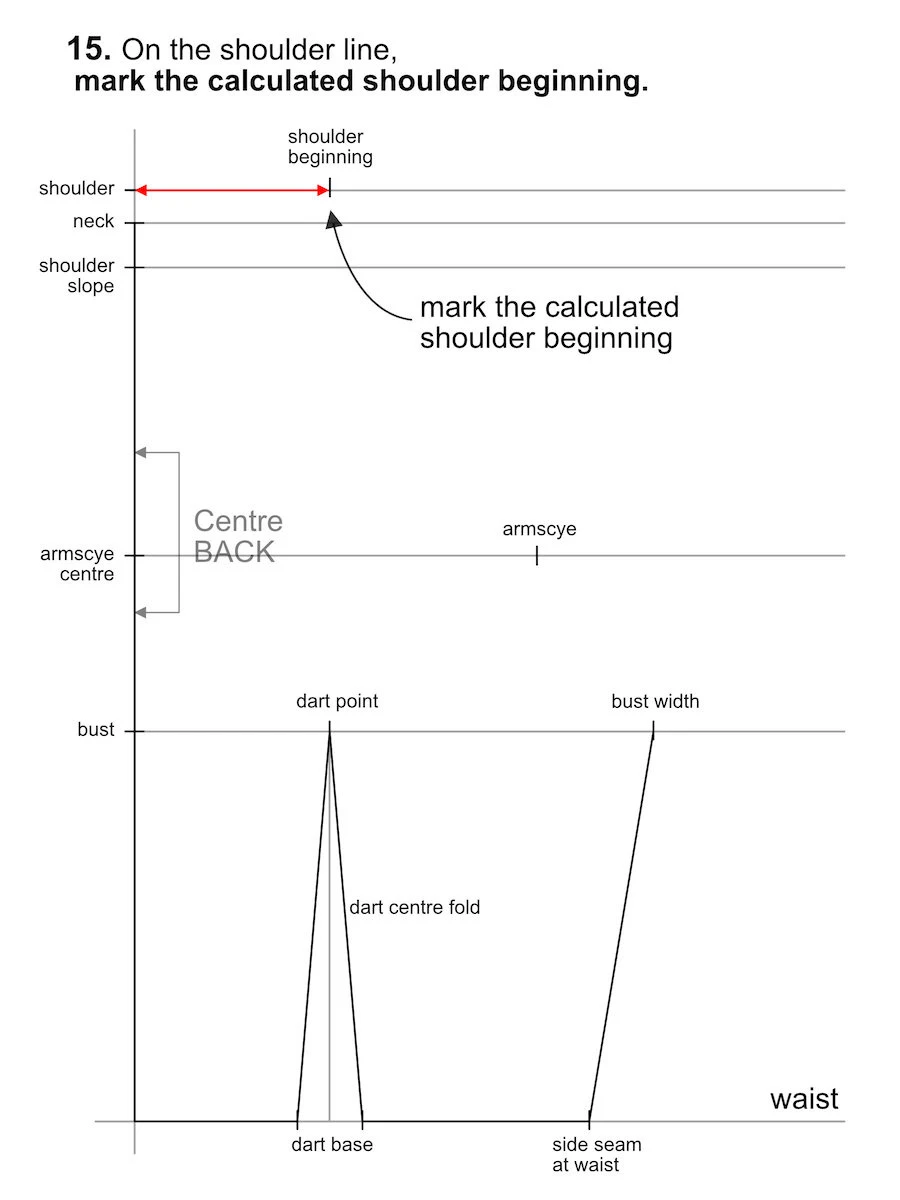
Draw according to the following formula:
l = neck circumference / 6 + 2 cm (6/8”)
——
neck circumference =
The first part of the formula (neck circumference / 6) computes the approximate radius of the neck. This means the centre of the pattern to the edge of the neck. However, the shoulder beginning is located a little further from the neck, therefore extra 2 cm (6/8”) need to be added.


Start at the shoulder beginning. First, draw a curved line and then draw along the horizontal neck line.

Draw according to the following measurement:
m = shoulder length

Draw the armscye: start at the shoulder beginning, pass through the “armscye” marking and finish at the “bust width marking”.
The pattern is almost ready. Now, cut the BACK pattern piece from the fabric. Make sure there are no draglines along the back of the neckline or at the armscye. Moreover, that the centre BACK and the side seam hang nice and straight.

Fold a narrow dart at the armscye that points towards the centre BACK of the pattern. Pin this dart.

Outline the dart legs with a pencil or marker.

Transfer the dart to the BACK pattern piece. At the BACK the dart is quite narrow and the dart legs the same length.

Using a tape measure or a flexible ruler, measure the length of the bodice armscye. Do NOT include the dart in the measurement.
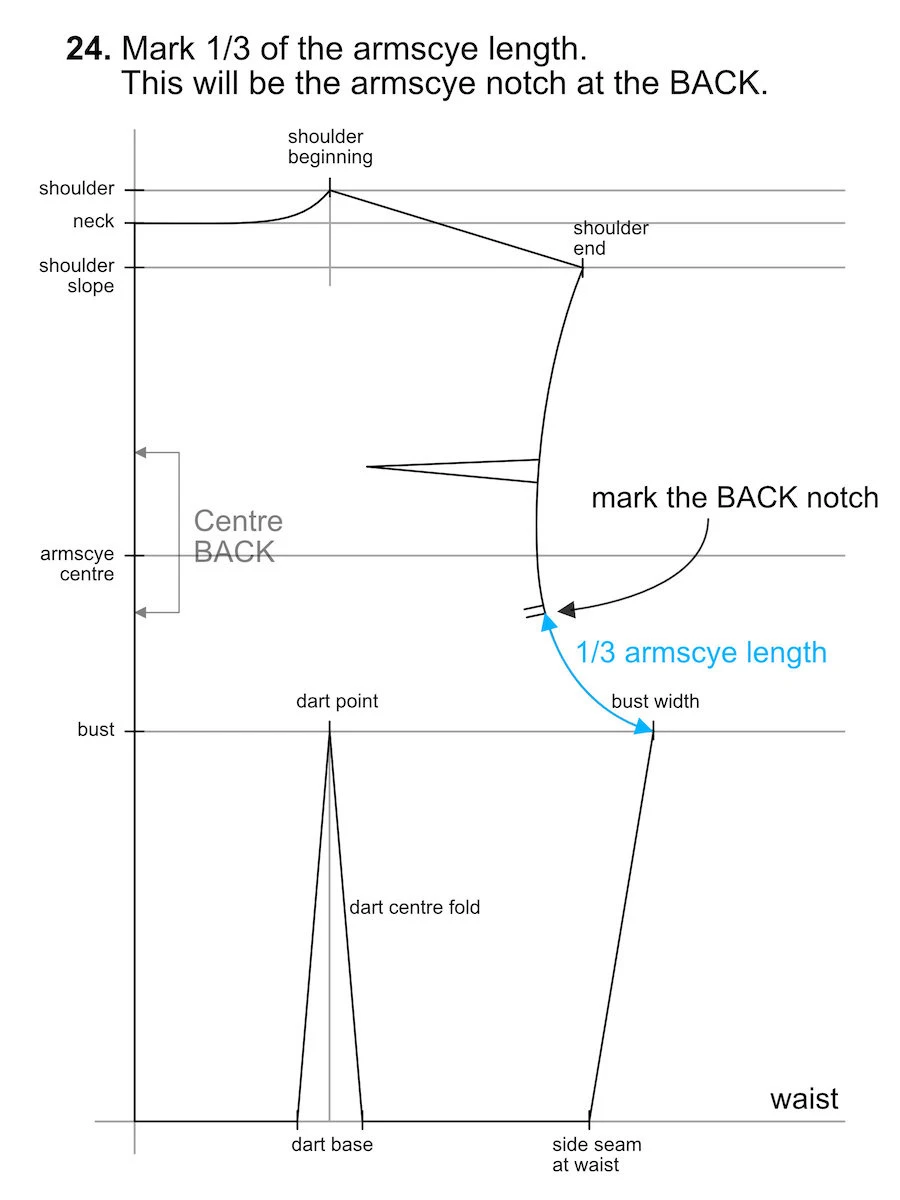
Calculate 1/3 of the measured armscye length and mark this distance on the armscye with two small strokes. This will be the notch a the BACK for sewing the set-in sleeve.

Your basic bodice block BACK pattern piece is ready.
How to draft the basic bodice block – FRONT pattern piece
The steps and formulas for the FRONT part of the bodice will be similar to the ones you have followed to draw the BACK pattern piece.

On a large sheet of paper, draw two perpendicular lines. The vertical one will be the centre FRONT and the horizontal one the waistline.

Draw according to the following measurement:
a = shoulder to waist length at FRONT
Draw according to the following measurement:
b = shoulder slope

Draw according to the following measurement:
c = neck to waist length at FRONT
Draw according to the following measurement:
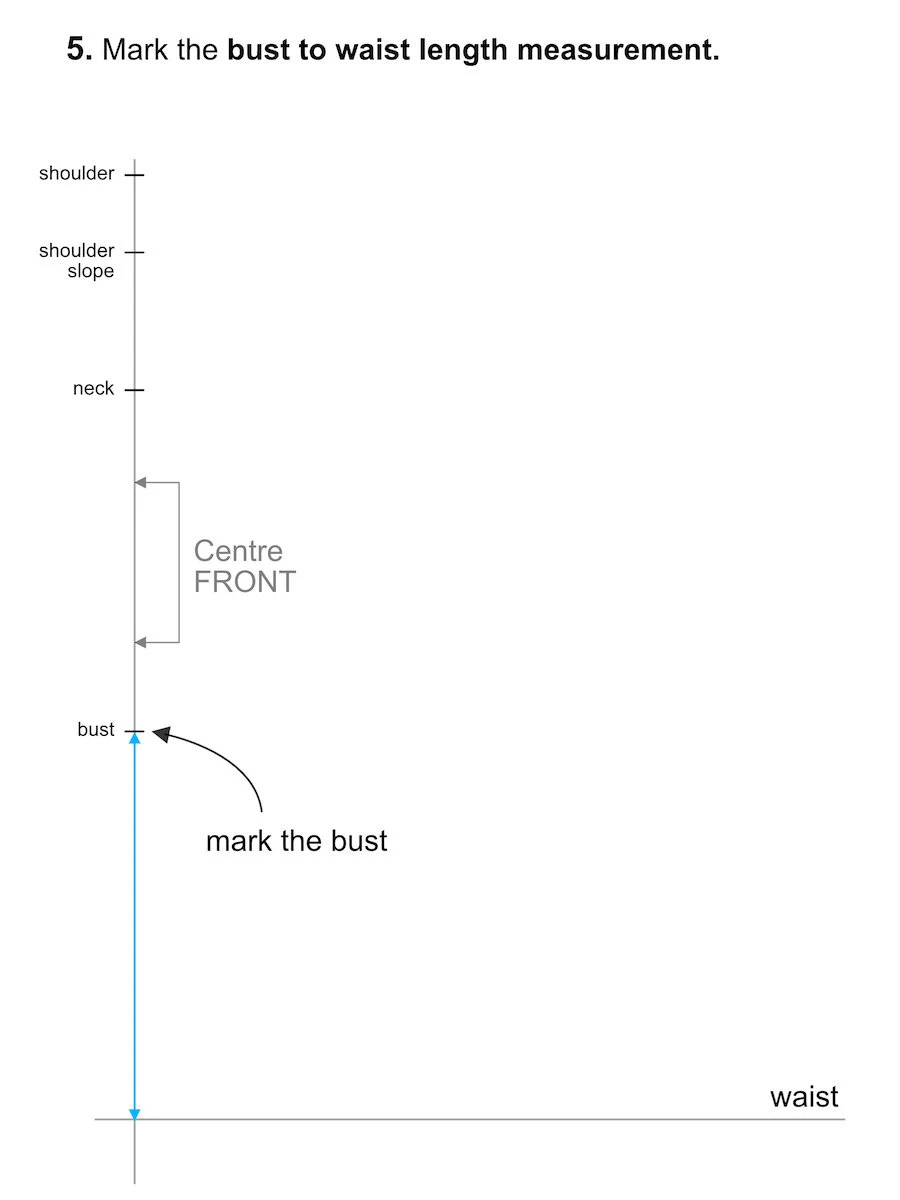
d = bust to waist length

Draw according to the following formula:
e = (neck to waist length at BACK – bust to waist) / 3
————
neck to waist length at BACK =
bust to waist =


Draw according to the following formula:
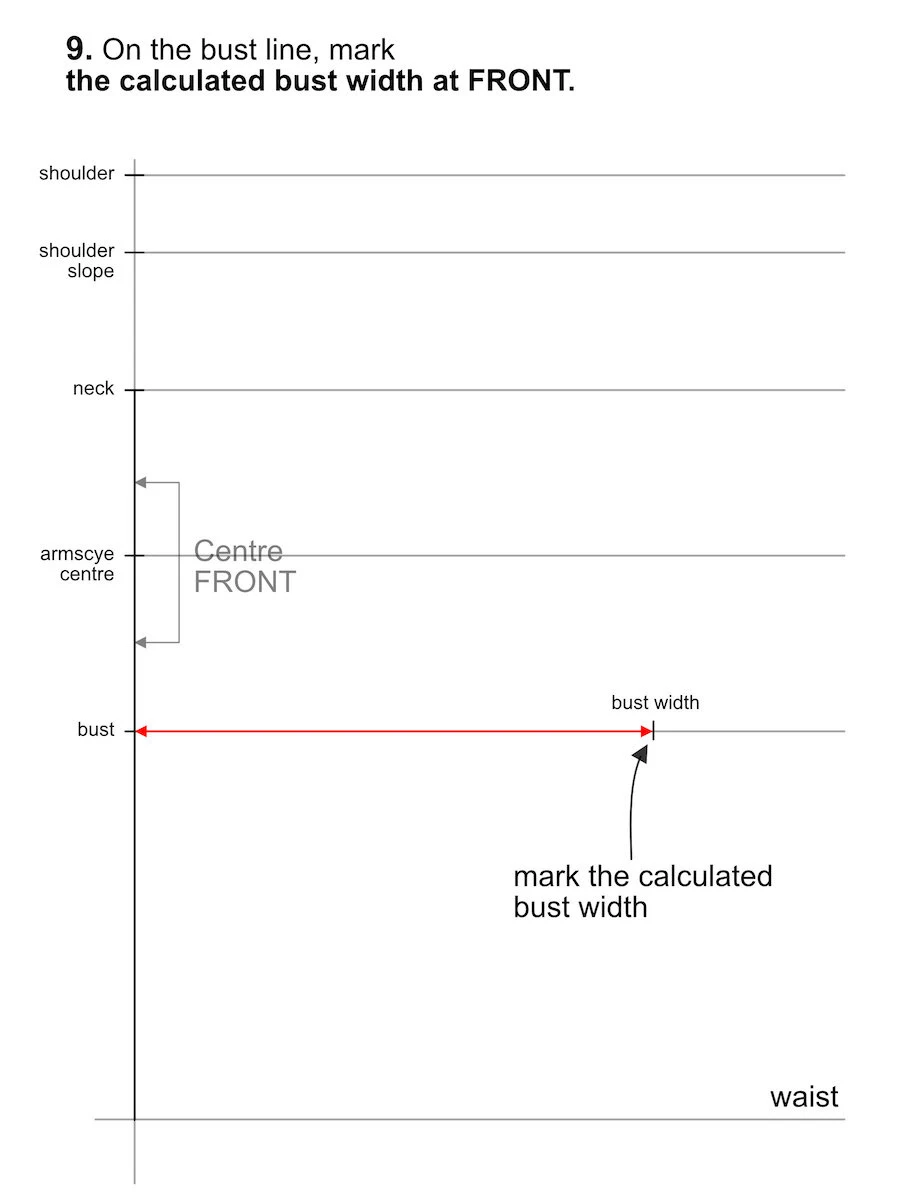
f = (bust circumference + ease)/ 4
————
bust circumference =
bust ease =
Draw according to the following formula:
g = bust divergence / 2
————
bust divergence =

Draw according to the following formula:
h = (waist circumference + ease) / 4 + dart width
= dart width = ((bust circumference + ease) – (waist circumference + ease)) / 8
The waist width of the FRONT pattern piece is the same as the waist width of the BACK pattern piece.

Draw according to the following formula:
j = (bust divergence – dart width) / 2
——
bust divergence =
i = dart width
Draw the dart base under the dart point. Make sure the vertical line crosses its centre. The measurement between the centre back and the dart base marking on the left should match the formula (bust divergence – dart width) / 2.

Draw according to the following measurement:
k = dart point = 4 cm (1 1/2”)


Draw according to the following formula:
l = armscye centre width at FRONT / 2
——
armscye centre width FRONT =
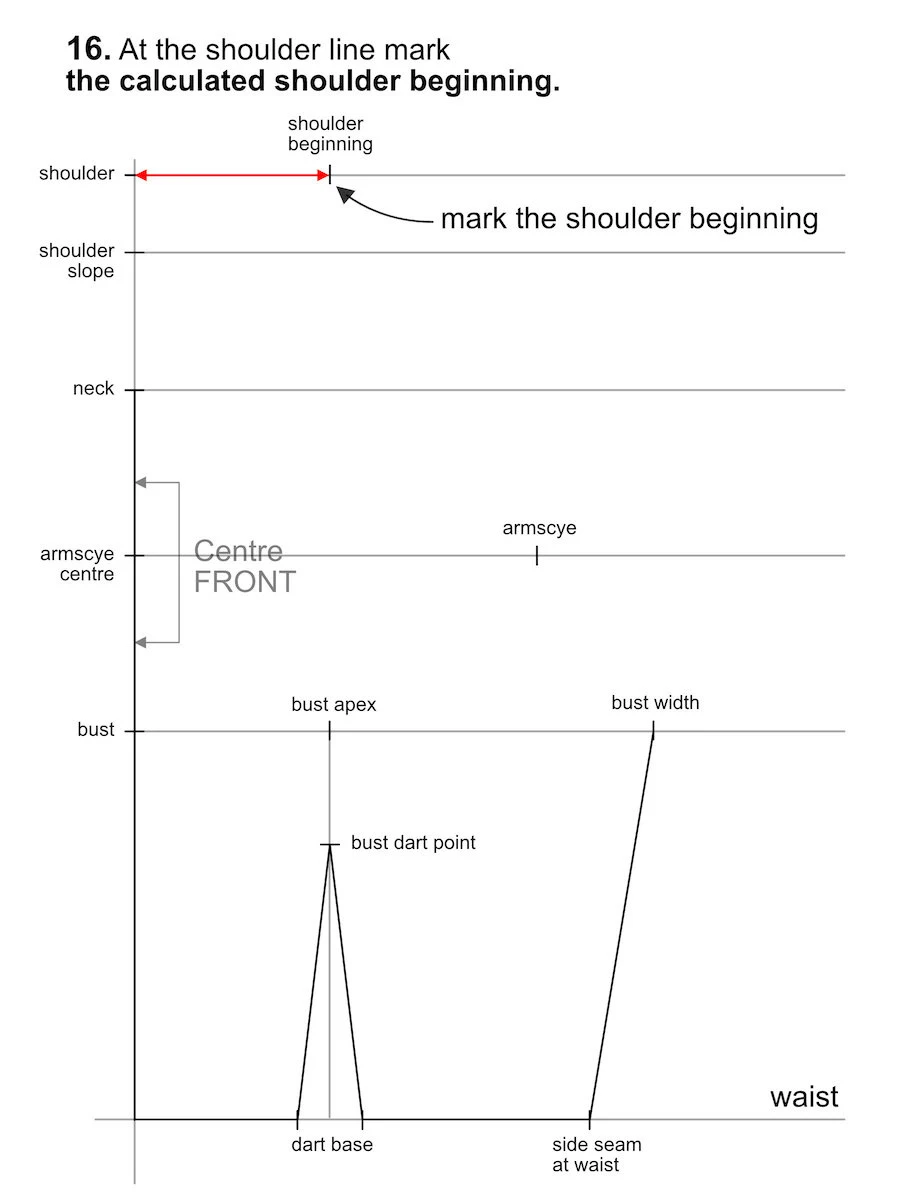
Draw according to the following formula:
m = neck circumference / 6 + 2 cm (6/8”)
——
neck circumference =


Start at the shoulder baginning. First, draw along the vertical line and then move towards the neckline marking.

Draw according to the following measurement:
n = shoulder length
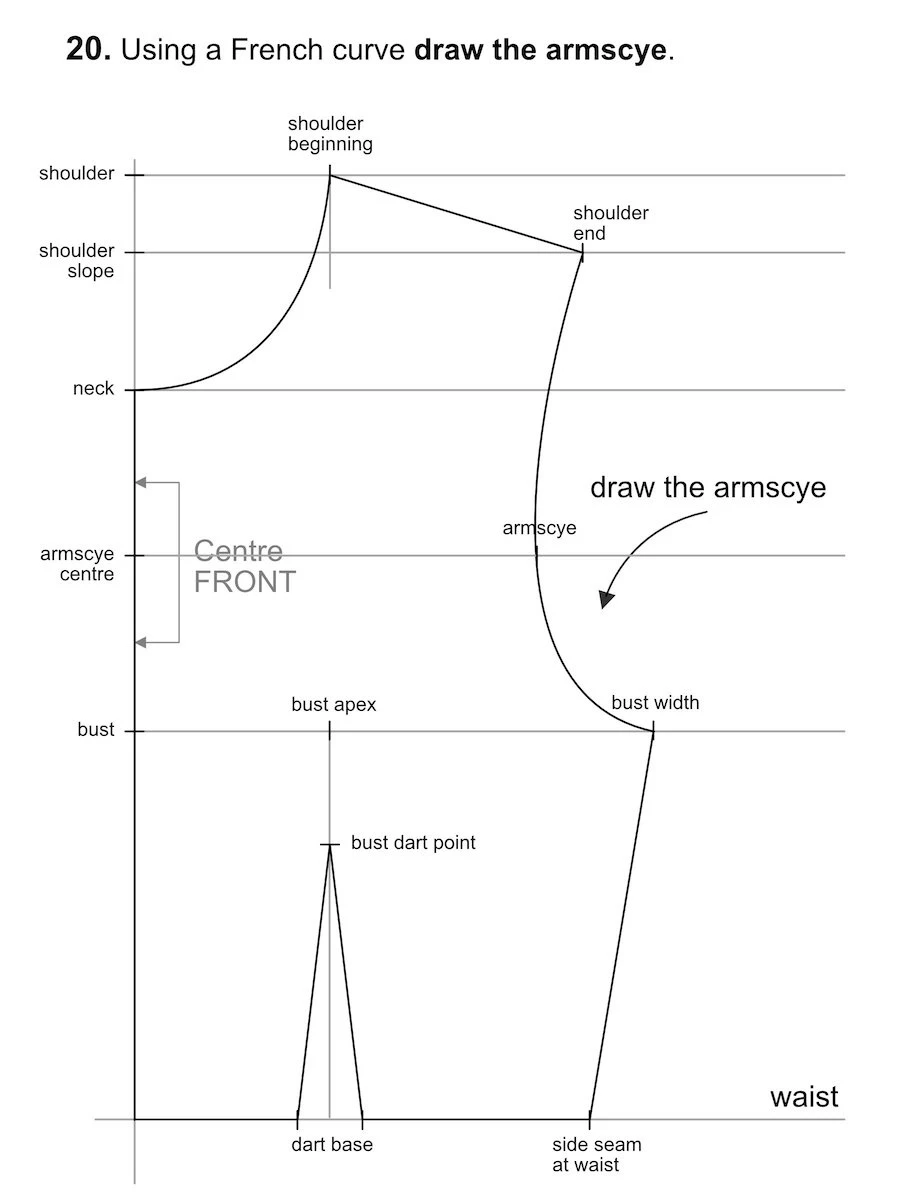
Draw the armscye: start at the shoulder begining, pass through the “armscye” marking and finish at the “bust width marking”.
The pattern is almost ready. Now, cut the FRONT pattern piece from the fabric. Make sure there are no draglines on the bust. Further, the dart points towards the bust apex (but ends below the apex). And, that the centre FRONT and the side seam hang straight.

Fold and in a dart at the arsmcye. The legs of the dart should direct towards the bust apex. Pin this dart.

Mark the dart legs with a pencil or a marker so that you can visibly see them after you unfold the dart.

Transfer the dart from the bodice to your pattern.
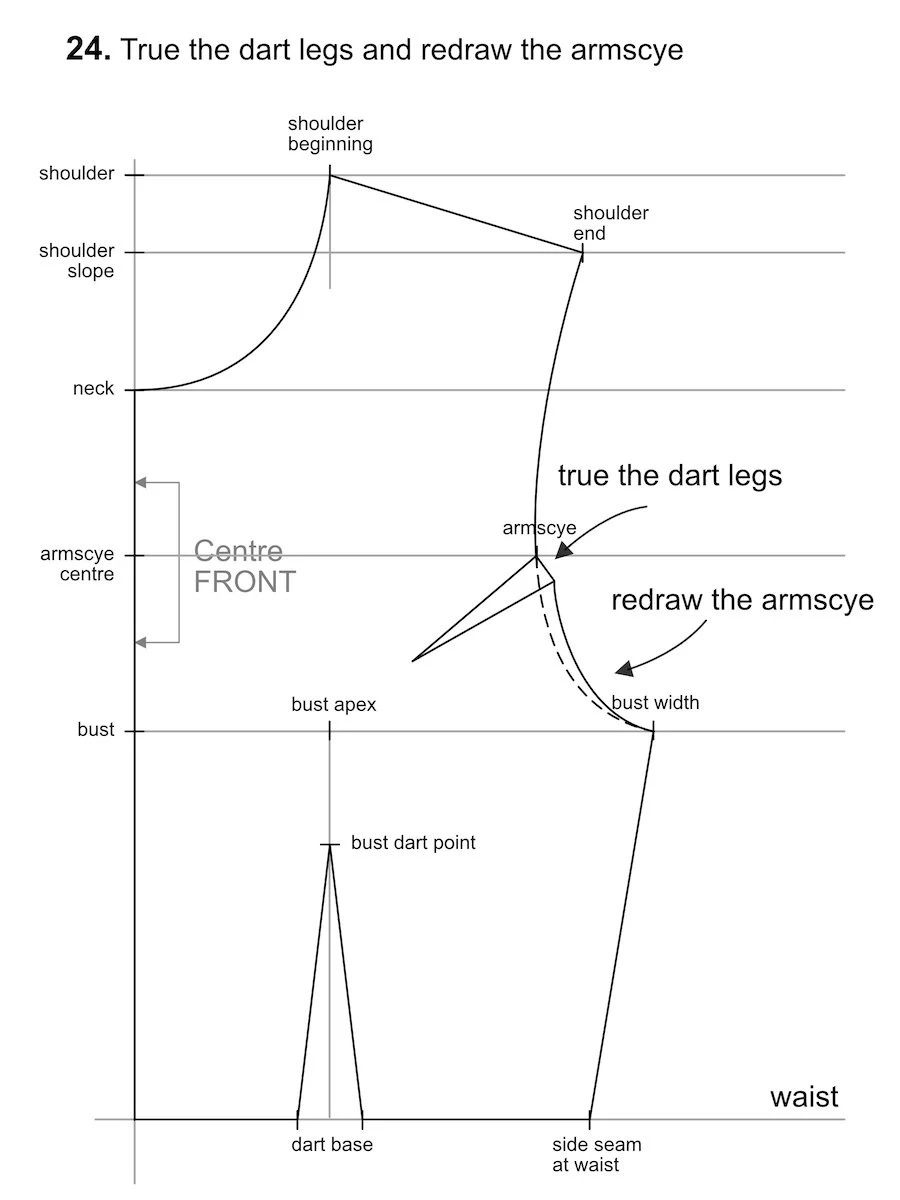
Now, you need to true the dart legs. That means making both dart legs equally long. Prolong the shorter (bottom) leg of the dart. Make sure it is as long as the upper one and redraw the lower part of the armscye. The black dotted line on the left shows the original shape of the armscye.

Using a tape measure or flexible ruler, measure the length of the armscye. Do NOT include the dart in the measurement.

Calculate 1/3 of the measured armscye length and mark this distance on the armscye with two small strokes. This will be the notch a the BACK for sewing the set-in sleeve.

The basic bodice is now complete! You can continue by drafting a basic sleeve pattern.


Working with the basic sloper
If you are just beginning with making your own sewing patterns, you might find the following publication by Adele P. Margolis useful. It will teach you how to alternate basic blocks to make your own designs (click here to read my review). This way you can turn your very simple looking basic bodice into an interesting fashion piece.
Conclusion: How to draft a bodice block
Drafting a basic bodice sloper might look a little complicated and overwhelming at first sight. Especially if you have to take so many different body measurements. However, if you take them correctly, drafting the pattern slowly, in a step-by-step manner, will lead you to the desired result: a nice fitted bodice.
Now, that your bodice pattern is finished, you can move to the next step: drafting a sleeve for the bodice. You will find detailed instructions in this tutorial.
Basic bodice block drafting FAQs
- Measure your bust circumference at the fullest part.
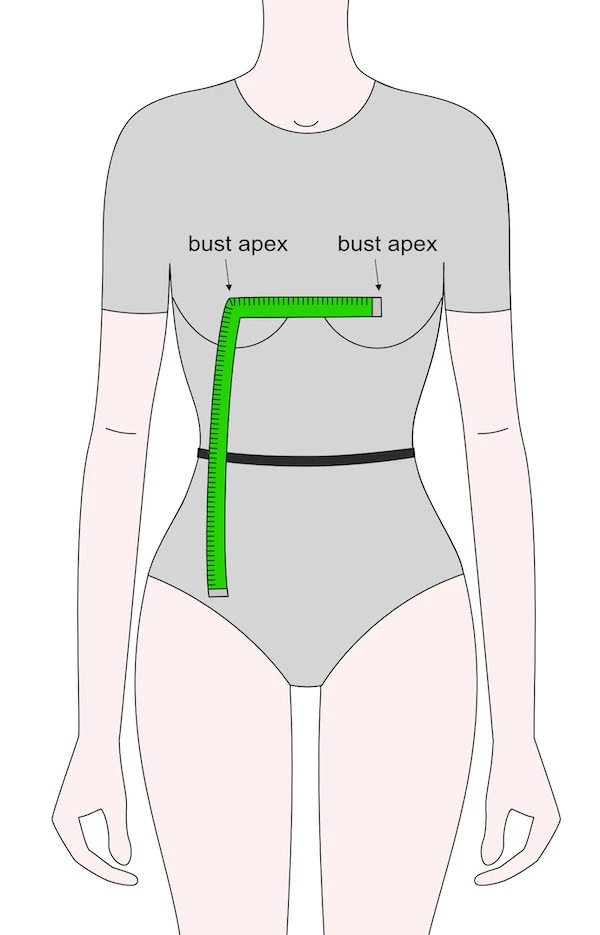
- Measure bust divergence (distance between bust apexes).
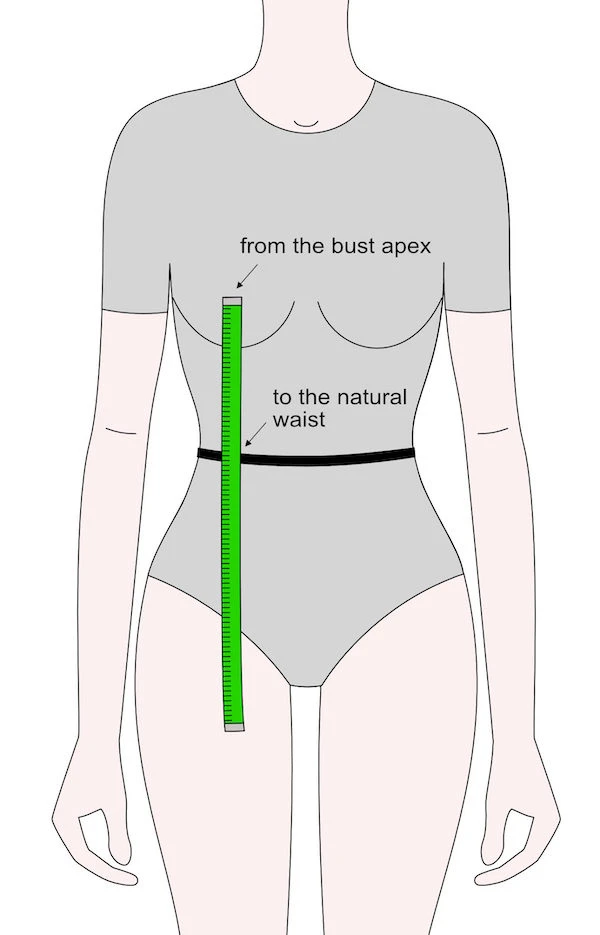
- Measure from a bust apex to the elastic band placed at your natural waist.
- Measure your neck circumference at the base of your neck.
- Measure the neck to waist length at the front. Start at the top of the breastbone, across the fullest part of the bust, to the natural waist.
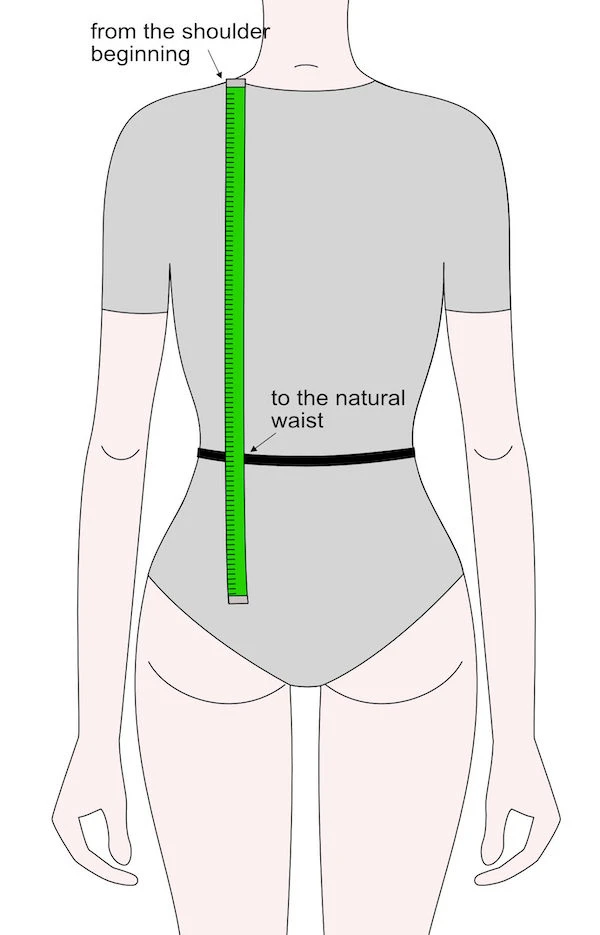
- Measure from the beginning of your shoulder down to the elastic band at your natural waist.
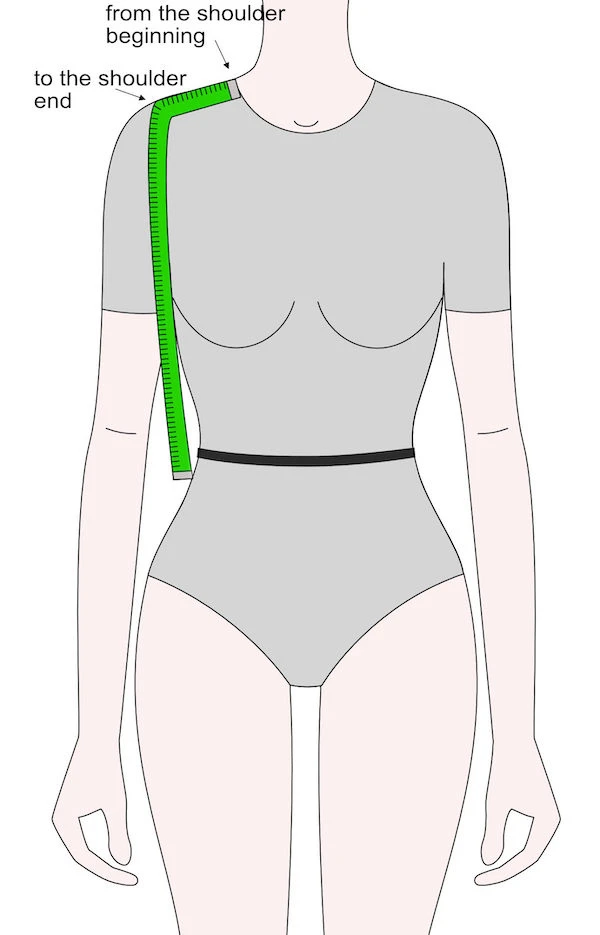
- Measure the shoulder length from the shoulder beginning to the end of the shoulder.
- Measure the shoulder slope: the vertical difference between your shoulder beginning and shoulder end.
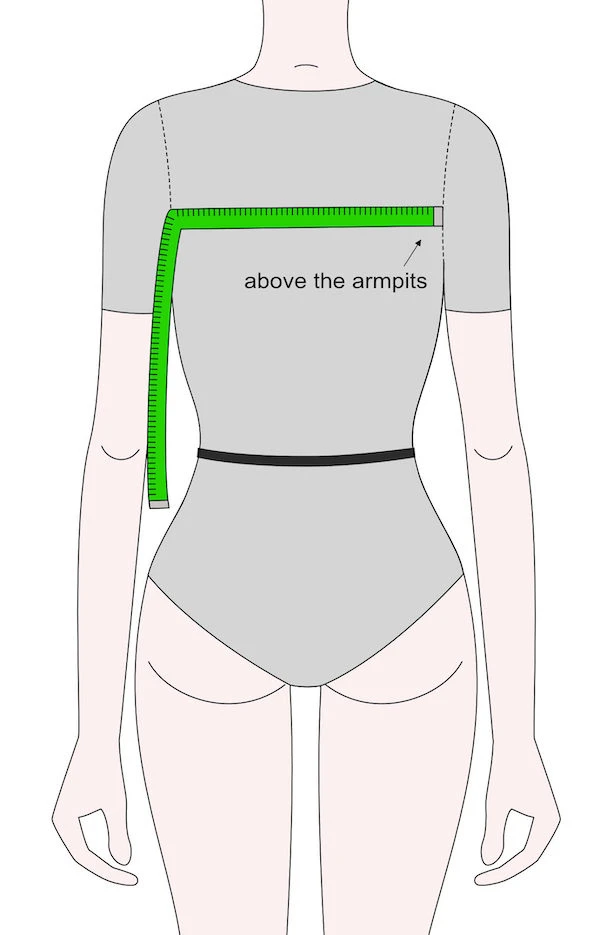
- Measure the armscye centre width at the front, above the armpits.
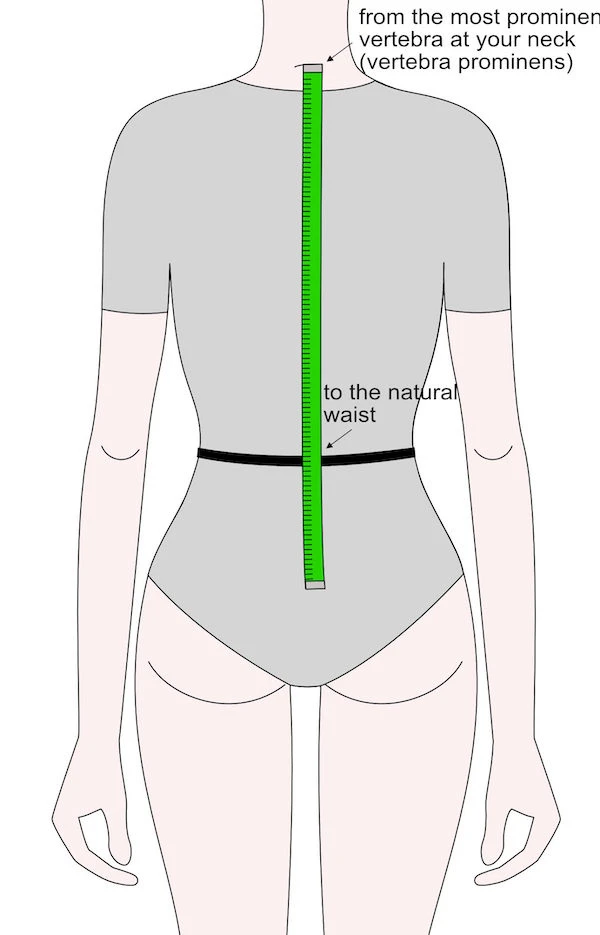
- Measure the neck to waist length at the back. Start at the most prominent vertebra of your neck and measure to the elastic band at your natural waist.
- Measure from the beginning of your shoulder down to the elastic band at your natural waist at the back.
- Measure the armscye centre width at the back, above the armpits.
Thank you so much, Anicka. I will take time and do this for my granddaughter! She lives so far away, in another country, so I need to get it correct.
Hello Niranjala, I hope it will turn out well!
Anicka
Thank you so very much. You are the only person who makes it easier for me
Hi Andrea, thank you for your lovely comment. I hope your basic blocks turn out well :)!
Anicka
Thanks again, can’t wait to try it.